Introduction to eformsign for Microsoft Office
eformsign for Microsoft Office is an Office add-in that converts documents created using Microsoft Office into electronic documents containing fields. By eformsign for Microsoft Office, you can easily convert existing Excel, Word, and PowerPoint forms such as contracts, applications, and agreements into electronic documents.
Previously, converting Excel, Word, or PowerPoint documents into electronic documents required the use of an IDE (Integrated Development Environment) needing a high degree of programming knowledge for use. Now, with eformsign for Microsoft Office, anyone with the ability to use Microsoft Office can easily create electronic documents.
eformsign for Microsoft Office, provided as a Microsoft Office add-in, is easy to use as it is displayed as a ribbon menu and contains various fields including signature, check box, text box, camera, and voice.
The process of creating electronic documents using eformsign for Microsoft Office’s fields is as follows:
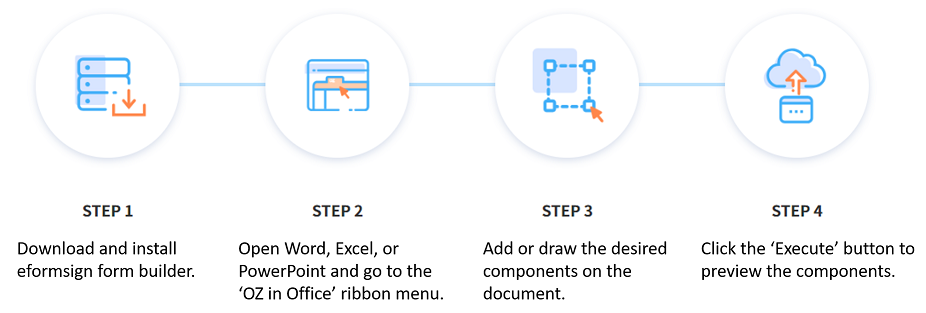
Downloading and Installing eformsign for Microsoft Office
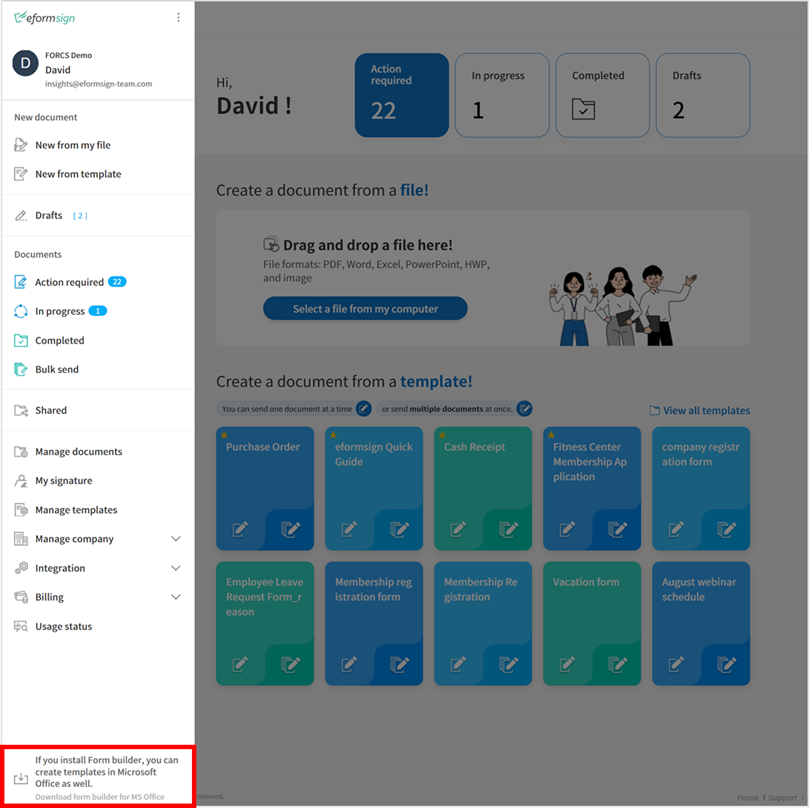
1. Login to eformsign and then click the menu icon
(![]() ) on the top left corner of the dashboard screen to open the
sidebar menu. Then, click the Download eformsign for Microsoft Office button
at the bottom.
) on the top left corner of the dashboard screen to open the
sidebar menu. Then, click the Download eformsign for Microsoft Office button
at the bottom.
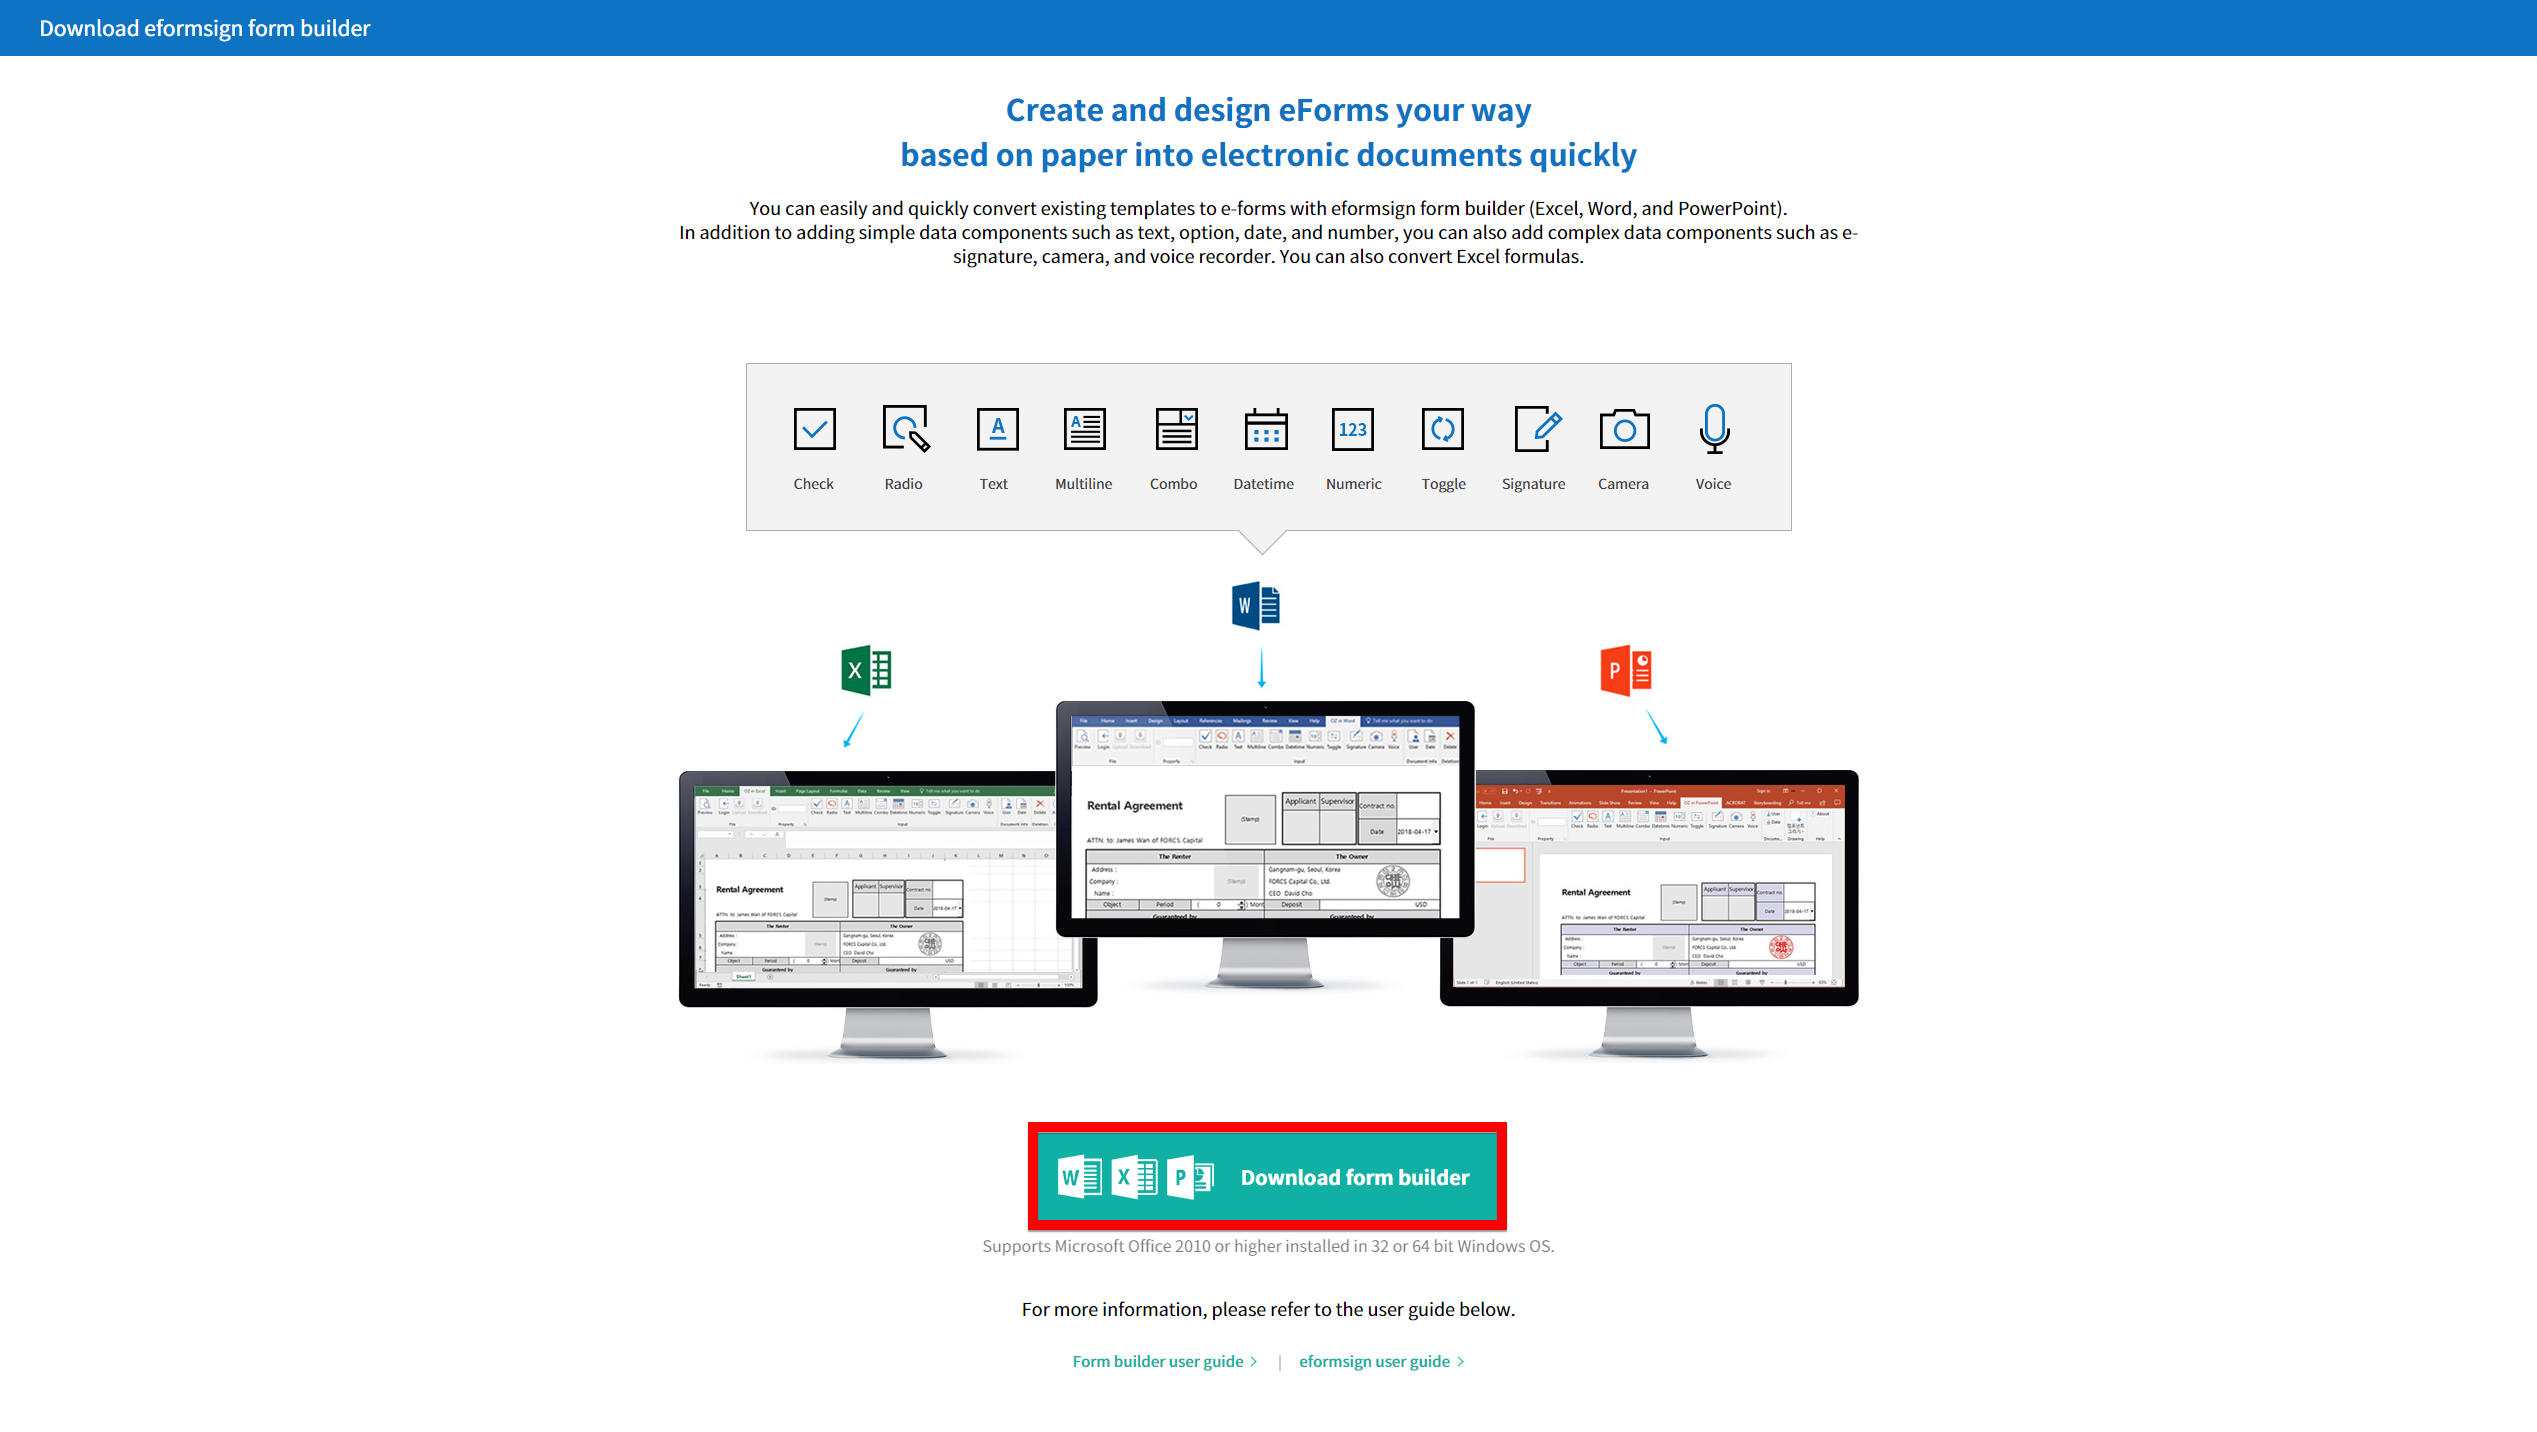
2. The Download eformsign for Microsoft Office page will be displayed, as shown below. Click the Download eformsign for Microsoft Office button at the bottom of the page.
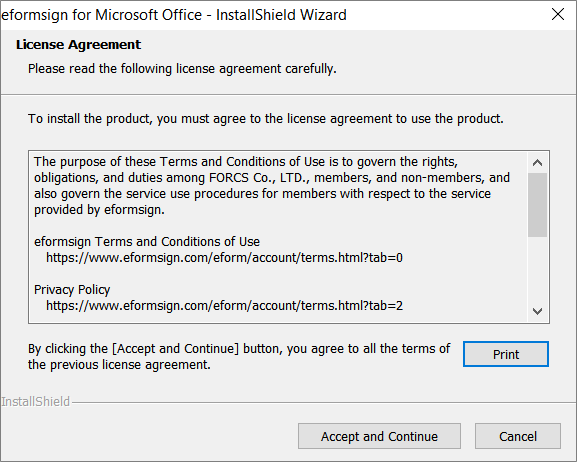
3. After clicking the eformsign for Microsoft Office executable file you downloaded, the following installation screen will be displayed. Read the license agreement carefully and click the Accept and Continue button if you agree to all the terms of the license agreement. The installation will proceed.
The following pop-up will be displayed when the installation is completed.
5. Check whether eformsign for Microsoft Office was installed properly by running MS Office (Word, Excel, PowerPoint). If eformsign is displayed as below, then it was installed properly.

Overview of Fields
Fields are used to create fields in electronic documents that users can enter information. Many different fields including signature, check, date, and text are provided in eformsign for Microsoft Office, and each field can be configured in detail by using the Field Properties tab.
Field Types
The fields provided in eformsign are as follows:

Basic Fields
Check: Ticks a check box.
Radio: Selects an item among multiple items (can also be set to select multiple items).
Text: Enters short text (usually 1 to 2 words).
Handwriting: Allows to trace text shown on the background.
Multiline: Enters long text with multiple lines.
Number: Enters a number.
Label: Sets the form ID.
Combo: Displays a drop-down menu that allows you to select an item.
Datetime: Enters a specific date.
Numeric stepper: Enters a number.
Toggle: Switches to another value if two or more values are entered.
Signature: Enters a signature.
Company stamp: Inserts a company stamp.
Camera: Takes a photo using a camera or selects a photo from an album in devices with a built-in camera (e.g. smartphone, tablet, etc.). Selects an image file in devices without a camera (e.g. desktop PC).
Voice: Records audio in devices with a voice recording function.
Attachment: Attaches a file.
Data Fields
Accessing Field Properties
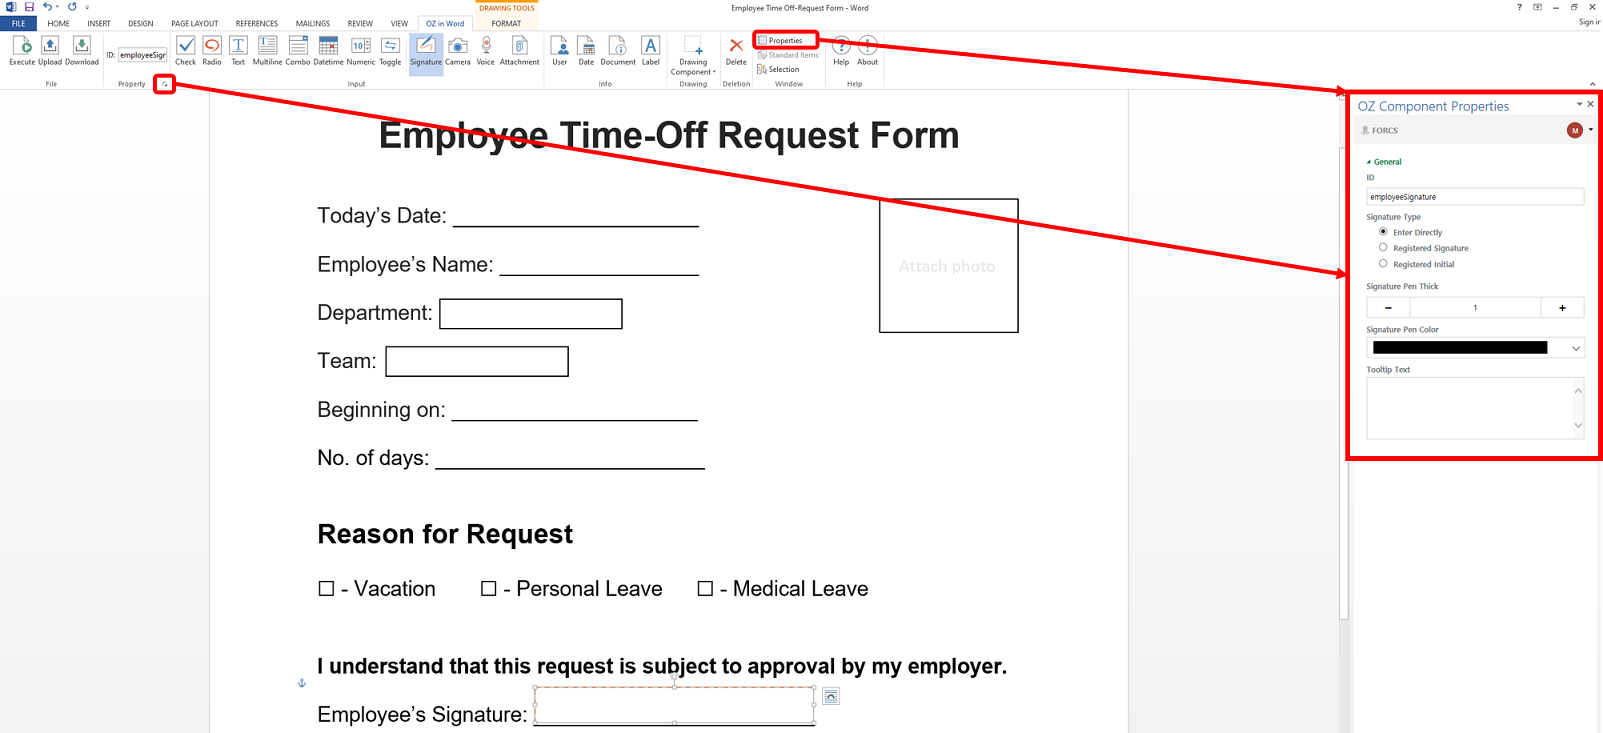
Every field has its own detailed settings called OZ Component Properties. The properties of each field can be accessed by selecting a field and then clicking the property icon or the Properties menu.
Note
All fields must have an ID. An ID is automatically generated when you create a field, but it is recommended to rename it to something you can easily recognize. For example, you can rename the ID of a field for entering John Doe, Jane Doe, etc. as ‘name’. By doing so, it is easier to identify fields when deciding whether to display a field to a specific user when you are configuring the Field settings of a template.
Adding fields
Method 1: Adding Fields by Clicking a Field Type
Open Word, Excel, or PowerPoint and select the location in the document where you want to add the field.
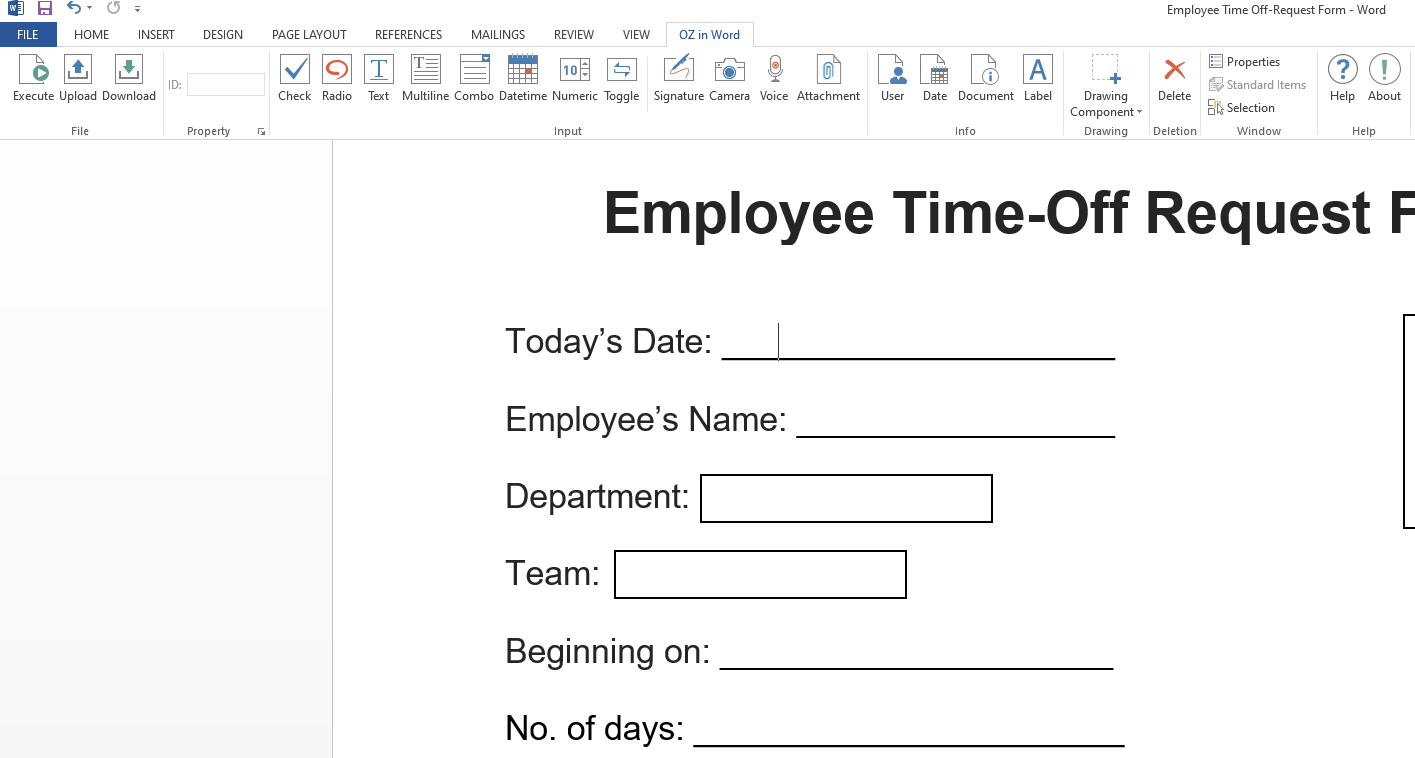
Click the field type you want to add in the ribbon menu under eformsign.
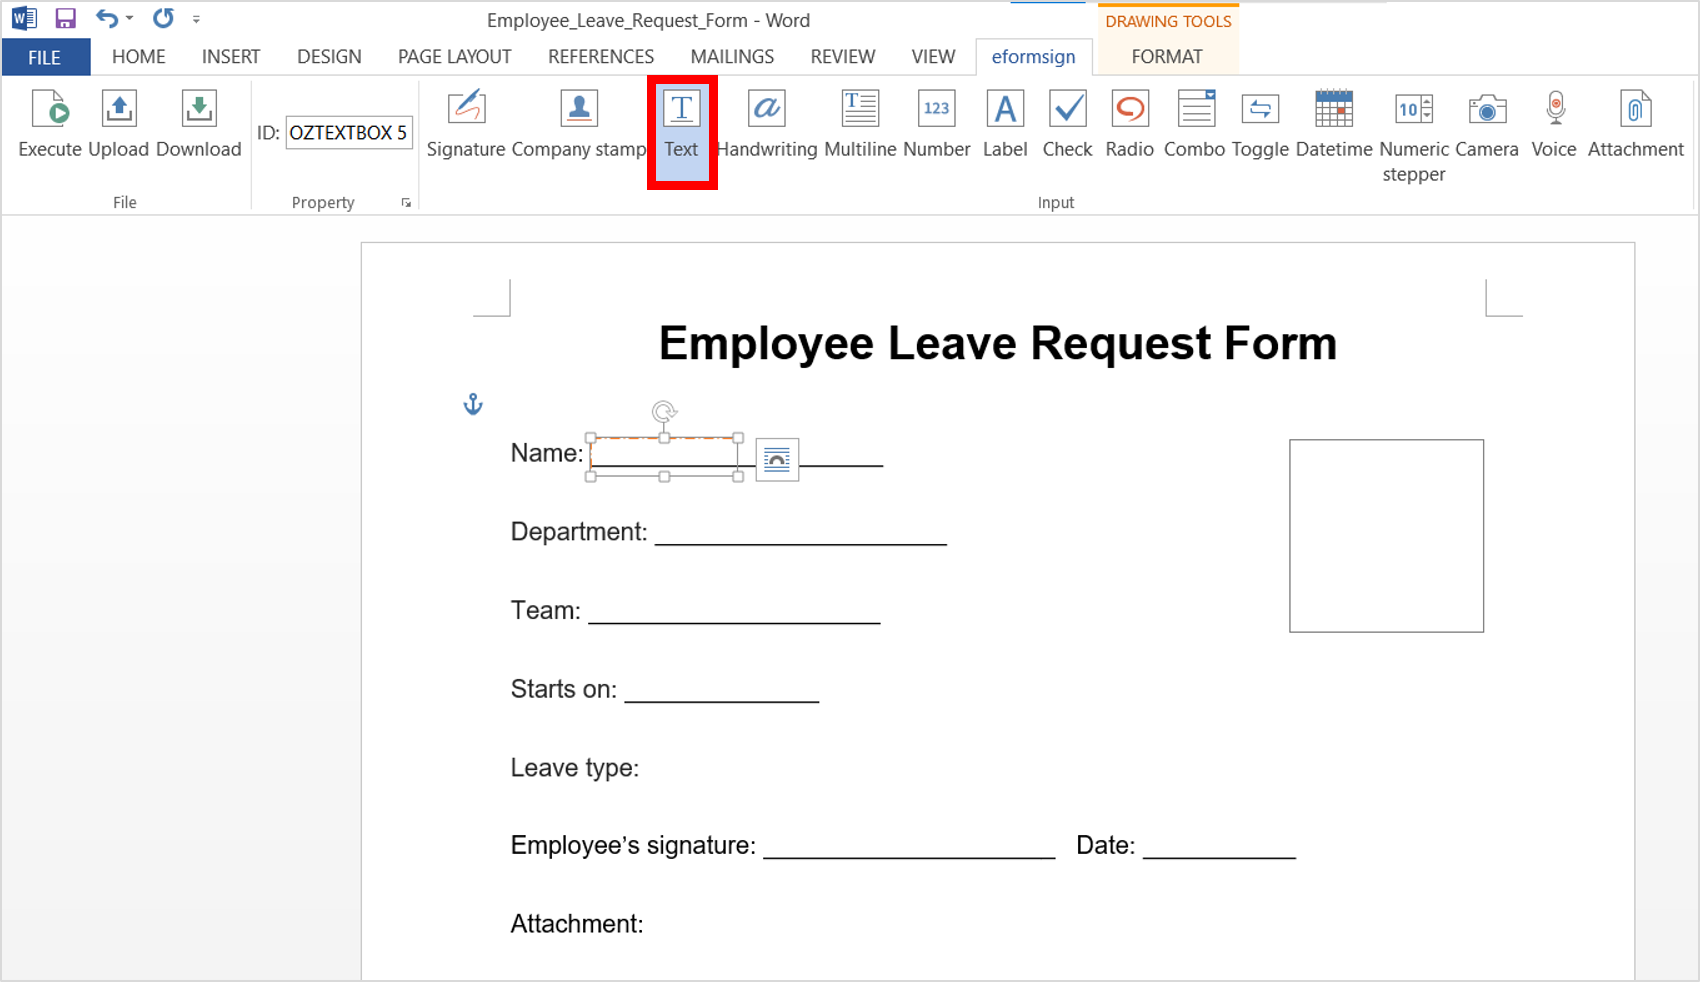
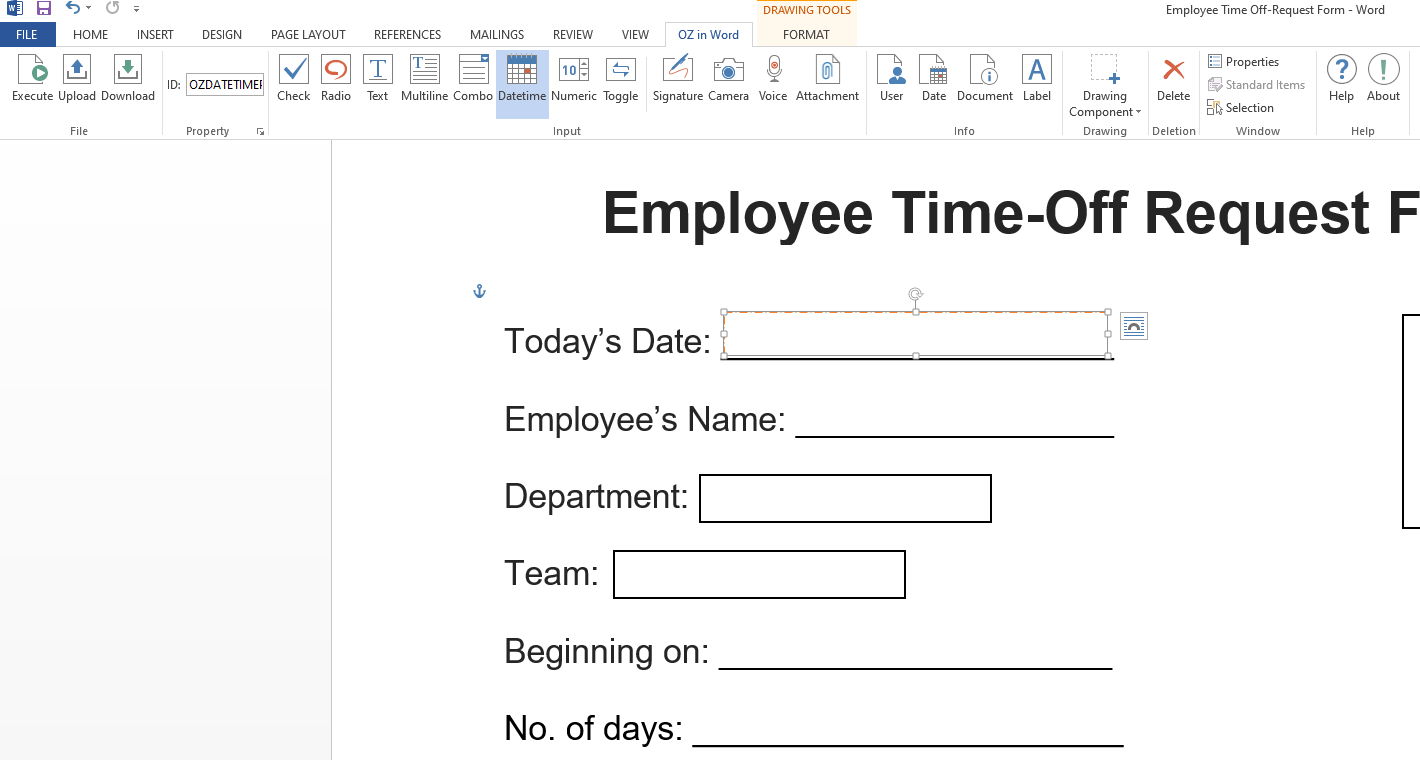
Adjust the size of the field. *Size cannot be adjusted in Excel.
Method 2: Adding Fields by Drawing a Field
Open Word or PowerPoint and go to the eformsign ribbon menu. *Drawing is not available in Excel.
Click the Drawing Component icon and select the field type you want to add in the drop-down menu displayed.
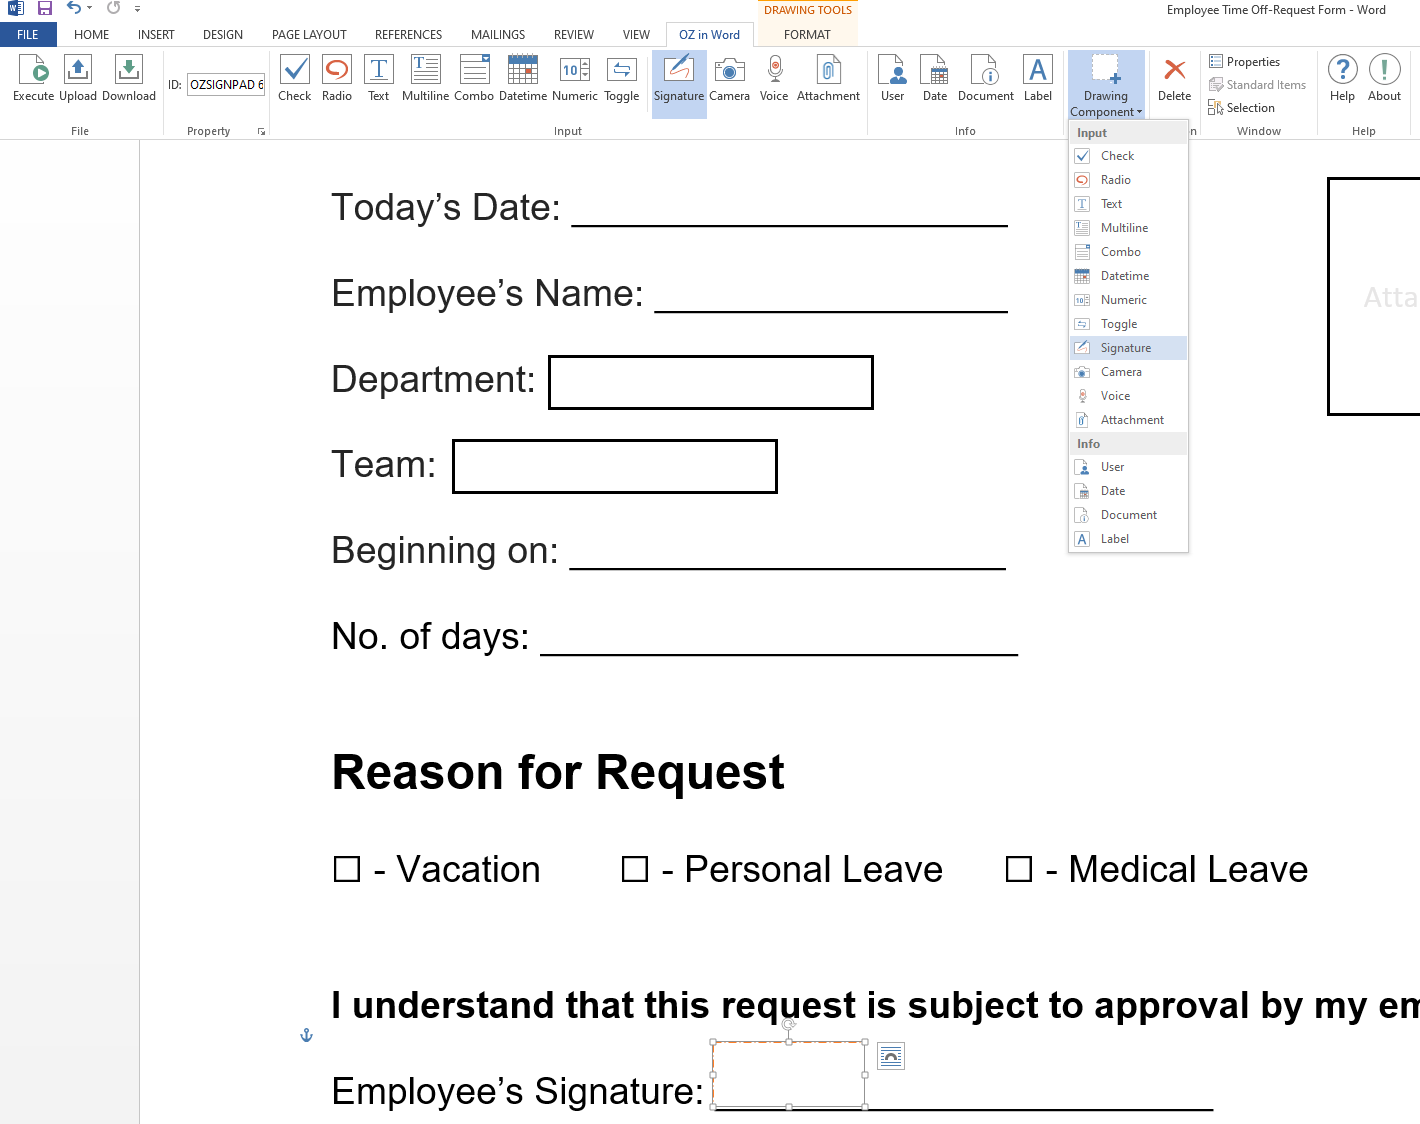
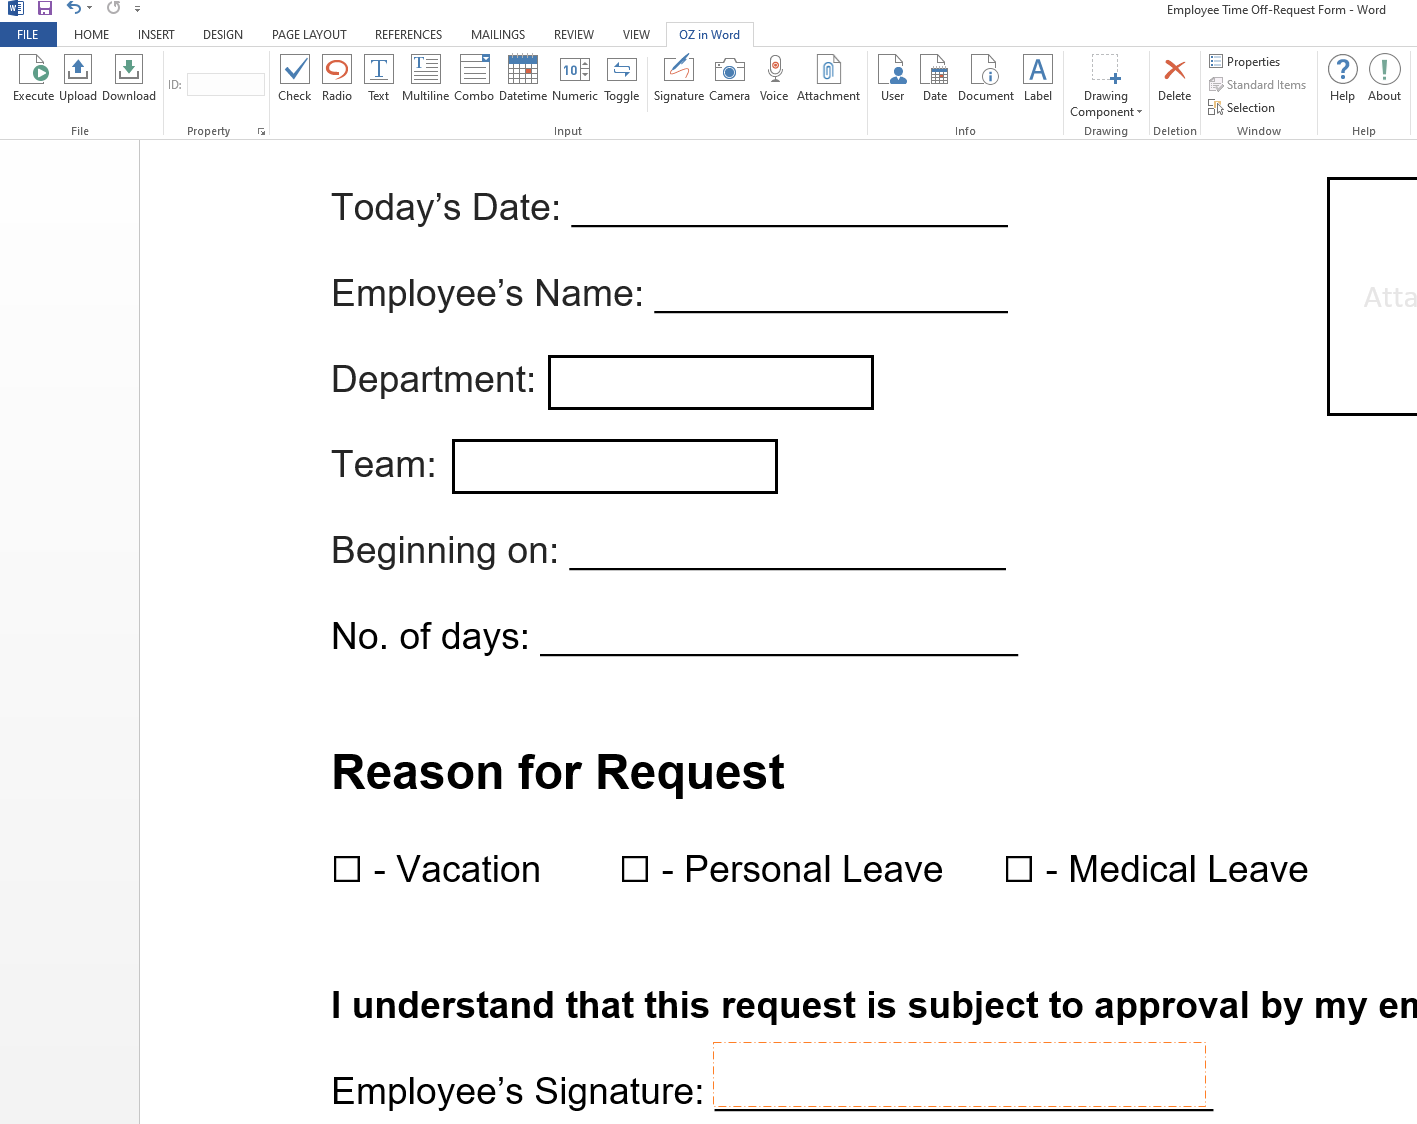
Add the field in the position and size you want.
Deleting fields
Select the field you want to delete and then click the Delete icon (![]() ) in the eformsign ribbon menu. You can also select and delete multiple fields.
) in the eformsign ribbon menu. You can also select and delete multiple fields.
How to Use Each Field Type
eformsign provides various types of fields such as check box, combo box, text, and signature through Microsoft Office’s eformsign ribbon menu.
All fields of eformsign have both common and unique properties. You can view both the common and unique properties of fields in the OZ Component Properties tab. Common properties include ID and Tooltip Text, and the meaning of each property is as follows:
ID: Unique ID that identifies each field. You can use the field ID to set a field to be required or inaccessible when setting fields in the workflow and to download data in CSV format.
Tooltip Text: In Windows, the text in the Tooltip Text box of a field is displayed in the form of a speech bubble when hovering the mouse over the field. In mobile, the text is displayed on the quick type bar when clicking on the field.
Note
To open the OZ Component Properties window, click on a field and then click the Properties icon (![]() ) in the eformsign ribbon menu.
) in the eformsign ribbon menu.
Note
The Tooltip Text feature is not provided for the Info group including User, Date, Document, and Label field types.
The description of each field type provided in eformsign is as follows.
Signature
This field is used for signing a signature on a document.

Clicking the signature area displays the Signature pop-up which allows you to sign a signature by drawing, entering text, or using a previously registered signature.

Field Properties
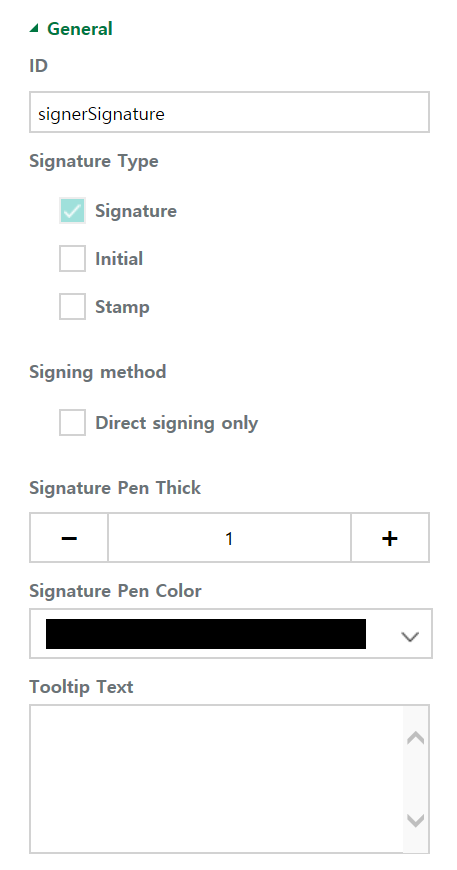
① ID
Enters the ID of the signature field. For example, the ID of the field can be ‘signerSignature’ for contract signers.
② Signature Type
Selects the signature type to be used when signing.
Enter directly: The user manually creates a signature by drawing it.
Registered Signature: If the user already has a signature added on eformsign, then clicking the signature area inserts the added signature onto the document. If not, then the user manually creates a signature.
Registered initial: If the user already has an initial added on eformsign, then clicking the signature area inserts the added initial onto the document. If not, then the user manually creates an initial.
Registered Stamp: If the user already has a company stamp added on eformsign, then clicking the signature area inserts the added stamp onto the document. If not, then the user manually applies a stamp by scanning and uploading a stamp.
Note
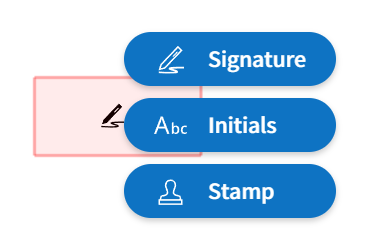
If there is a signature or initial added on eformsign, then it will be automatically entered in the signature area when a signature area is clicked. However, if there is no added signature or initial, then a regular Signature pop-up will be displayed when a signature area is clicked. If more than one signature type is selected, then the buttons for each signature type will be shown as below.
Tip
In some cases, you may need to use a seal or stamp on a document rather than your own signature. With eformsign, you can also use a stamp image to stamp the signature on a document. To use a stamp image when submitting a document, click the Stamp tab in the Signature pop-up, and then select a stamp image and click OK.
③ Signature Pen Thick
Sets the signature pen thickness.
④ Signature Pen Color
Sets the signature pen color.
Tip
You can set the signature date to be automatically entered in documents that require signature, such as electronic contracts and electronic agreements.
Open the document file (Word, Excel, PowerPoint) to be converted into an electronic form or create a new document.
Add a Signature field in the area of the document to be signed.
Enter the ID of the Signature field in the Component Properties tab. For example, the ID can be named ‘employeeSignature’.
Add the Date (not to be confused with Datetime) field where the signature date will be entered.
Open the Component Properties tab of the Date field.
Select the Date Type as Last modified date of the content.
Enter the ID of the Signature field in the Input Component ID field on the bottom. In this case, it would be ‘employeeSignature’.
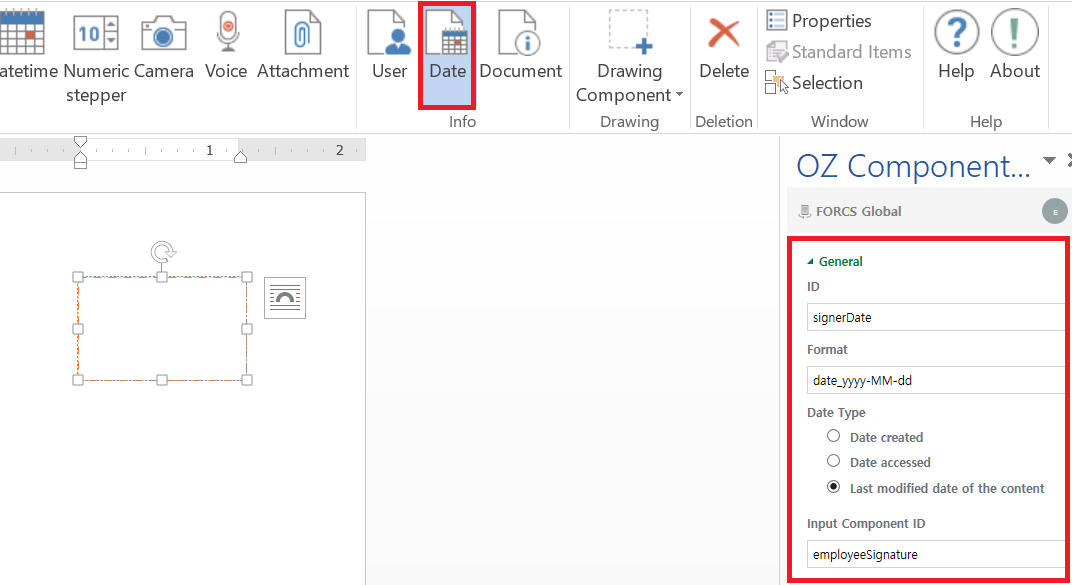
※ You can select the format of date to be displayed on the Date field by selecting the desired date format in the Component Properties tab.
Company stamp
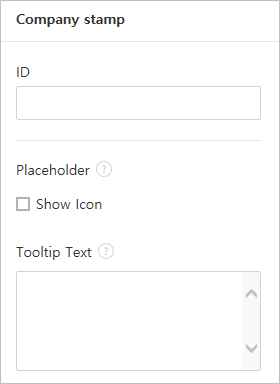
The company stamp field is used for inserting a company stamp that is added to eformsign onto a document. Company stamps can be added in the Manage company > Manage company stamp menu and they can only be used by members who have been granted permission to use them. Also, the history of company stamp usage is recorded in the Manage company stamp menu.

Text and Multiline
Both Text and Multiline fields are used to create text fields. The Text field is suitable for short text with 1 to 2 words, and the Multiline field is suitable for long text with more than 1 line.
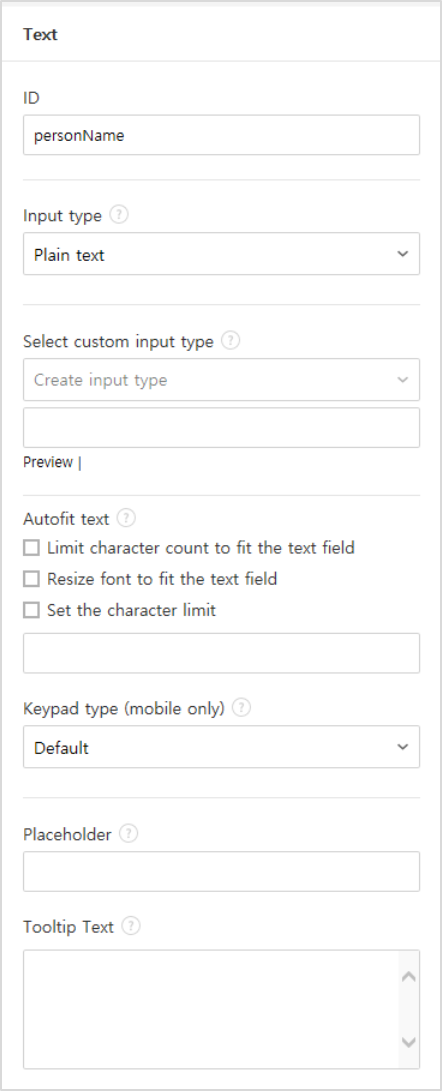
Component Properties
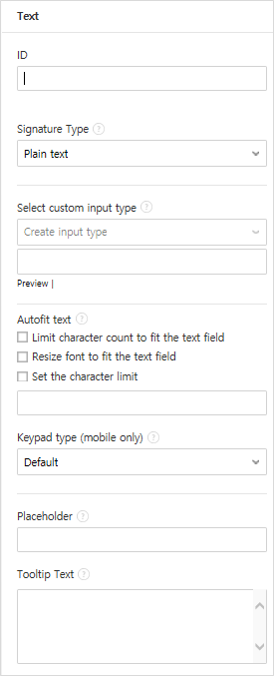
① ID
Enters the ID of the Text/Multiline field. For example, the ID of the field in which John Doe, Jane Doe, etc. are entered can be named ‘personName’.
Note
All fields must have an ID. An ID is automatically generated when you create a field, but it is recommended to rename it to something you can easily recognize. For example, you can rename the ID of a field for entering John Doe, Jane Doe, etc. as ‘name’. By doing so, it is easier to identify fields when deciding whether to display a field to a specific user when you are configuring the Field settings of a template.
② Input type
Selects either ‘’Plain text’, ‘Password’, or ‘Custom’ for the Text field and ‘Plain text’ and ‘Custom’ for the Multiline field.
③ Select custom input type
Selects additional input types as well as create a custom input type by creating a rule. It is enabled when Input type is set to ‘Custom’.
④ Autofit text
Allows you to limit character count to fit the text field, resize font to fit the text field, and set the character limit for each text and multiline field.
⑤ Keypad type (mobile only)
Selects the keyboard type to be used when entering text in the field. Keyboard Type can only be used in mobile devices such as smartphones and tablets.
⑥ Placeholder
Displays a help message when no value is entered.
⑦ Tooltip Text
Displays the description in Tooltip Text when you hover the mouse over a field.
Handwriting
The handwriting field is used to trace a pre-written text.
You can type in the text to be displayed on a document in which recipients can trace.

Field propertites
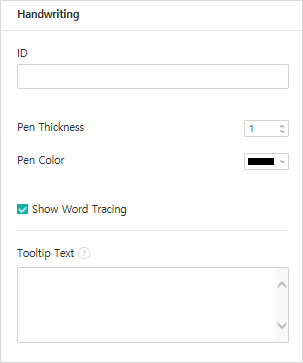
① ID
Enters the ID of the handwriting field.
② Pen Thickness
Sets the pen thickness.
③ Pen Color
Sets the pen color.
④ Show Word Tracing
Allows you to type in the text that will be displayed on the handwriting field.
Number
Enters a number.

Field properties
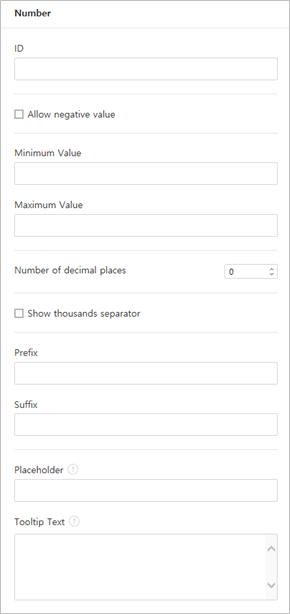
① ID
Sets the ID of the number field.
② Select custom input type
Selects additional input types as well as create a custom input type by creating a rule. It is enabled when Input type is set to ‘Custom’.
③ Allow negative value
Allows to enter a negative value.
④ Maximum Value, Minimum Value
Sets the minimum or maximum value that can be entered.
Note
If you enter a value that is lower than the minimum value set, then the value is changed to the minimum value. If you enter a value that is higher than the maximum value set, then the value is changed to the maximum value.
⑤ Number of decimal places
Sets the number of decimal places that can be entered. The number of decimal places that can be entered is from 0 to 10.
⑥ Show thousands separator
Automatically marks the value entered with a comma separated by thousands.
⑦ Prefix, Suffix
Sets the prefix/suffix required for a number to be entered automatically. For example, if you need to enter “10,000 dollars in total,” set the prefix to “total” and the suffix to “dollars”.
⑧ Placeholder
Displays a help message when no value is entered.
⑨ Tooltip Text
Displays the description in Tooltip Text when you hover the mouse over a field.
Label
This field is used for setting the form ID of a document.
Field Properties
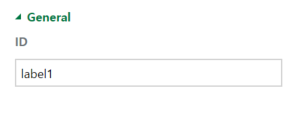
① ID
Sets the label field ID.
Check
The Check field is used to check whether an item is checked or not. This field is similar to the Radio field, but it is used for checking the status of an item (whether it is checked or not) while the Radio field is used for checking which item among multiple items is checked.

When data is downloaded in the CSV format, the Check field’s input value is displayed as follows:
When the item is checked: true
When the item is not checked: false
In Word and PowerPoint, the Check field is shown as a rectangular shape. Make sure to enter data inside the rectangular shape.
Field Properties
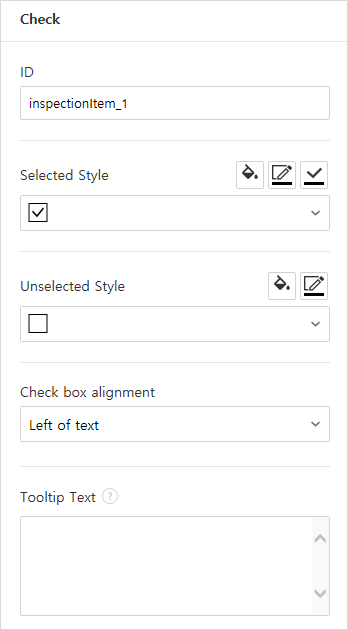
① ID
Each Check field must be given a different ID. If multiple check fields are given the same ID, then only the value of the last field is displayed.
② Selected Style
You can specify the style of each cfield in Field Properties. The check box is set as the default style, and you can change it to another style (radio button or red circle).
The below example shows how check boxes are displayed according to the selected style.
③ Unselected Style
You can select the style of each field that is not selected. For unchecked style, checks display square boxes, radio buttons display circles, and circles display nothing.
④ Check box alignment
You can choose whether to align the placeholder text to the right or left of the check box.
⑤ Tooltip Text
If you hover mouse over a field, the description you entered in the tooltip text will be displayed. In the eformsign app, this will be displayed at the top center of the keypad.
Radio
The Radio field is used for checking which radio button is selected among multiple items. When data is downloaded in the CSV format, the selected item will be displayed.

In Word and PowerPoint, the radio field is shown as a rectangular shape. Make sure to enter data inside the rectangular shape.
Field Properties
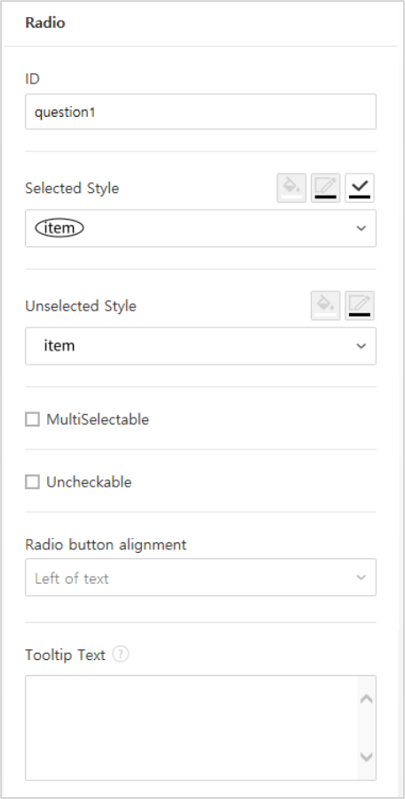
① ID
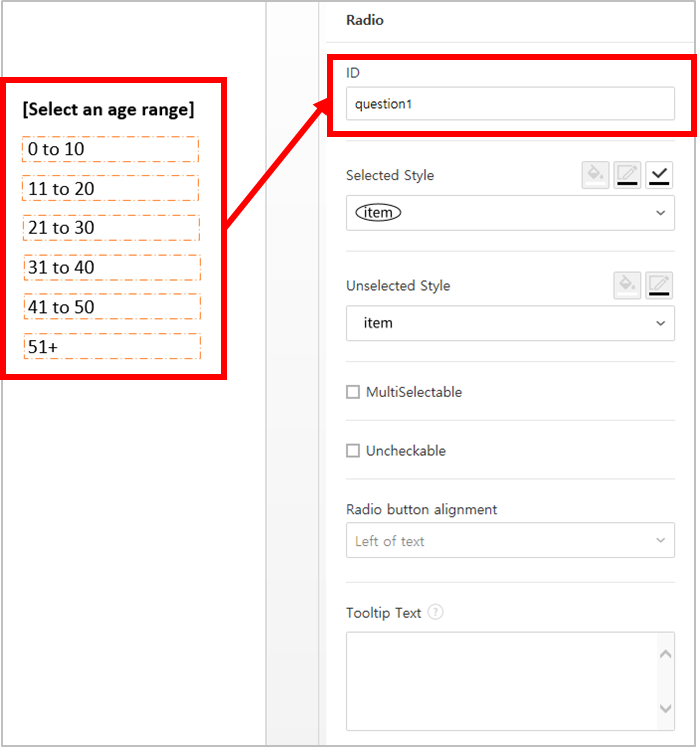
In Field Properties, make sure that all the selected radio buttons are assigned the same ID.
For example, if there are six choices available in a multiple choice question, assign “question1” as the ID for all of them. In the example shown below, the IDs of all the items are set to the same “question 1”.
② Selected style
You can specify the style of each field in Field Properties. The black circle set as the default style, and you can change it to another style in the dropdown menu.
③ Unselected style
You can select the style of each field that is not selected.
④ MultiSelectable
Checking the MultiSelectable option allows you to select multiple items. If you select more than one item, then when data is saved, each item is separated with a comma (,).
⑤ Uncheckable
Checking the Uncheckable option allows you to deselect a selected item by clicking it again.
⑥ Radio button alignment
Select whether to place the button to the left or right of the text.
⑦ Tooltip Text
If you hover mouse over a field, the description you entered in the tooltip text will be displayed. In the eformsign app, this will be displayed at the top center of the keypad.
Combo
The Combo field is used when you need to select one of multiple items.

If you click a combo field, a list of items is displayed as follows:
Field Properties
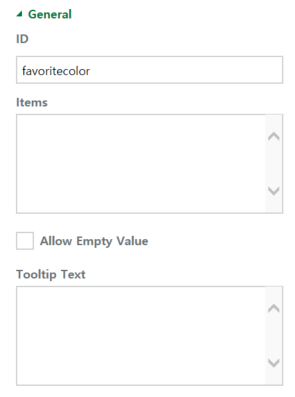
① ID
Enters the ID of the Combo field. For example, the ID of the field for selecting the favorite color can be ‘favoriteColor’.
② Items
Enters the items you want. You can separate the items by pressing Enter.
Note
If you want to display a message such as ‘Please select a color’ in a combo box in a document for recipients to view, then enter the message at the top of the list of items in the combo box and select it before sending the document.
③ Allow Empty Value
Checking the Allow Empty Value option allows you to deselect a selected item. Empty Value can be allowed in the following ways:
PC: Right-click on the field and select the Allow Empty Value option in the pop-up menu.
Mobile: Click the Trash can icon.
④ Placeholder
Displays a help message when no value is entered.
⑤ Tooltip Text
Displays the description in Tooltip Text when you hover the mouse over a field.
Toggle
This field is used for indicating a specific status such as ON/OFF. If you use this field, then the input value is switched according to a defined order whenever the field is clicked.

You can change the status to Good or Bad by clicking the fields as follows:
Field Properties
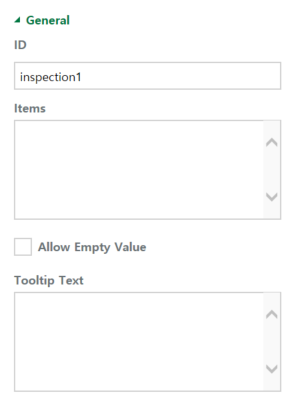
① ID
Enters the ID of the toggle field. For example, the ID of the field for the first inspection item can be named ‘inspection1’.
② Items
Enters the list of items that will be toggled whenever the toggle field is clicked. You can separate each item by pressing Enter.
③ Allow Empty Value
Checking this option allows you to clear the item displayed on the toggle field. When you select a toggle field, you can toggle to another item but cannot clear the item displayed on the field. However, by checking this option, you can clear the item displayed on the field as described below:
PC: Right-click on the field to display the pop-up menu and then select the Initialize Input Data menu.
Mobile: Click the Trash icon.
④ Tooltip Text
Displays the description in Tooltip Text when you hover the mouse over a field.
Datetime
This field is used for entering a date. Clicking the field displays a date selection window where you can select the date you want.

Field Properties
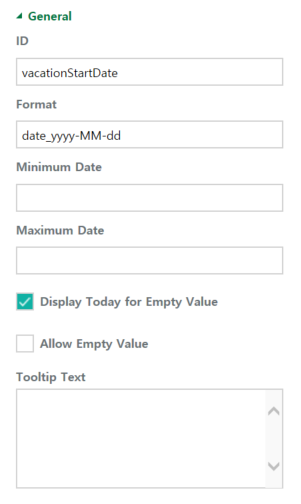
① ID
Enters the ID of the Datetime field. For example, the ID of the field for selecting the vacation start date can be named ‘vacationStartDate’.
② Format
Sets the format in which date is displayed. The default setting is date_yyyy-MM-dd.
yyyy: Displays the year.
MM: Displays the month. Must be in uppercase.
dd: Displays the days.
For example, if you want to display the date in the format of ‘15-02-2020’, then enter dd-MM-yyyy in the Format field.
③ Minimum Date/Maximum Date
Sets the range of dates that can be selected in the field by specifying the minimum and maximum dates.
④ Display Today for Empty Value
Checking this option automatically enters the date (the date in which the document is opened) when the document is opened. This option is checked by default when you add a Datetime field. You can change the date by clicking the field.
⑤ Allow Empty Value
Checking this option allows you to clear the number displayed on a Numeric stepper field. In a Datetime field, once you select a date, you can change it to another date but cannot clear the date. However, checking this option allows you to clear the date displayed on the Datetime field. If no date is selected in the Datetime field but the Display Today for Empty Value option is checked, then the date field is automatically filled in with the date in which the document is opened.
PC: Right-click on the field to display the pop-up menu and then select the Initialize Input Data menu.
Mobile: Click the Trash icon.
⑥ Tooltip Text
Displays the description in Tooltip Text when you hover the mouse over a field.
Numeric stepper
This field is used for entering a number. Clicking the field displays two arrows on the right, and you can increase or decrease the number by clicking them. In PCs, you can directly enter the desired number into the field by using a keyboard. In smartphones and tablets, you can scroll through the list of numbers and select the one you want.

Field Properties
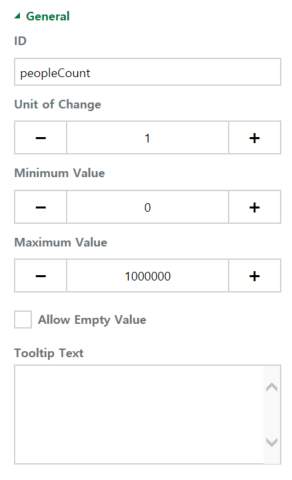
① ID
Enters the ID of the numeric stepper field. For example, the ID of the field for entering the number of people in a reservation can be named ‘peopleCount’.
② Unit of Change
Enters the unit of number that will increase/decrease the number whenever the up/down arrow icon is clicked. For example, if the ‘Unit of Change’ is set to 100, then when you click the up arrow icon (▲), the number is increased by 100 such as 200, 300, 400, and so on.
③ Minimum/Maximum Value
Sets the range of numbers that can be entered into the field by specifying the minimum and maximum values. For example, for the date of birth, setting the Minimum Value to 1900, Maximum Value to the current year, and the Unit of Change to 1. Also, if you enter a value that is lower/higher than the Minimum/Maximum Value, then the Minimum/Maximum Value will be automatically entered. For example, if the Maximum Value is set to 100 and you enter 101, then the number will automatically change to 100.
④ Allow Empty Value
Checking the Allow Empty Value option allows you to clear the number displayed on the numeric stepper field. After entering a number in a numeric stepper field, you can change the number again, but cannot clear the number. However, by checking this option, you can clear the number displayed on the field as described below.
PC: Right-click on the field to display the pop-up menu and then select the Initialize Input Data menu.
Mobile: Click the Trash icon.
⑤Placeholder
Displays a help message when no value is entered.
⑥ Tooltip Text
Displays the description in Tooltip Text when you hover the mouse over a field.
Camera
This field is for uploading photos (taken with a device with a built-in camera such as smartphones and tablets) on a document. In PCs without a camera, clicking the field displays a window for selecting a desired image file.

If the size of the selected image is larger than the size of the text box, then it is resized to fit the field.
Note
For the device with a built-in camera, camera feature will be executed, and for the devices with no camera, a window for selecting an image file will be displayed.
Field Properties
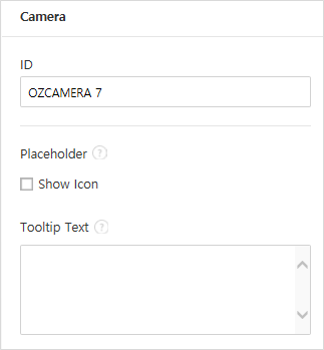
① ID
Enters the ID of the Camera field. For example, the ID of the field that takes the photo of a driver’s license can be ‘driverLicense’.
② Placeholder
Enters the text displayed before taking a photo.
Tip
If you check the Show icon check box, the camera icon is shown on the camera area.
③ Tooltip Text
Displays the description in the Tooltip Text when you hover the mouse over a field.
Voice
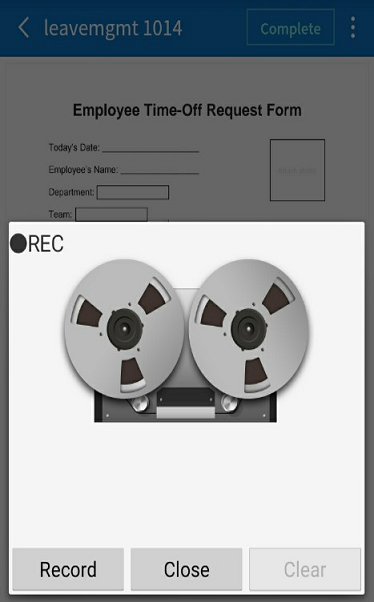
This field is used for storing recorded voice. You can set the maximum recording time and you can also configure the settings to allow users to only listen to the voice recording.

When you add a Voice field in eformsign for Microsoft Office, you can record voice or play a voice recording as follows:
Note
If the recording time limit is set to 1 or higher, recording is completed automatically at the time set (unit: seconds).
In the case of ActiveX viewer, the recording playback UI is supported from Windows 8 and later.
In PCs, the Voice field works only when a voice recording device is connected to a PC.
Field Properties
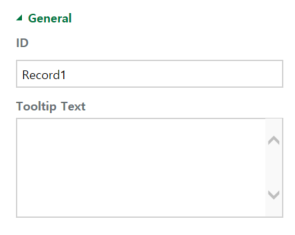
① ID
Enter the ID of the Voice field. For example, the ID of the field that plays voice recordings can be named ‘Record1’.
② Placeholder
Enters the text shown before recording.
Tip
If you check the Show icon check box, the mic icon will be displayed on the voice recording area.
③ Tooltip Text
Displays the description in Tooltip Text when you hover the mouse over a field.
Attachment
This field is used for attaching a file to a document. When attaching a file to a document by using the Attachment field, the file will be attached at the very end of the document as a new page.

The types and sizes of files that can be attached are as follows:
File type: PDF, JPG, PNG, and GIF
File size: Up to 5MB
Field Properties
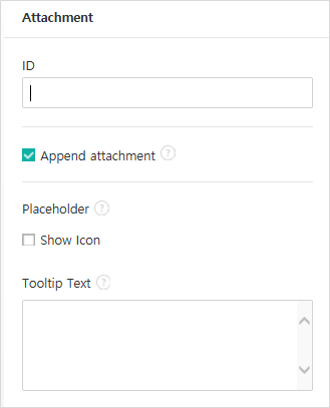
① ID
Enters the ID of the Attachment field. For example, the ID of the field for attaching a resume can be named ‘myResume’.
② Placeholder
Enters the text shown before attachment.
Tip
If you check the Shown icon check box, the clip icon will be displayed on the attachement area.
③ Tooltip Text
Displays the description Tooltip Text when you hover the mouse over a field.
User
This field is used for entering the information of the user who created or modified a document. The user’s basic information such as name or contact information, or custom field information is automatically entered into the user field based on the settings.

Field Properties
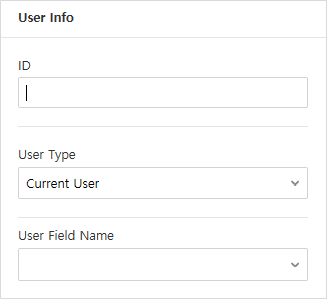
① ID
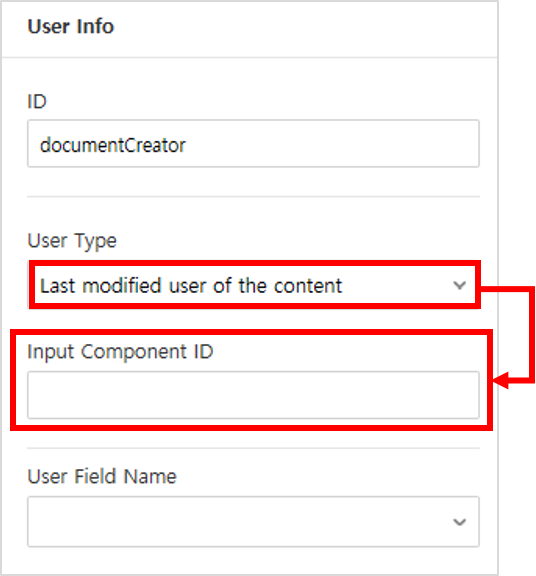
Enters the ID of the user field. For example, the ID of the field that displays the name of the document creator can be named ‘documentCreator’.
② User Type
Document Creator: Displays the information of the user who created the document.
Current User: Displays the information of the user who has most recently opened or modified the document.
Last modified user of the content: Displays the information of the user who entered information in a specific field.
If you select Last modified user of the content, then the Input Component ID field will be displayed. In this field, enter the ID of the field that will display the information when triggered.
Note
You need to have company administrator or template manager permission to perform this action.
Note
To automatically fill in the signer’s name in the User field, create a Signature field and then name the ID (for example, signer1). Then, create the User field that will display the signer’s name when triggered and name the ID (for example, signer1name). Then, select Last modified user of the content under User Type and enter the ID of the Signature field (in this case, signer1) under Input Component ID.
③ User Field Name
This field allows to select the type of member information that will be displayed. You can select basic information in the Manage member > Member info menu of the member or information in a custom field.
Basic member information types: Name, ID, Department, Position, Mobile, and Telephone
Note
You need to have company administrator permission to change basic member information.
To modify a member’s basic information, login to eformsign and go to the Manage company > Manage members menu. Select a member in the member list and edit the information in the Member info tab on the right. Then, click the Save button.
Date
This field is used to automatically enter the date in which a document is created or modified. The date in which the document is created, the date in which the document is accessed, or the date in which the content of a field is last modified is automatically entered, according to the date type selected.

Field Properties
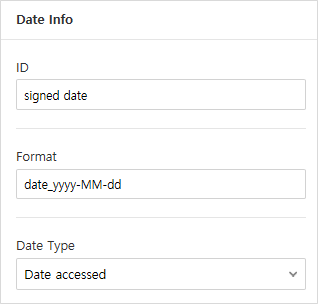
① ID
Enters the ID of the Date field. For example, the ID of the field that displays the date in which the document is signed can be named ‘signed date’.
② Format
Sets the format in which date will be displayed.
yyyy: Displays the year.
MM: Displays the month. Must be in uppercase.
dd: Displays the day.
For example, if you want to display the date in the format of ‘15-20-2020’, then enter dd-MM-yyyy in the Format field.
③ Date Type
Date created: Displays the date in which the document is created.
Date accessed: Displays the most recent date in which the document is modified or opened.
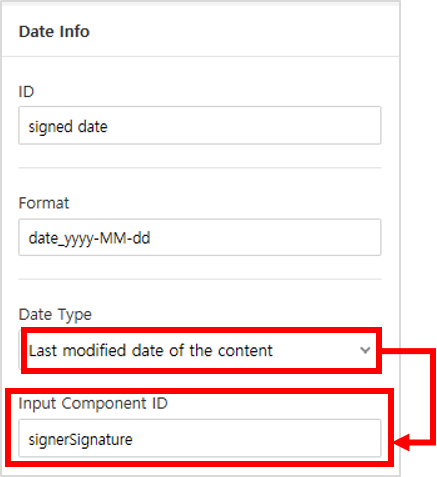
Last modified date of the content: Displays the date in which the information of a specific field is filled in.
If Last modified date of the content is selected, the Input Component ID field is displayed. In this field, enter the ID of the field that will display the information when triggered.
Note
You need to have company administrator or template manager permission to perform this action.
Note
If you want the signature date of a signer to be displayed automatically in a contract, first add a Signature field and then name the ID (e.g. ‘contractSign’). Then, add a Date fieldwhich will display the signature date when the signature is signed and name the ID (e.g. signDate). Then, select Last modified date of the content under Date Type and enter the ID of the signature field (in this case ‘contractSign’) in the Input Component ID field.
Document
This field is used for entering document-related information in the document itself. You can select either one of the document ID or document number.

The document ID is a unique document ID assigned in the system, so it does not require separate settings. For settings related to document number, upload a template and then go to Template settings > General.
Field Properties
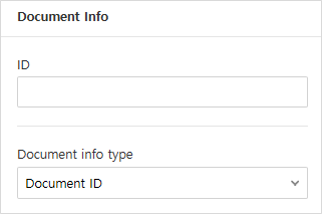
① ID
Enters the ID of the document field. For example, the field ID can be ‘docNum’ for document number.
② Document info type
Selects the type of information that will be used.
Document ID: A unique ID containing 32 digits of alphanumeric characters assigned to all documents in the system. E.g. 0077af27a98846c8872f5333920679b7.
Document no.: The document number set in Template settings > General. For information on how to set a document number, go to Generating and viewing a document number.
Upload Form File
Form files created using eformsign for Microsoft Office are uploaded in the following order:
Click the Execute icon (
 ) in the File group. The login page will be displayed as a pop-up window.

After you log in, the document converted to a form will be displayed as a preview.

Click the Upload form file button or click the Upload (
 ) icon in the ribbon menu. The Template list page with the Create template card will be displayed.
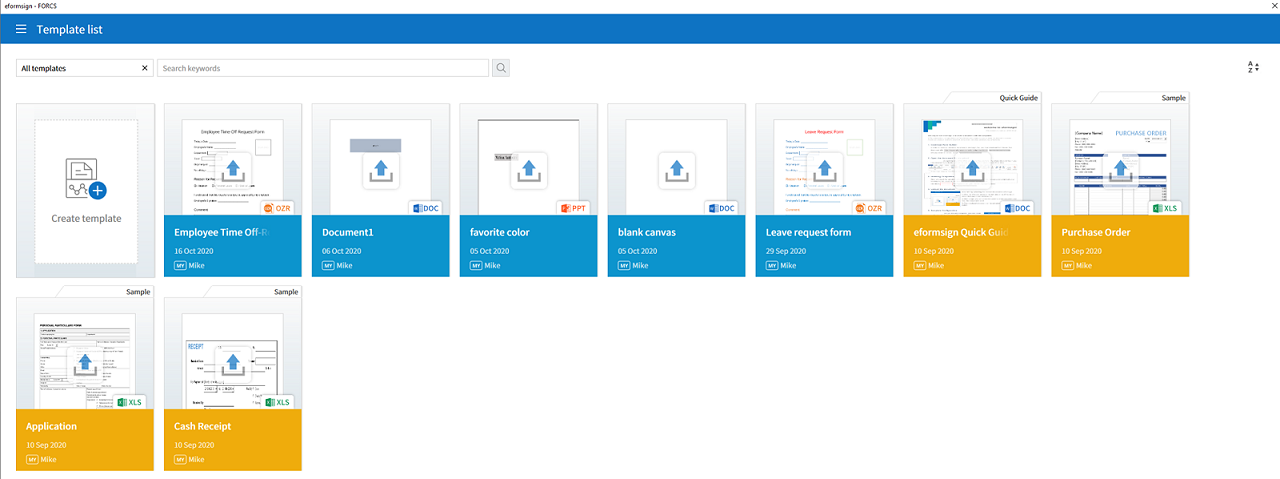
Click the Create template card. The screen for configuring the template settings will be displayed. Click the settings tabs on the left to configure the settings for the template and then click the Save button on the top right corner to save and create a template.
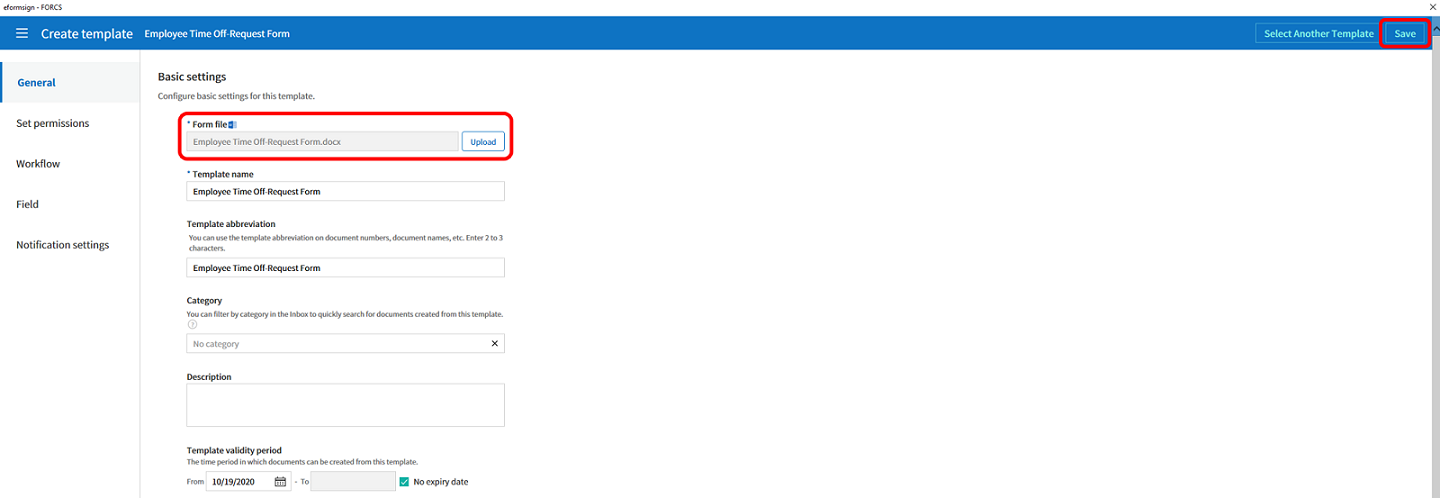
Configuring Template Settings
After uploading a template, you can configure additional settings for documents created from the template such as the template name, document number, and workflow.
Login to eformsign.
Go to the Manage templates menu.
Click the Template settings icon (
) of the desired template.
General: Sets the template name, abbreviation, document name, document number, etc.
Set permissions: Sets the permissions for who can create documents created from the template and who can open, void, or permanently remove documents created from the template.
Workflow: Sets the steps of the document workflow from Start to Complete.
Field: Sets the field default values, auto-filled values, etc.
Notification settings: Sets the notification settings for documents created from the template.
After configuring all settings, click the Save button to save the settings.
Important
In order to create documents from a template, you need to first save and deploy the template first. If you save the template but don’t deploy it, then the template will not be shown in the New from template page of the members with template usage permission.
Note
For a detailed explanation of templates, please refer to Creating templates using eformsign for Microsoft Office.


