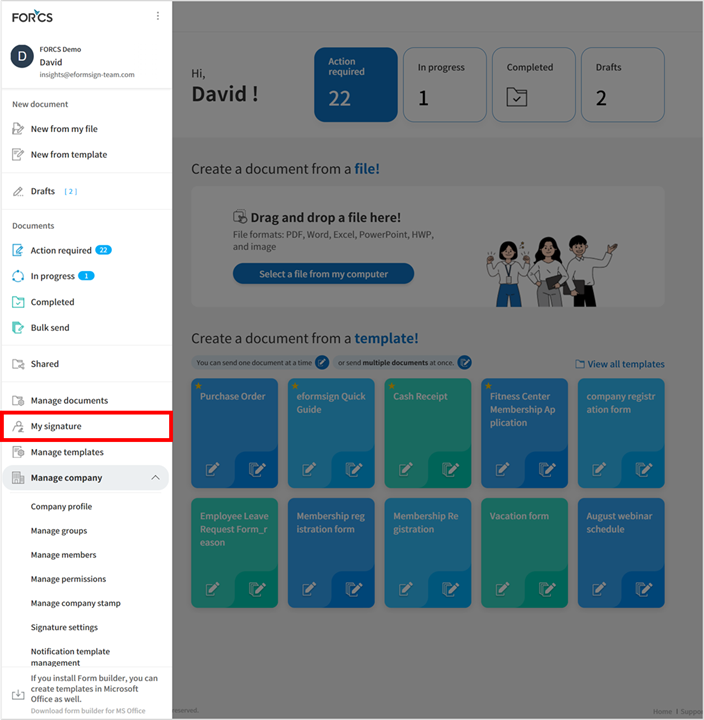
After logging into the eformsign dashboard, click the menu icon () at the top left corner of the screen. The sidebar menu will be displayed as shown below.
Note
Each menu may appear differently depending on the permissions you have. The company administrator can access all the menus and have all the permissions.
The description of each menu is as follows:
New document: Shows the menus in which you can create a document by uploading a file from your computer or selecting a template uploaded to eformsign.
New from my file: Allows you to create a document even when there is no template. Simply upload a file (pdf, doc, docx, xls, xlsx, ppt, pptx, odt, jpg, png, gif, and tiff) from your computer and then upload it to eformsign. Then, add fields onto the document and send it to recipients for signature.
New from template: Views the list of templates in which you can create documents from. You can select a template and then create a document.
My saved files: Shows the list of documents saved when creating a document by accessing the New from my file menu.
Documents: Shows the menus in which documents are stored.
Action required: Shows the list of documents that you need to sign, approve, or send.
In progress: Shows the list of documents you have created or processed but are incomplete.
Completed: Shows the list of all the completed documents you have created or participated in.
Bulk send: Shows the list of all the document you have sent in bulk.
Shared: Allows you to share your documents with others and view documents others members shared with you.
Trash: Shows the list of deleted documents that are not deleted permanently.
Manage documents: Only document managers can access this menu. Document managers can view, download, permanently remove, and void (excluding completed documents) all documents created from a template that they have permission to access. The company administrator by default has permission to do all this for all documents in the company.
Manage bulk sent documents: Only document managers can access this menu and can view documents bulk created from templates in which you are given permission. However, the company administrator can view and manage all documents.
My signature: You can create and add your signature to be used when signing a document.
Contacts: You can add non-member contacts to the contact list and manage them.
My contacts: You can add and view the contact information of non-members.
Shared contacts: You can add the contacts you want to share with other members in the Manage shared contacts page.
Manage templates: Only template managers can access this menu. You can view the template list and configure the template settings.
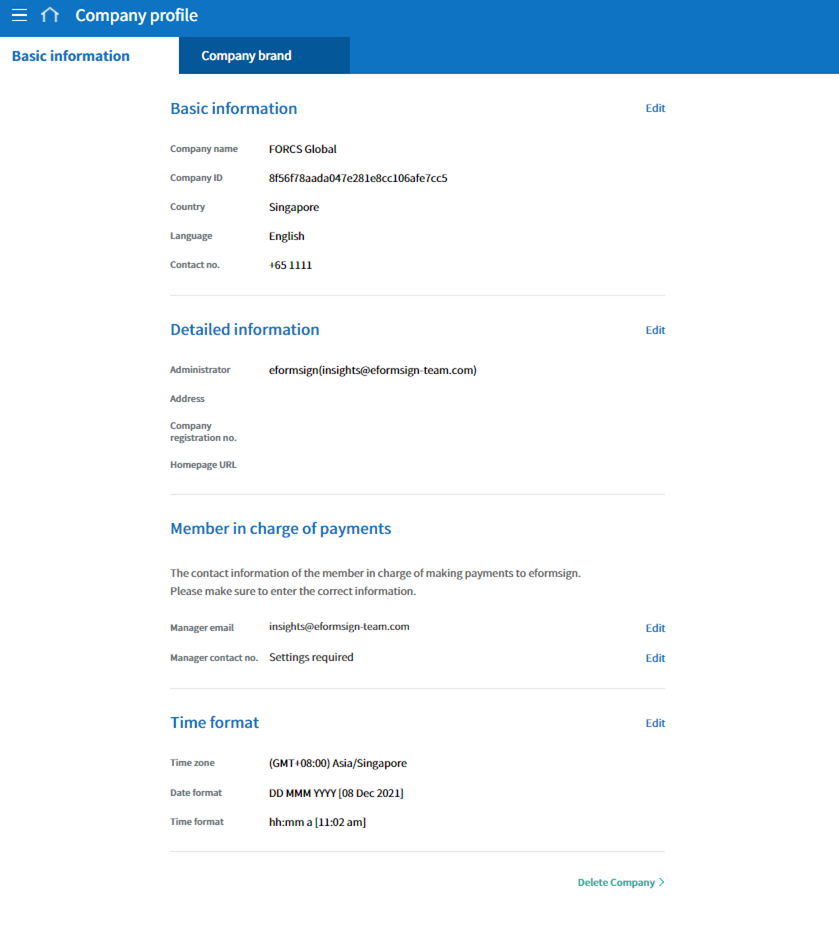
Manage company: Only company managers can access this menu. You can view and edit company information.
Company profile: You can view and edit company information
Manage groups: You can create groups or edit group information.
Manage members: You can invite members or edit member information.
Manage permissions: Allows the company administrator to assign members as company managers, template managers, and document managers, as well as manage their permissions.
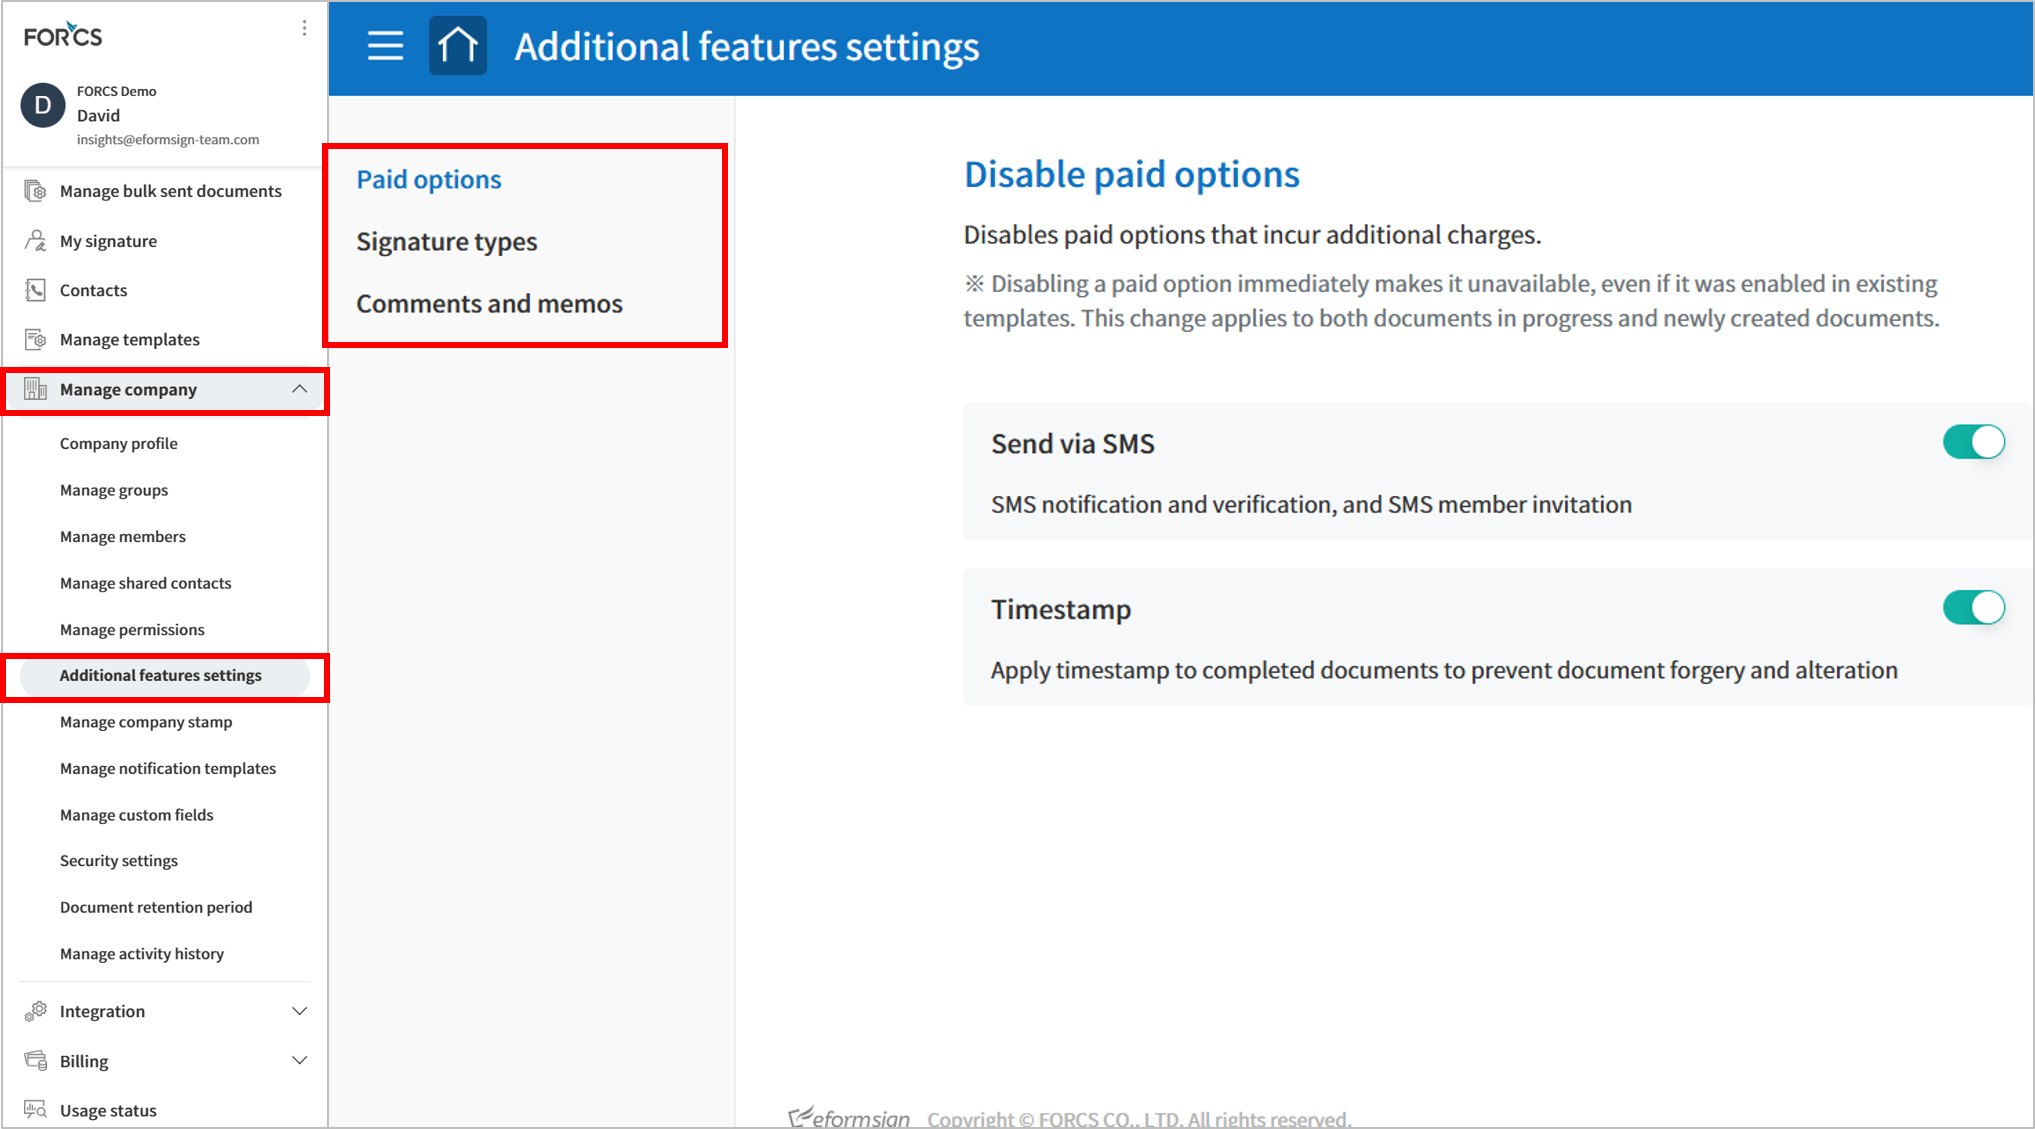
Additional features settings: Allows administrators to easily manage and control various additional features for the entire company.
Paid options: Control the use of paid options such SMS verification and timestamps.
Signature types: Disable/enable Signing with text and Create stamp features.
Comments and memos: Control whether members can use the comments and memos features when filling in documents.
Manage company stamp You can grant stamp use permissions and view stamp use history, as well as adding and managing company stamps.
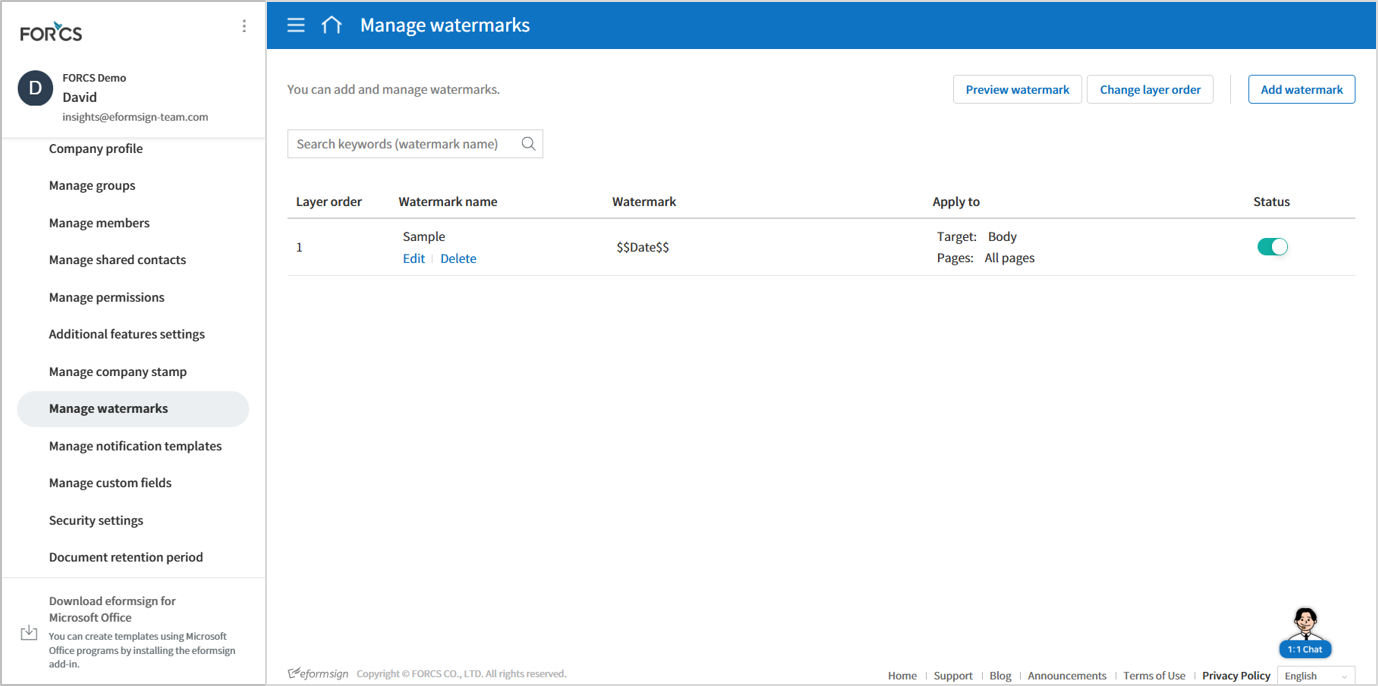
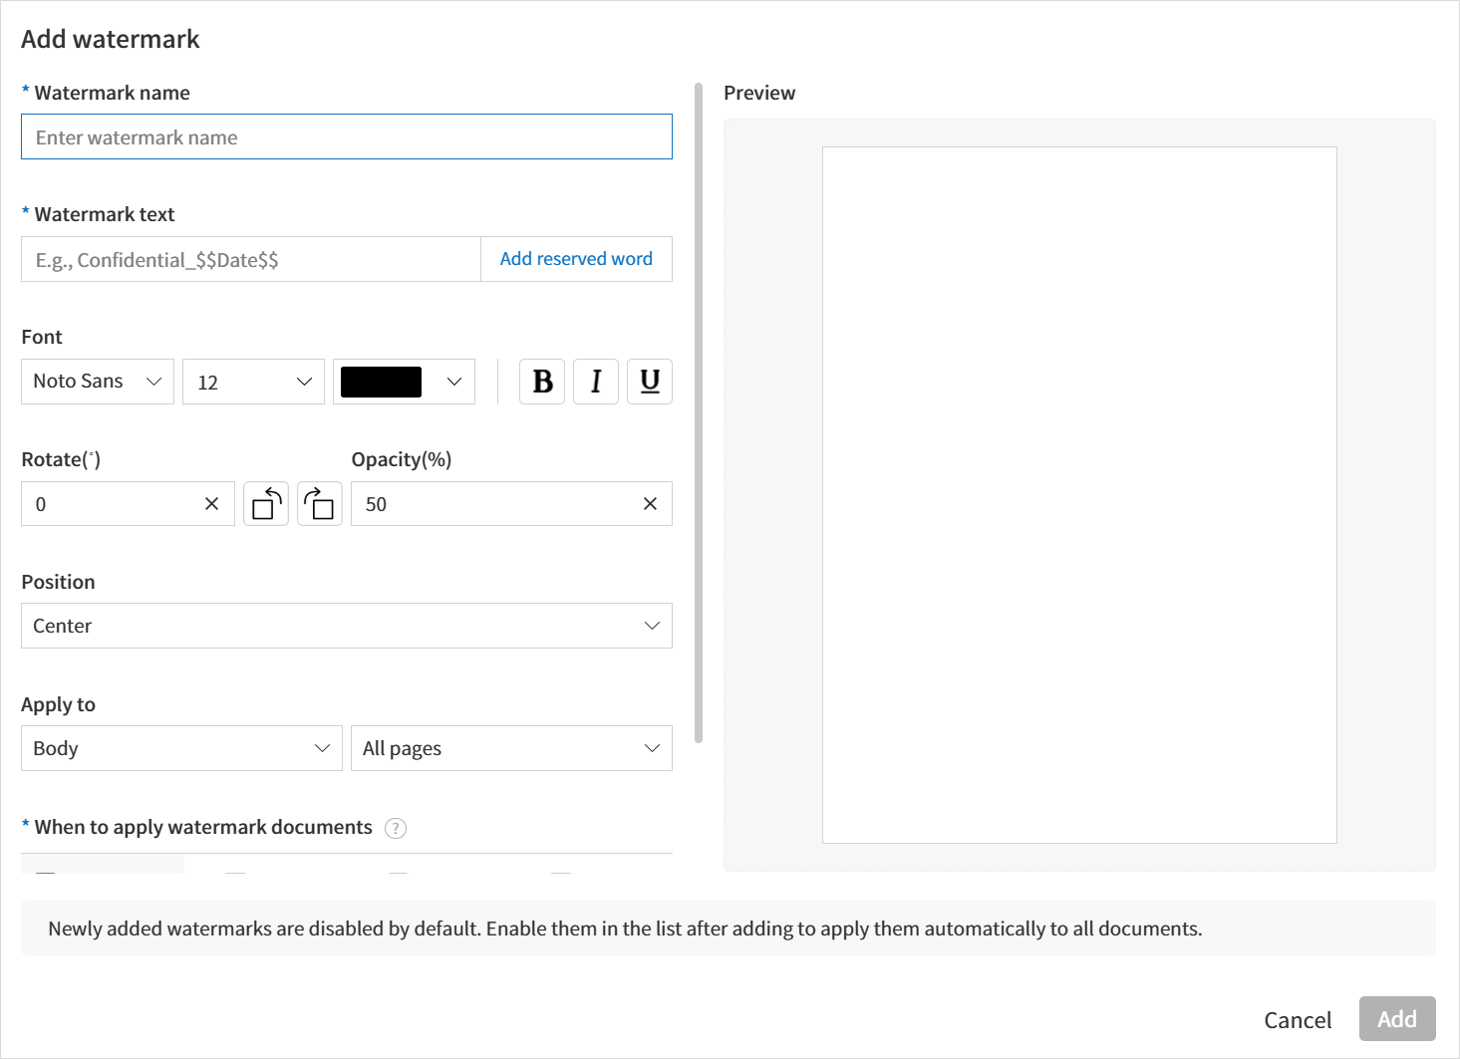
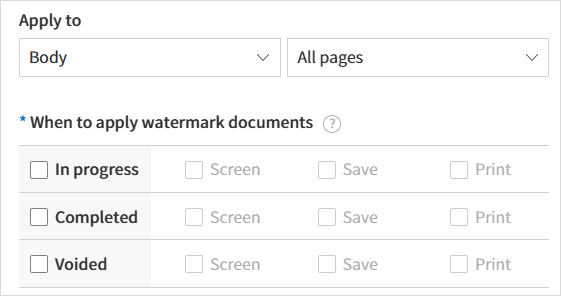
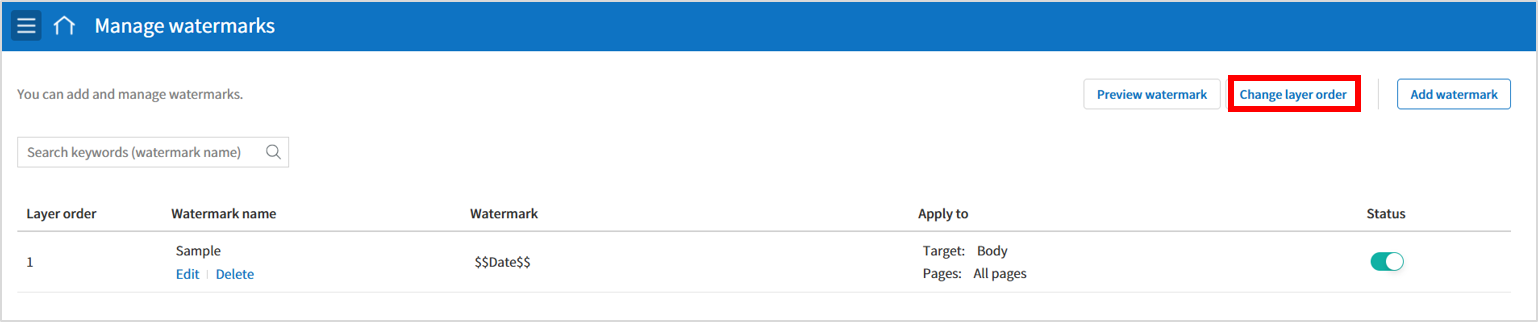
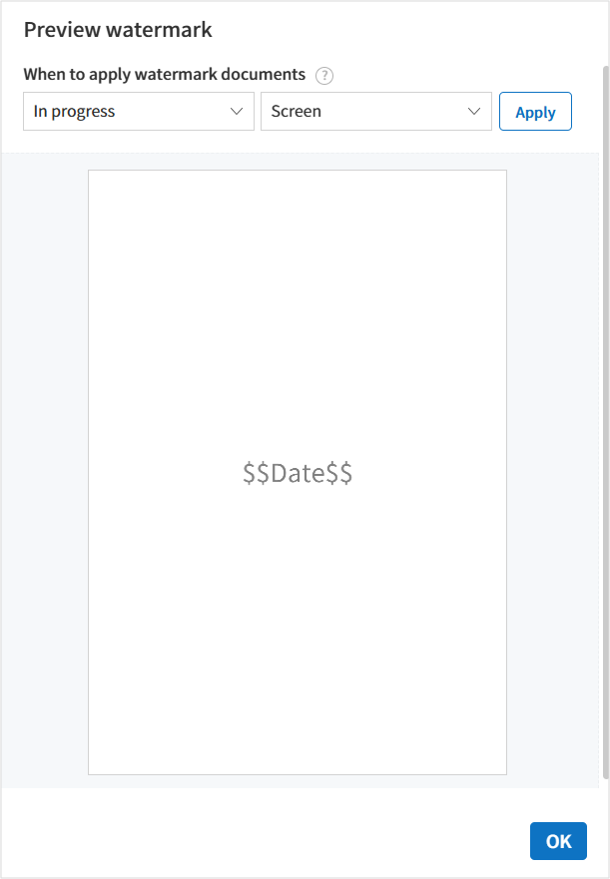
Manage watermarks: You can add and manage watermarks.
Notification template management: You can view and edit email and SMS notification templates.
Manage custom fields: You can add and configure custom fields such as company, group, and member information.
Security settings: You can set security settings including Login settings and IP access settings. Login settings allows you to enable 2-step verification, disable multiple logins, and lock inactive accounts for fortied security. IP access settings allows you to set allowed IPs by admin, manager, and member permissions so that only certain IP addresses can log in to eformsign.
Document retention period: You can set the document retention period for all the documents created in the company.
Manage activity history: You can view the history of logins, profile revisions, downloads, and permissions, as well as download the history in the CSV format.
Integration: Only the company administrator can access this menu. You can connect eformsign with external services.
Cloud storage: You can connect your Dropbox, Google Drive, or Box accounts to store completed documents in external cloud storages.
Analytics & reporting: You can connect sheets in Google Sheets or Microsoft Office 365’s Excel with eformsign to store the data entered in eformsign documents to the sheets.
API / Webhook: You can create, edit, or delete API and webhook keys to use the eformsign API.
Billing: You can view your plan and payment history, change your plan, or change the payment method.
Plan: You can change the plan you are using.
Real-time billing: You can view your usage and billing status in real-time.
Payment history: You can view your payment history for the past 1 year.
Payment method settings: You can add the credit card information for payment.
Usage status: You can monitor weekly, monthly, and annual service usage status.
Download eformsign for Microsoft Office: You can download eformsign for Microsoft Office, which allows you to create electronic forms using Microsoft Office programs.
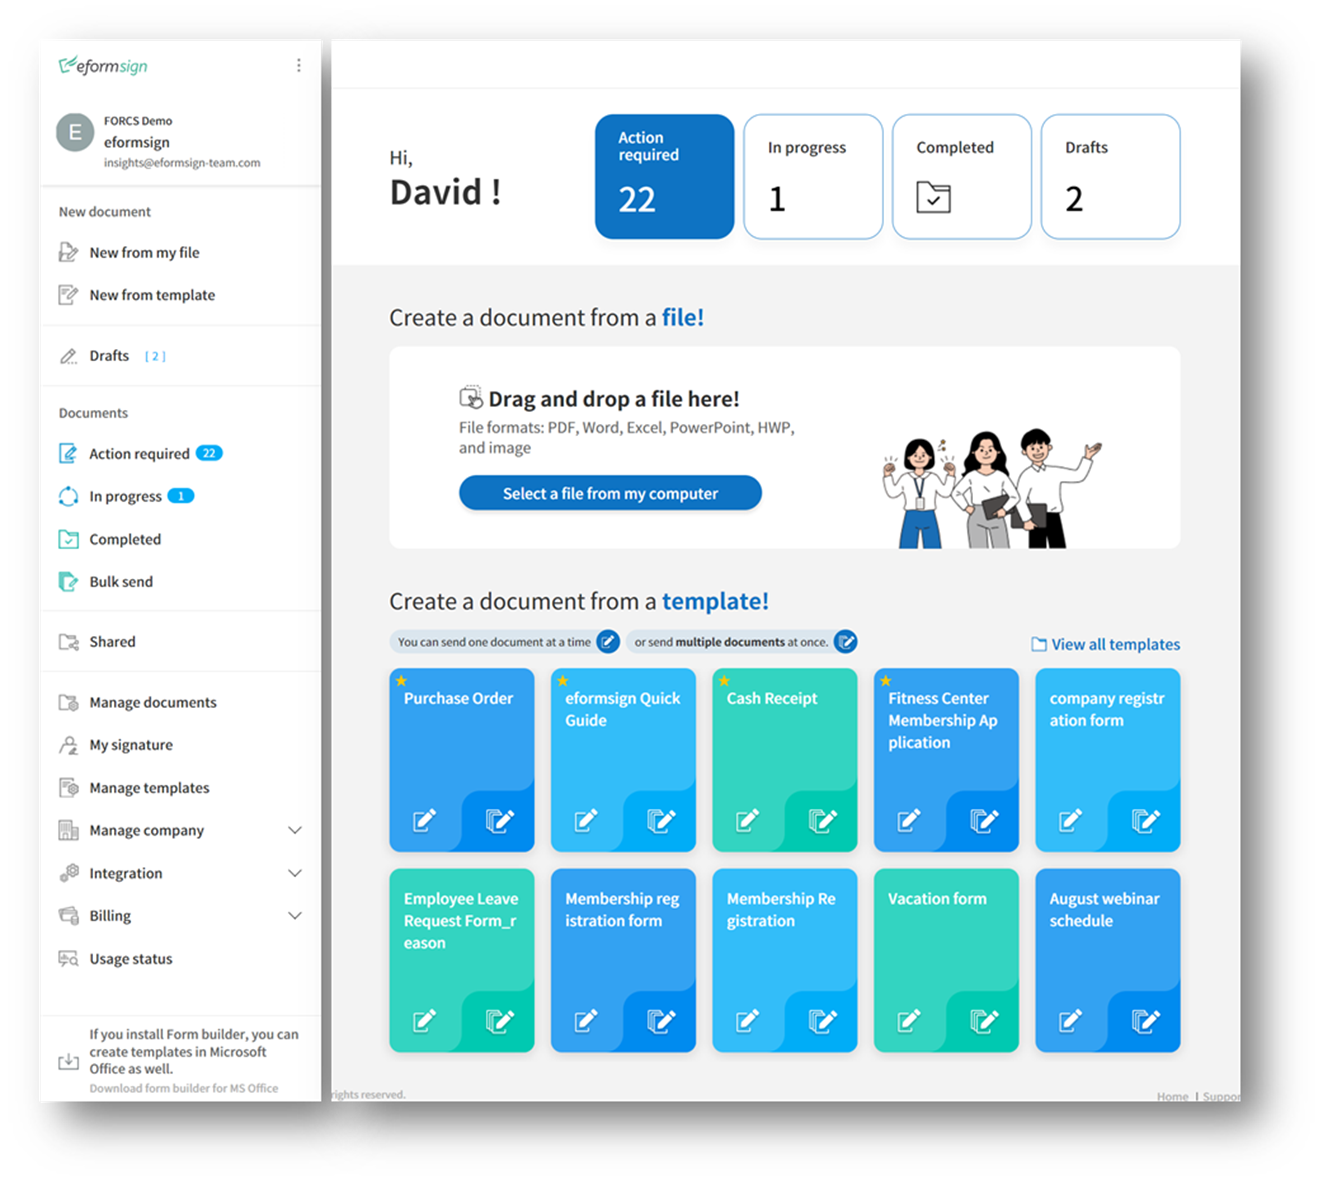
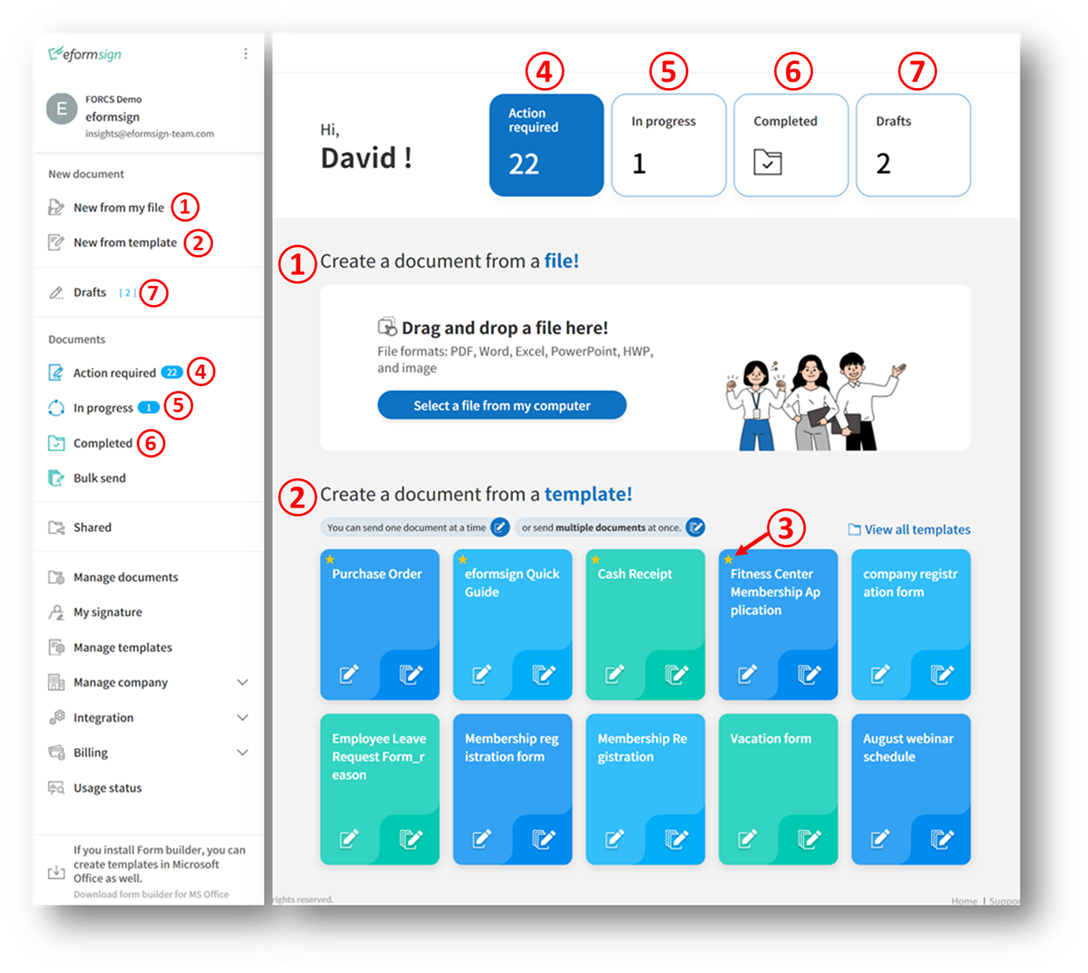
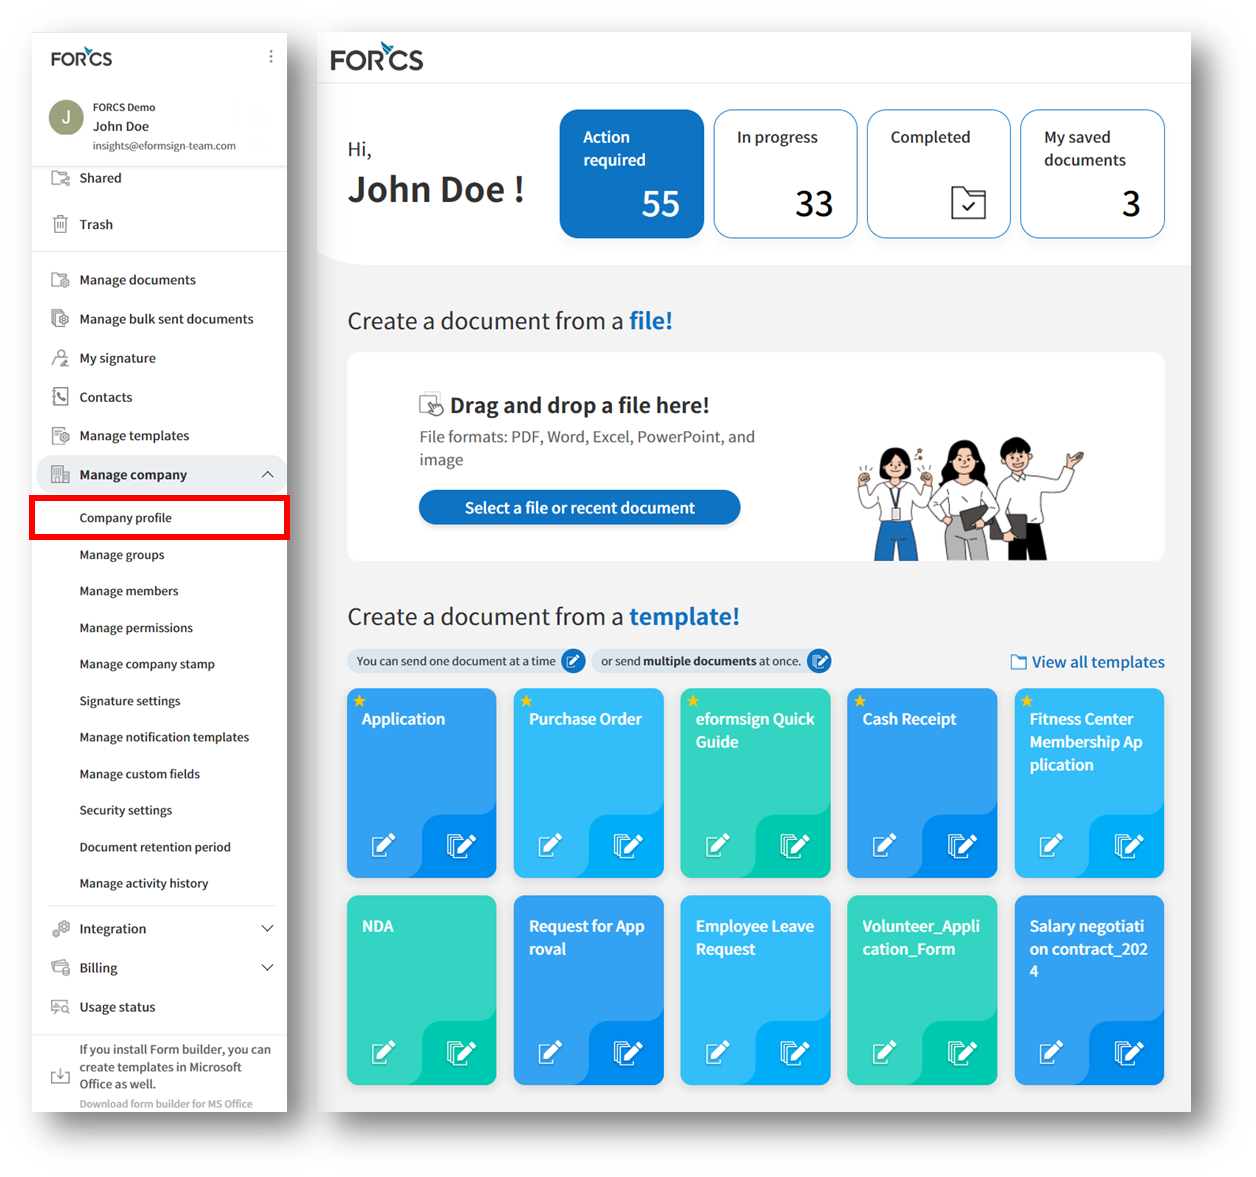
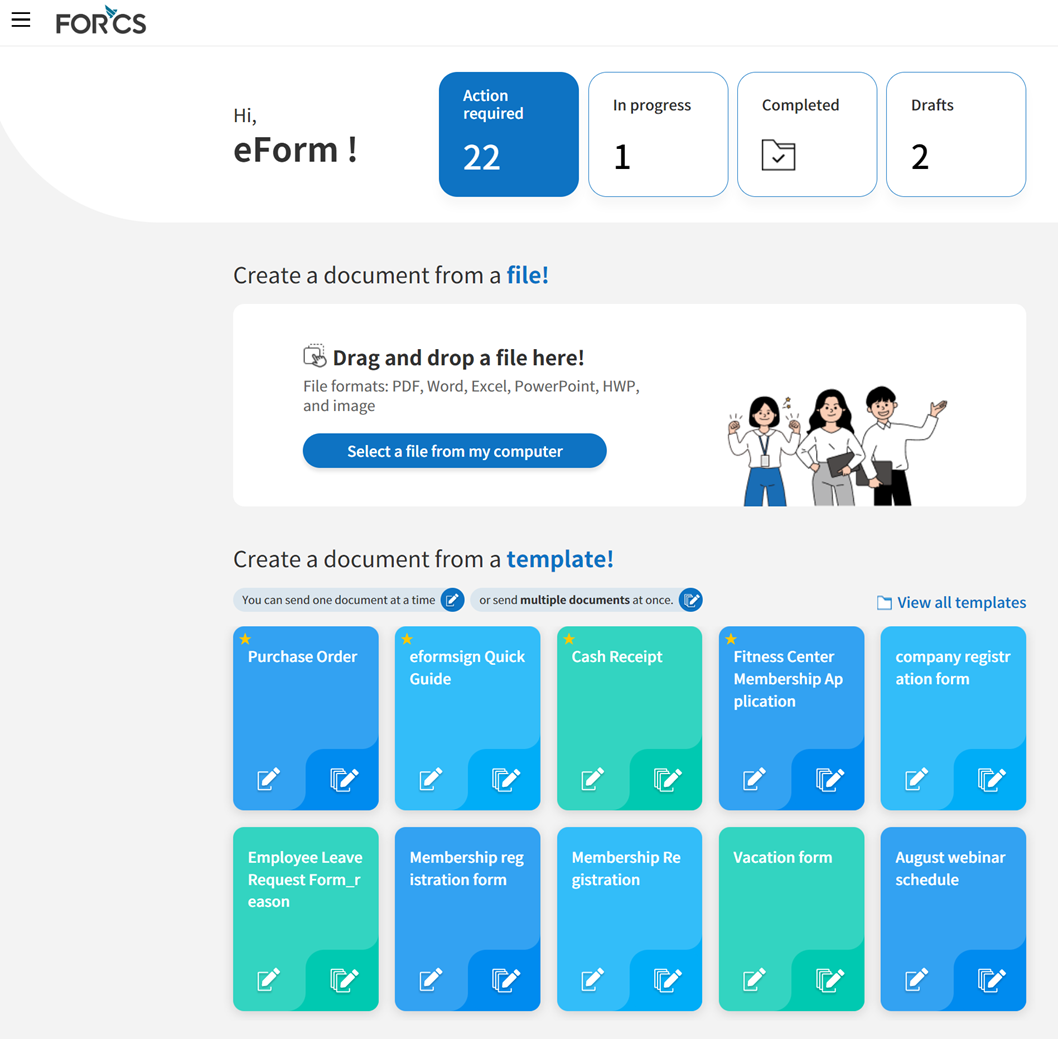
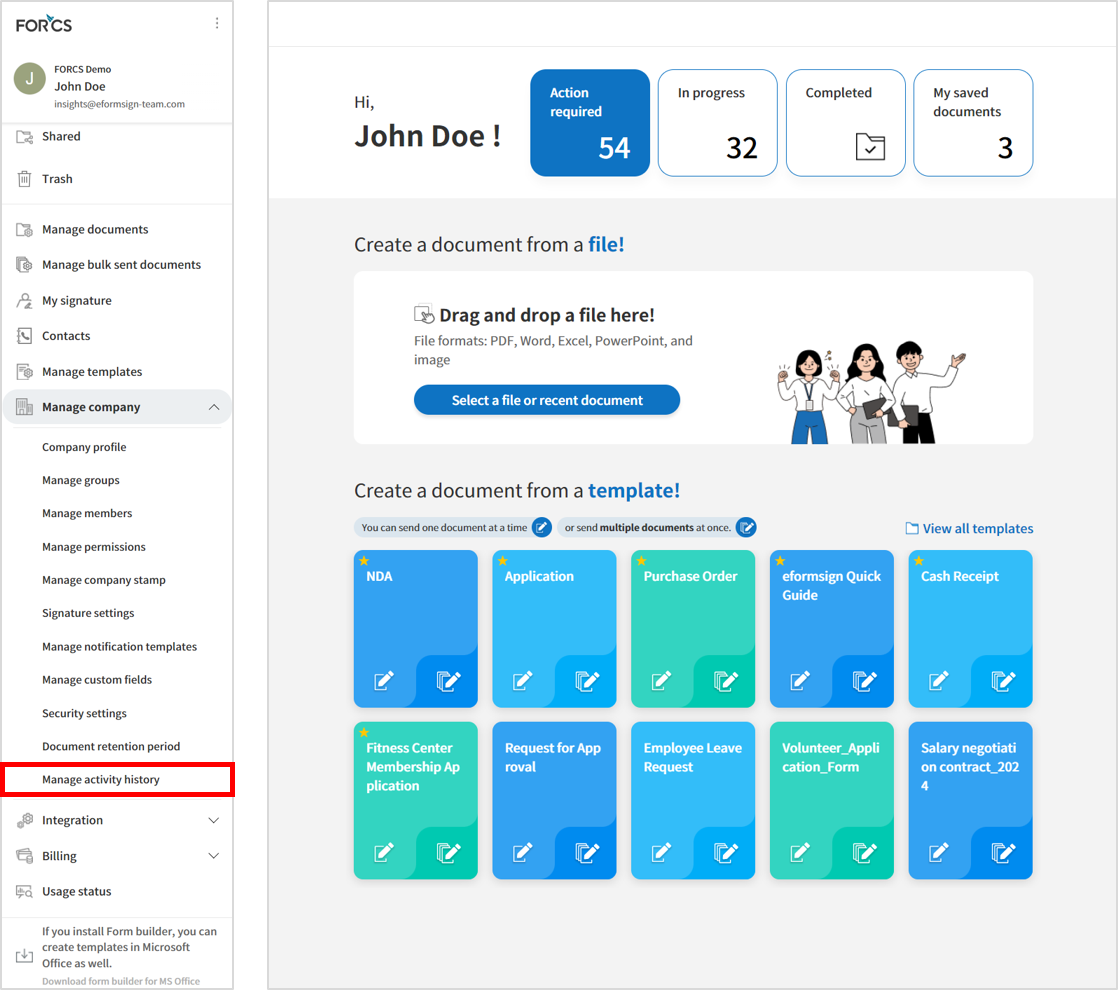
The dashboard is the main page displayed when logging into eformsign. In the dashboard, you can upload a file to create a document as well as create a document from a template you want. Also, you can go directly to a document inbox or view a template in the dashboard.
① Document inbox shortcut
Action required: Shows the number of documents you received from members or non-members that you need to sign, approve, or send. When clicked, it opens the Action required inbox.
In progress: Shows the number of documents that are in progress. When clicked, it opens the In progress inbox.
Completed: When clicked, it opens the Completed inbox.
My saved files: Shows the number of documents saved temporarily before clicking the Start now button when creating a document from New from my file. When clicked, it opens the My saved files inbox.
② New from my file
Opens the New from my file page where you can create new documents by uploading your files from your computer.
③ New from template
Opens the New from template page where you can create new documents from templates.
You can create 1 document from a template by clicking the create icon (), and create multiple documents at once from a template by clicking the bulk icon ().
Tip
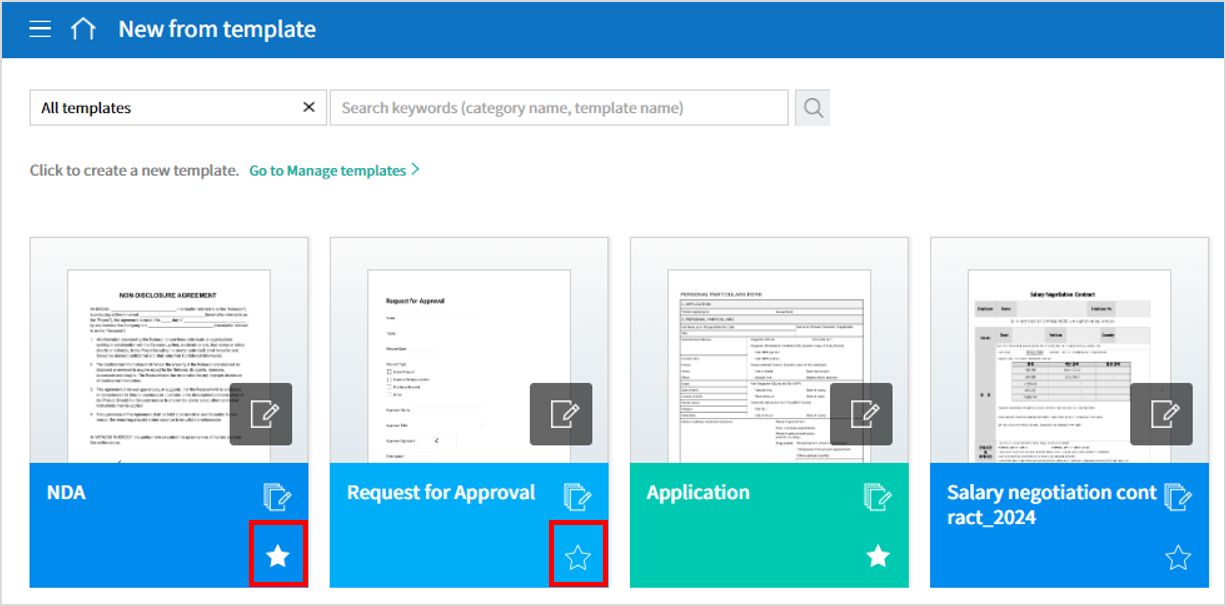
How to add template favorites
The templates you use most often will appear first in your dashboard when you favourite them. You can add templates as favorites in the New from template page.
Go to the New from template menu.
Click the star icon of the template to add it as a favorite.
In your dashboard, you’ll notice that your favourite templates are listed first.
Click the favorites star icon again to remove the template from the favorites list.
To view your personal information you entered when signing up for the eformsign service and the company information, click the see more icon () at the top right corner of the sidebar menu.
If you click the () icon in the sidebar, the following menu is displayed.
Change company: If you are a member of multiple companies, click the Change company menu to view the list of your companies and select a company to switch to.
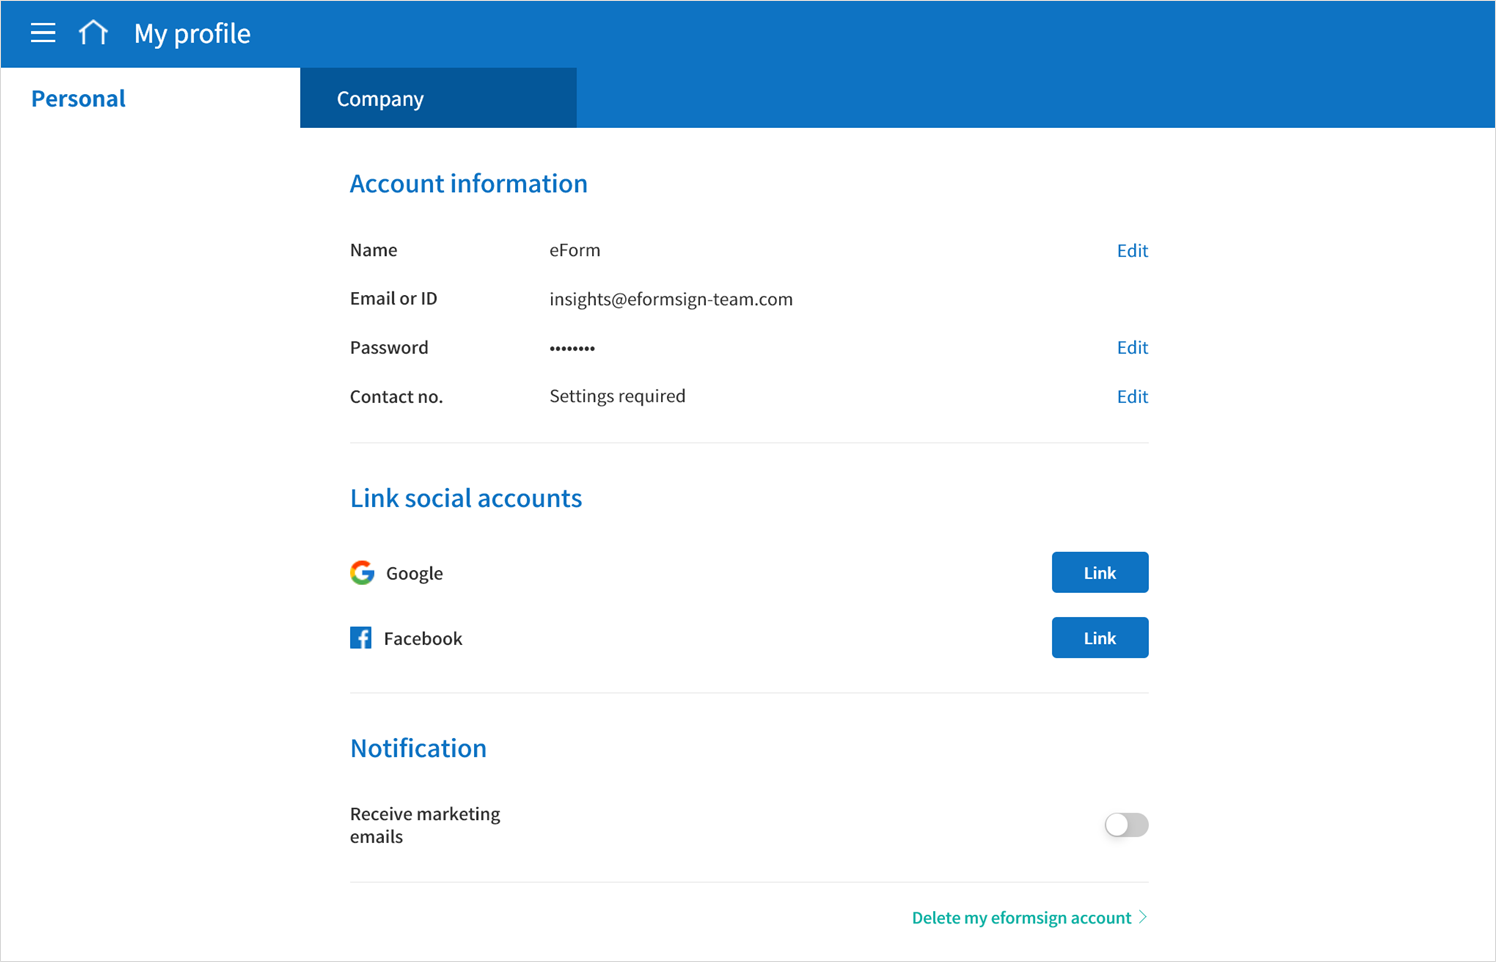
My profile: You can view and edit your personal information you entered when signing up for the eformsign service. You can also view the information of the company you are a member of.
You can view and edit the name, email or ID, password, and contact number of your eformsign account.
Security
You can set up notifications to be sent to your email when you log in to your account.
Link social accounts
You can link or unlink your Google and Facebook social accounts.
Notification
You can view whether you agreed to receive marketing emails. You can also change your selection.
Delete my eformsign account
You can delete your eformsign account by clicking the Delete the eformsign account button.
Note
Key personal information such as name and email are masked in the My profile menu. To view or edit, you must complete login verification by clicking the *View and edit hidden informtio n button. Members can only view information while the administrator and company managers can both view and edit information.
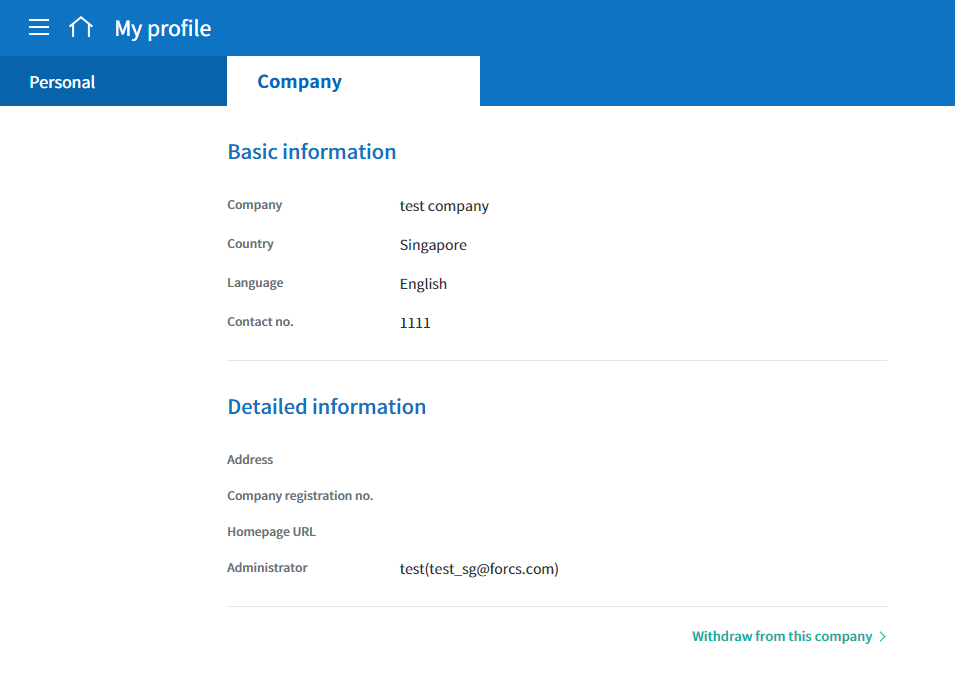
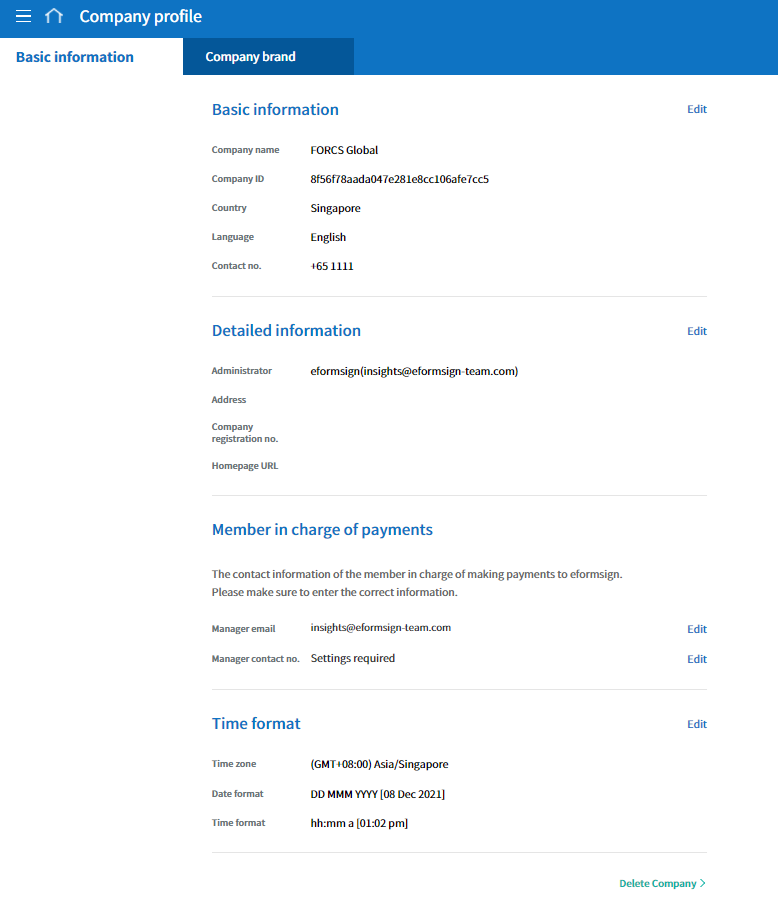
My profile > Company
Basic information
You can view basic information about your company including the company name, country, language, and contact number.
Detailed information
You can view detailed information about your company including the company address, company registration number, homepage URL, and company administrator’s email.
Note
You can only view company information in this page. If you want to edit the information, go to the Manage company > Company profile menu. Only the company administrator or company managers can edit company information.
Withdraw from this company
If you want to withdraw from the company, click the Withdraw from this company button. Then, the list of companies that you are a member of will be displayed and you can select a company that you want to withdraw from.
Important
Even if a member withdraws from a company, the member can still use the eformsign account and join another company or create a new
company.
However, if the company administrator withdraws from the company, the company will also be deleted. If the administrator wants to withdraw from the company without deleting the company, then the administrator needs to delegate permission to another member, and then withdraw from the company. You can delegate the company administrator permission in Manage company > Company profile > Basic information.
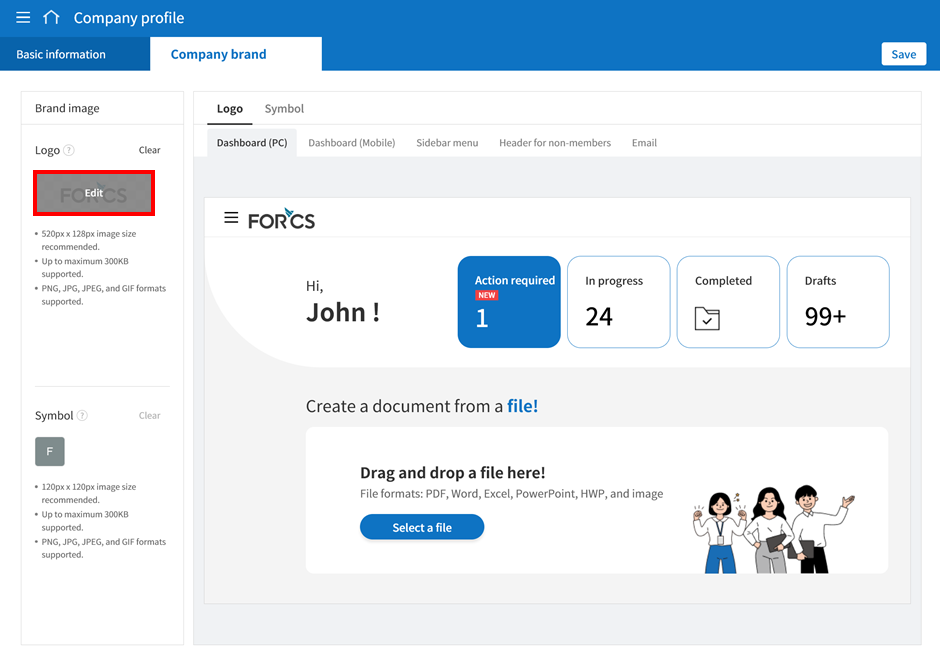
You can replace the eformsign logo and symbol with your company logo and symbol by adding them in the Company profile > Company brand tab.
Note
The difference between a logo and symbol
Both a logo and symbol are representative images of a company.
Usually, a logo has a long horizontal format that includes its brand name and a symbol only has a square image.
On eformsign, a 512 pixel X 128 pixel horizontal image size is recommended for logos, and a 120 pixel X 120 pixel square image size is recommended for symbols.
Permissions can be granted to each member. In eformsign, there are many different permissions. The company admin has access to all.
Company administrator
The company administrator is the representative of the company and has access to all menus. The company administrator can open, create, and manage all documents, as well as having the ability to transfer the company administrator role to another member.
Company manager
Company managers have the ability to access the Manage company menu. Company managers can view and edit company, group, and member information and grant permissions to members as well as having the ability to edit messages in eformsign email and SMS notification templates.
Template manager
Template managers have the permission to access the Manage template menu. Template managers can create new templates by using eformsign for Microsoft Office or Web Form Designer, and can also edit, deploy, and delete templates.
Document manager
Document managers have permission to access the Manage documents menu. They can manage documents created from templates they have access to. If a member is assigned as a document manager of a template, then the member can view, download, permanently remove, and void (excluding completed documents) created from that template.
Note
Manager permission can be granted only by the company administrator in the Manage company > Manage permissions menu.
Template user
Template users can create documents from a template. You can grant this permission for each template. When the permission for a template is granted to a member, the member can create documents from that template in the New from template page.
Template editor
Template editors can edit templates they have permission in.
The user who created a company is the company administrator by default, and the company administrator is the super administrator having all the permissions to use the eformsign service.
The company administrator:
Has access to all the menus.
Can create, edit, delete, and manage templates.
Can create, view, and manage all documents.
Can grant permissions to each member.
Can delegate its role to another member when the company administrator needs to be changed.
When the company administrator deletes their eformsign account, the company is also deleted. If the administrator wants to delete only the account, then she/he can delegate the administrator permission to another member, and then delete the account.
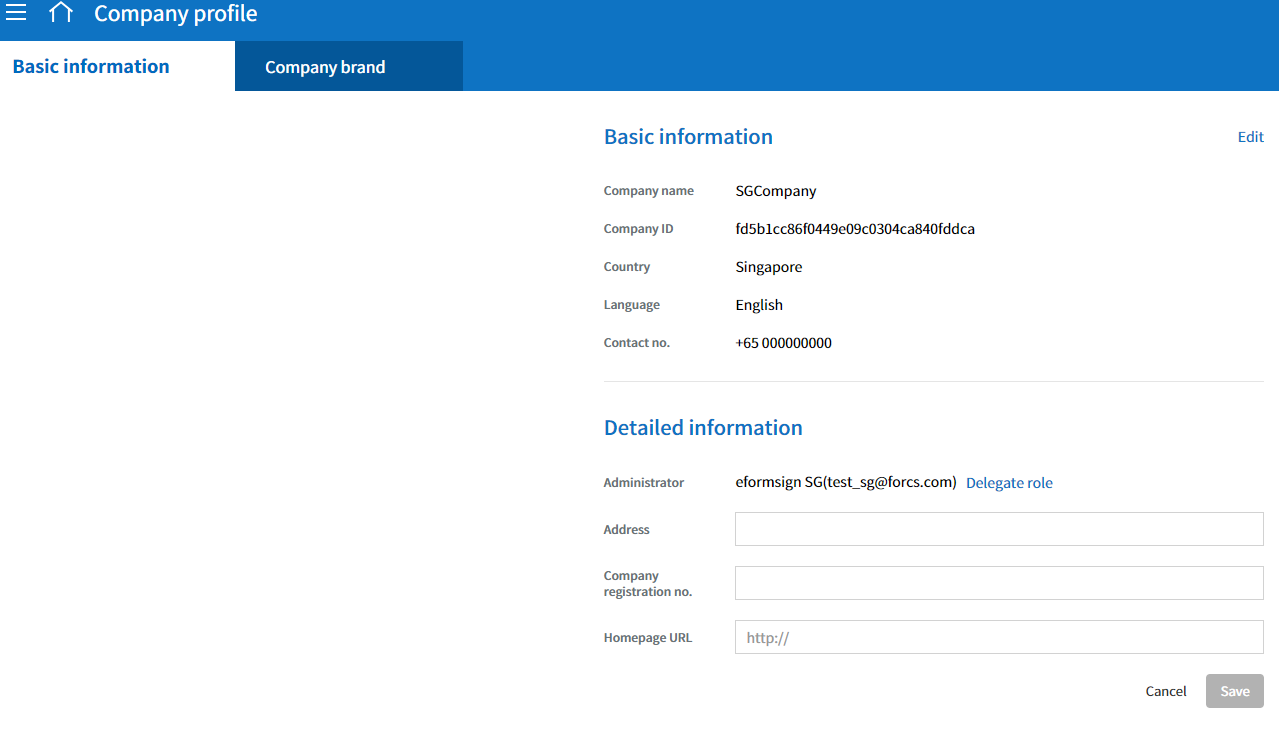
Delegating the Company Administrator Permission
Note
You need to have the company administrator permission to perform this action.
Click the sidebar menu icon, and go to the Manage company > Company profile menu.
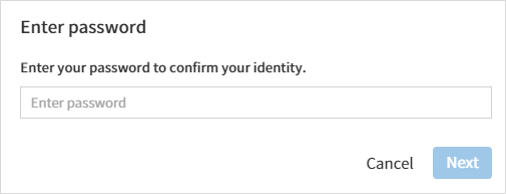
Click the Edit button in the Detailed information section, and then click the Delegate role button on the right side of the Administrator item.
Enter your password and then click the Next button.
Select the member you want.
Click the Confirm button to change the company administrator.
Company managers can access the Manage company menu and can view, edit, and delete information regarding the company and groups/members.
The company manager permission can be granted in the Manage members or the Manage permissions menu.
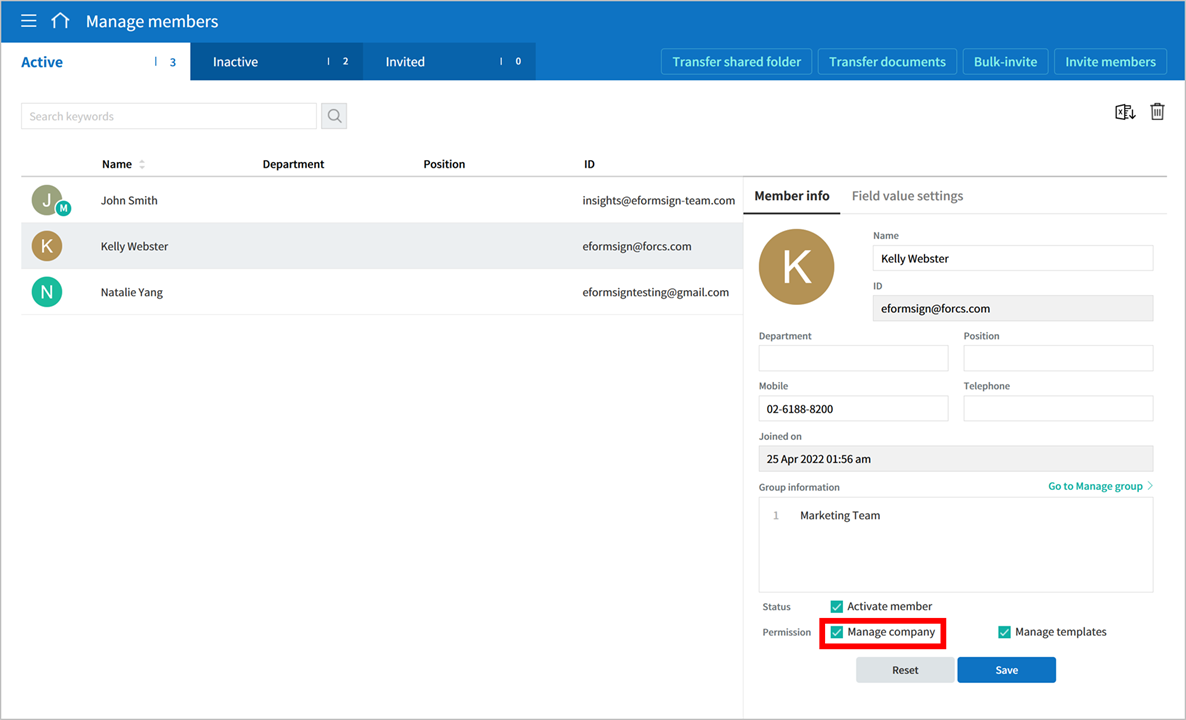
Granting the Company Manager Permission in the Manage company > Manage members menu
Click the sidebar menu icon, and go to the Manage company > Manage members menu.
Select the member in the member list you want to grant the company manager permission.
Tick the Manage company checkbox in the Permission item displayed at the bottom of the Member info tab located to the right of the member list.
Click the Save button.
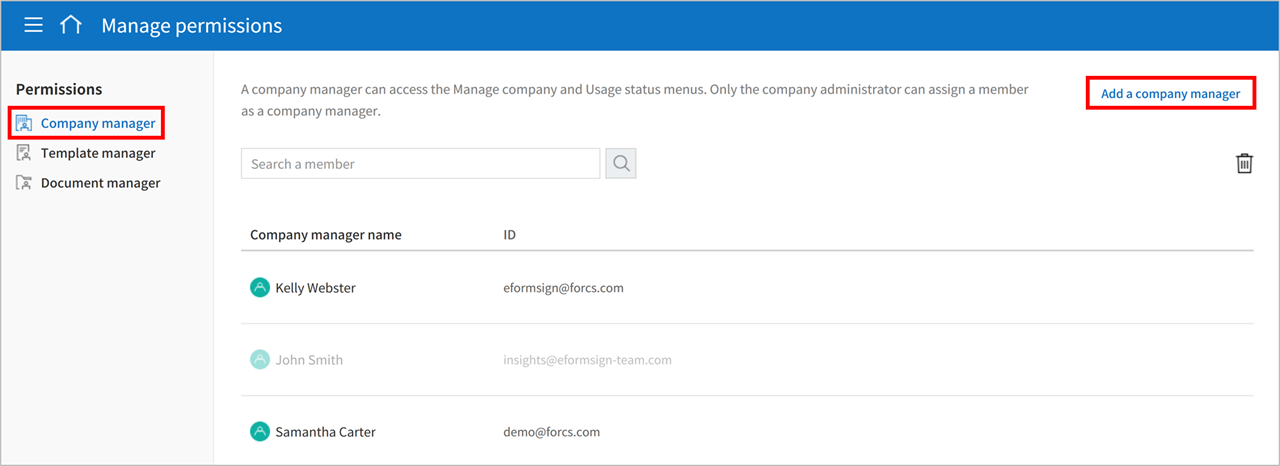
Granting the Company Manager Permission in the Manage company > Manage permissions menu
Click the sidebar menu icon, and go to the Manage company > Manage permissions menu.
Select the Add a company manager button at the top right corner of the screen.
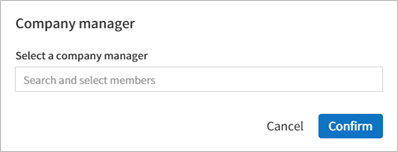
Select the member you want to grant the company manager permission.
Click the Confirm button to grant the member the company manager permission.
Note
To remove the company manager permission from a member, click the trash icon at the top right corner of the screen and select the member you want and then click the Remove button.
Template managers can access the Manage template menu, and can create, edit, deploy, and delete templates.
Note
The template manager who created a template is the template owner of that template by default. However, if multiple template managers exist in a company, a template manager may not necessarily be the template owner of a template.
If the template manager is not the template owner, the template manager can only view the template settings and duplicate the template.
The template manager permission can be granted in the Manage members menu or the Manager permissions menu.
Granting the Template Manager Permission in the Manage company > Manage members menu
Click the sidebar menu icon, and go to the Manage company > Manage members menu.
Select the member in the member list you want to grant the permission.
Tick the Manage templates checkbox in the Permission item displayed at the bottom of the Member info tab to the right of the member list.
Click the Save button.
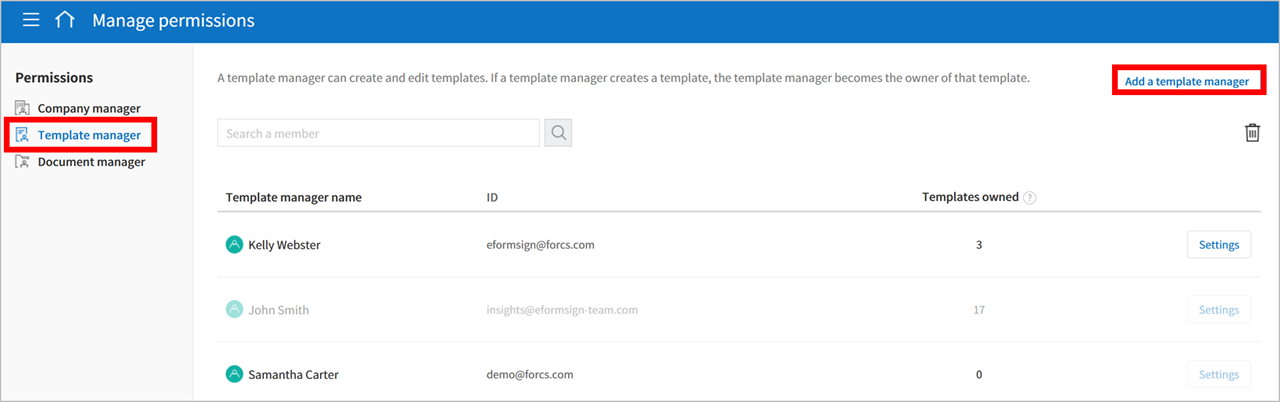
Granting the Template Manager Permission in the Manage company > Manage permissions menu
Click the sidebar menu icon, and go to the Manage company > Manage permissions menu.
Click Template manager on the left side of the screen.
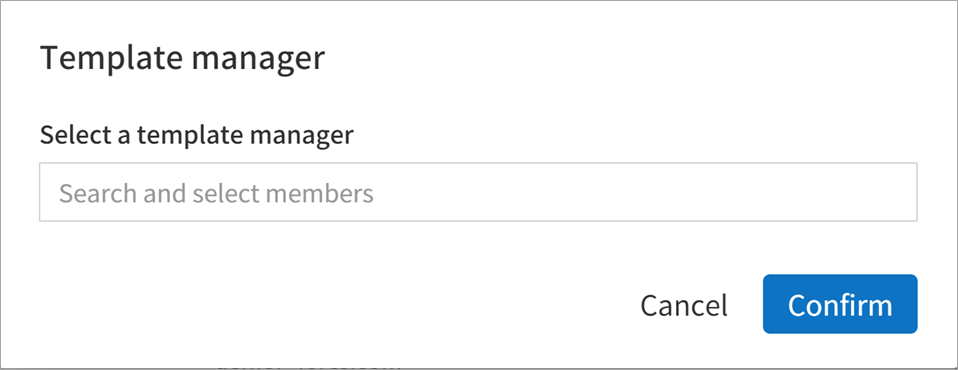
Click the Add a template manager button at the top right corner of the screen.
Select the member you want to grant the template manager permission.
Click the Confirm button to grant the member the template manager permission.
Note
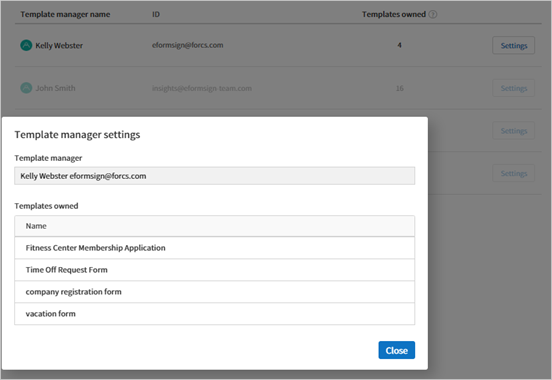
Viewing the number of templates owned by each template manager
You can view the number of templates owned by each template manager in the template manager screen, and can view the list of all templates each template manager owns by clicking the Settings button next to each template manager.
In the Template manager settings pop-up, you can view the list of all the templates owned by the template manager. To change the owner of a template, hover the mouse over the desired template, and then click the Change owner button that will be displayed. Then, select the new template owner in the Change owner pop-up and click the Change button.
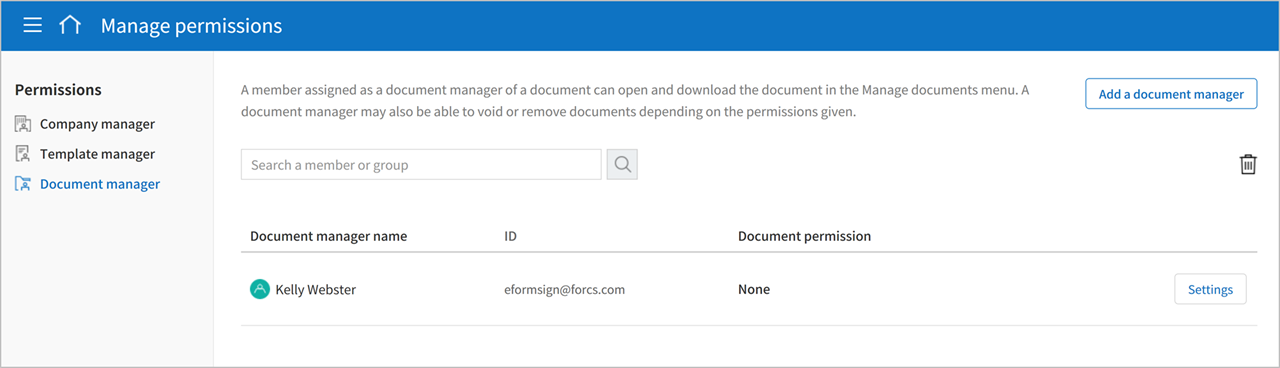
Document managers can access the Manage documents menu, and can view, download, permantely remove, and void (excluding completed documents) created from templates that they have been granted permission to access.
Granting the Document Manager Permission
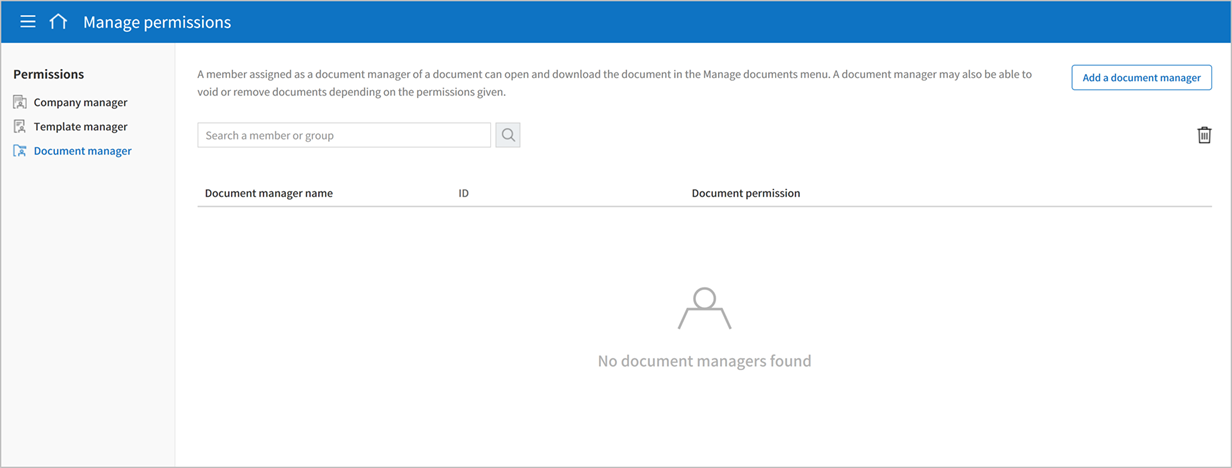
Go to Manage company > Manage permissions in the sidebar menu.
Click Document manager.
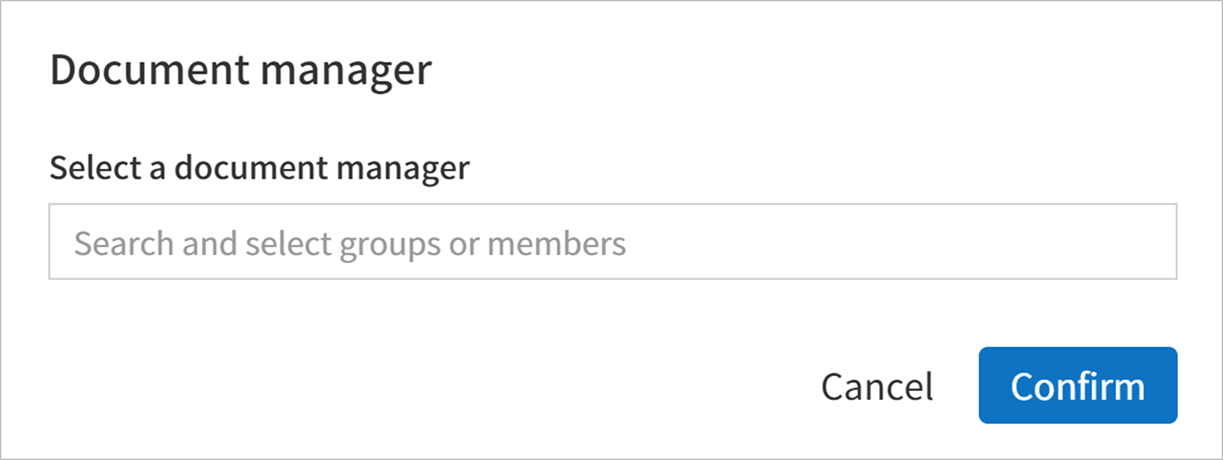
Click the Add a document manager button on the top right corner of the screen.
Select the member you want to grant the document manager permission.
Click the Confirm button to add the member as a document manager.
Click the Settings button to the right of the document manager to configure the settings.
Note
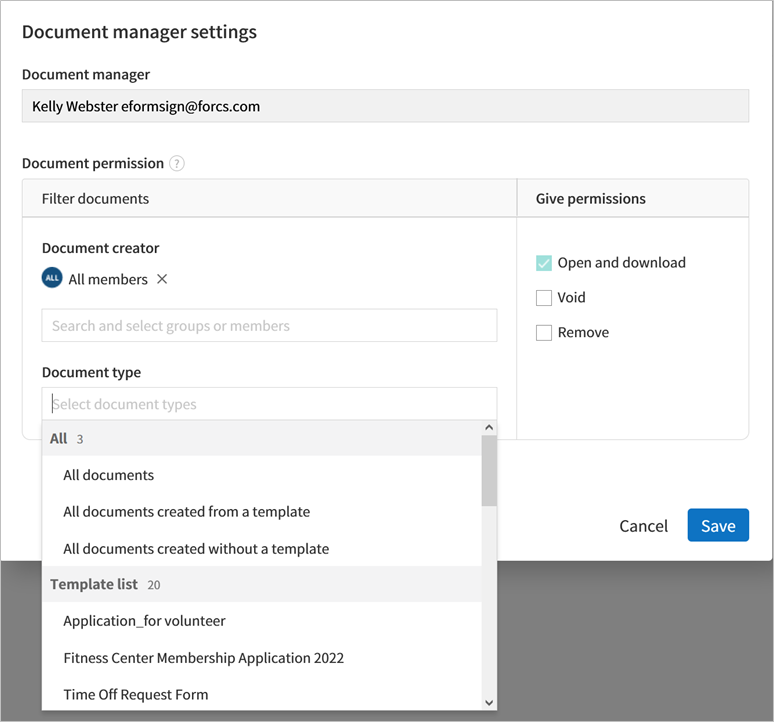
Document manager settings
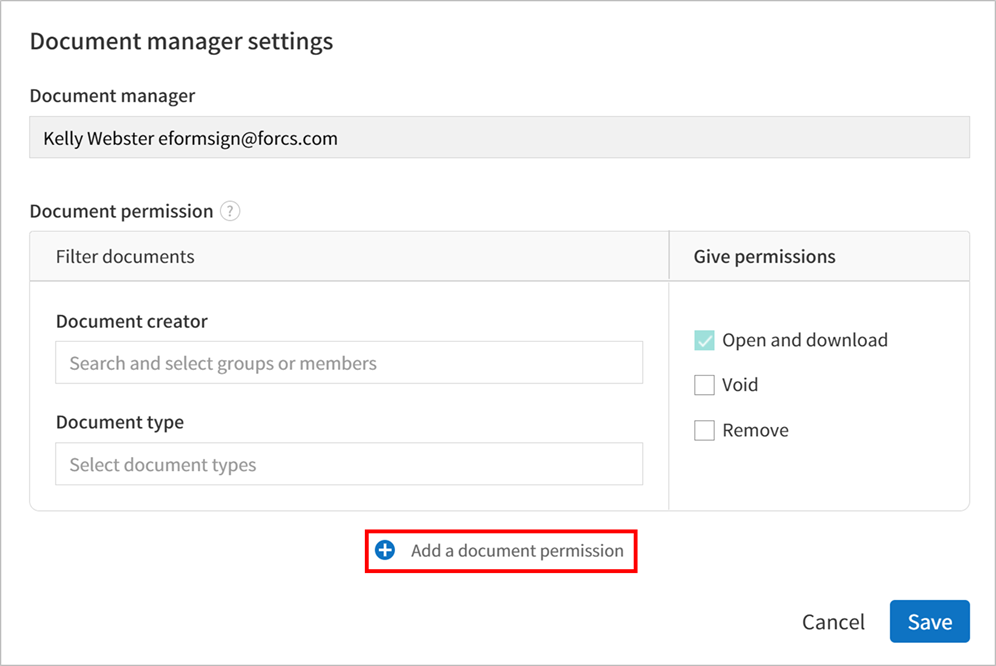
Set the conditions for granting document permission for the document manager.
Document permission: A condition that filters the documents the document manager can manage by document creator and document type. For example, if you select a member named John Doe under document creator and All documents under Document type, then the document manager has the permission to manage all the documents created by John Doe.
Document creator
A condition that filters documents by document creators. You can select all members, groups, or individual members.
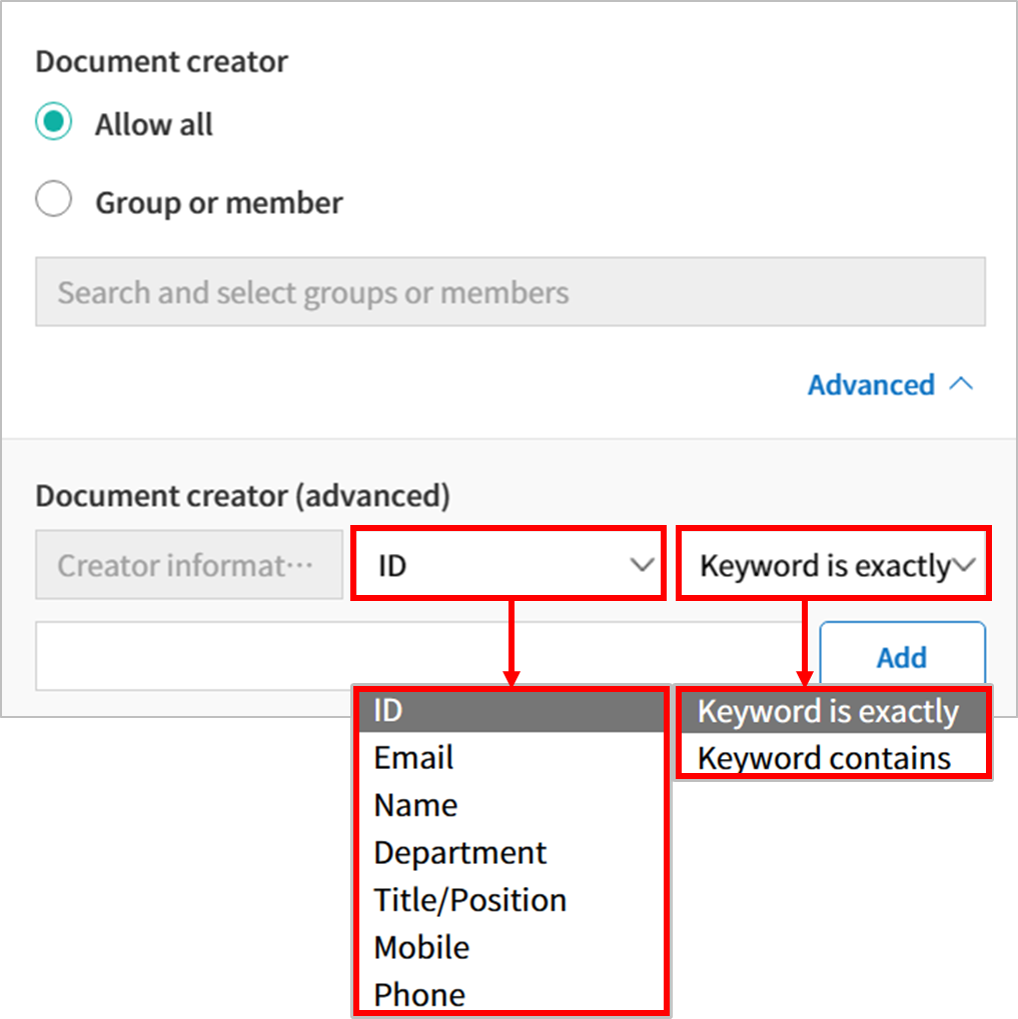
Advanced: The Document creator (advanced) option is displayed when you click Advanced under Document creator. It searches for documents whose creator information matches or contains the keywords.
Document type
All documents: All documents created by the document creators selected above.
All documents created from a template: All documents created by the document creators selected above that are created from a template.
All documents created without a template: All documents created by the document creators selected above that are created using New from my file.
Template list: All documents created by the document creators selected above from the selected templates that are created from the selected templates.
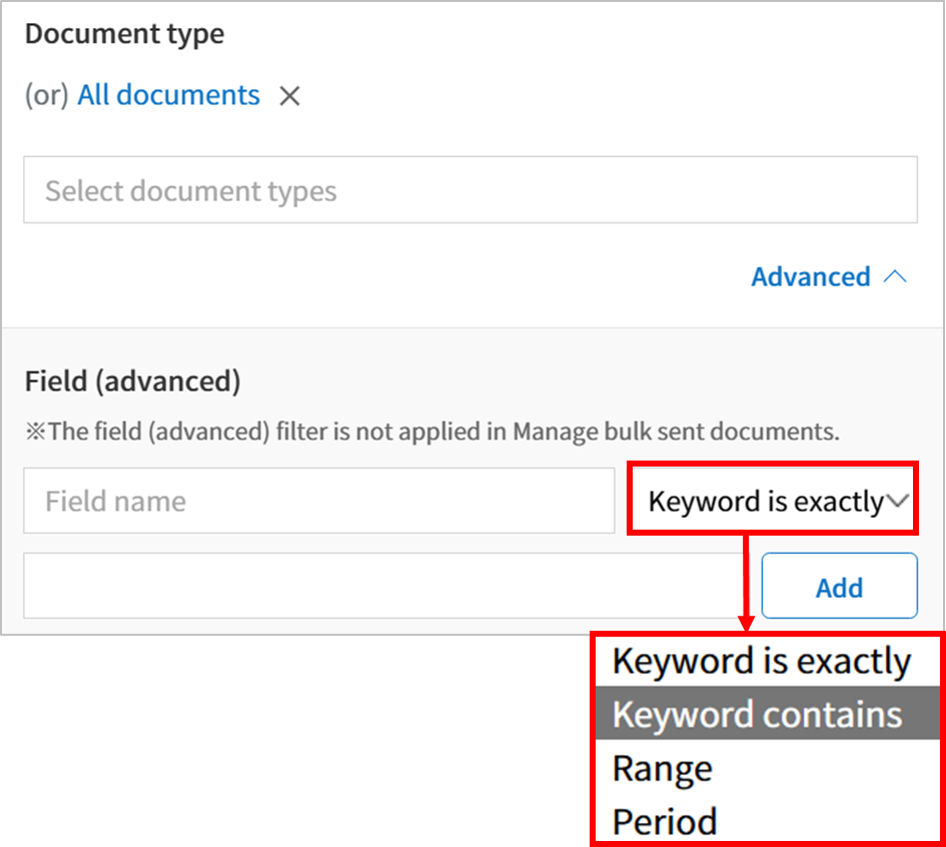
Advanced: The Field (advanced) option is displayed when you click Advanced under Document type. It searches for documents containing a particular field within a specific period/range or searches for documents containing a specific field with a specific value.
📣 The Advanced option allows you to add/delete multiple conditions and filter with an “OR” condition. Also, it cannot be applied in Manage bulk sent documents.
Give permissions: Check the permissions you want to give to the document manager for the filtered documents.
Open and download: The default permission granted to the document manager. The document manager can open and download all documents filtered using Document creator and Document type conditions.
Void: Permission to void documents (excluding completed ones) created by a selected document creator, if the document creator requested the document to be voided
Remove: Permission to permanently remove documents from eformsign.
Tip
You can click the below + Add a document permission button to add more document conditions.
Set the permissions and the scope of the permissions to be granted to the document manager.
Filter documents: A condition that filters the documents the document manager can manage by document creator and document type. For example, if you select a member named John Doe under document creator and All documents under Document type, then the document manager has the permission to manage all the documents created by John Doe.
Document creator
A condition that filters documents by document creators. You can select all members, groups, or individual members.
Document type
Filter documents by document type as follows.
All documents: All documents created by the document creators selected above.
All documents created from a template: All documents created by the document creators selected above that are created from a template.
All documents created without a template: All documents created by the document creators selected above that are created using New from my file.
Template list: All documents created by the document creators selected above from the selected templates that are created from the selected templates.
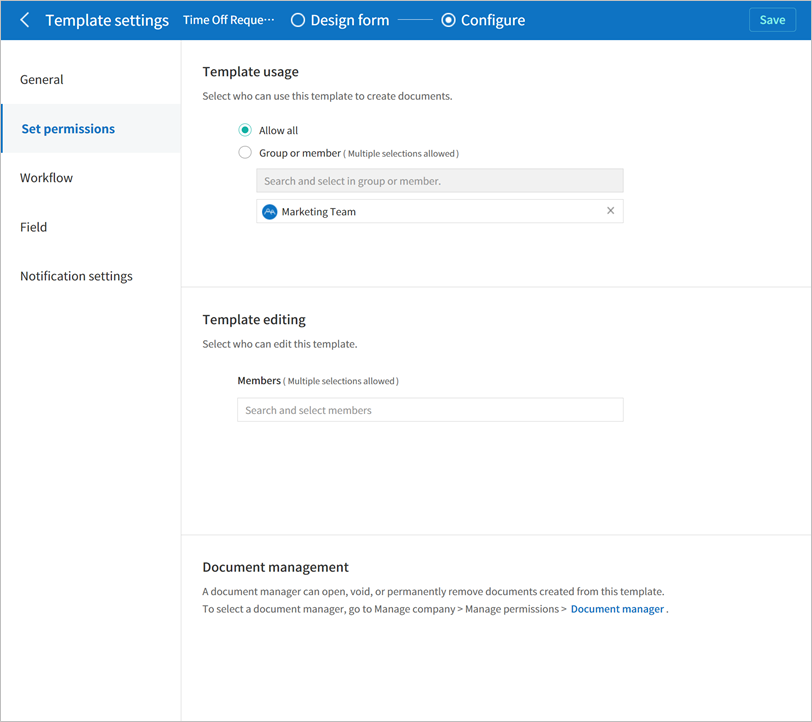
You can grant two types permissions for each template: Template usage for using the template to create documents and Template editing for editing the template.
A member who has been granted the Template usage permission for a template can create new documents from that template by clicking New from template.
A member who has been granted the Template editing permission for a template can edit that template.
Caution
The template editing permission can be granted only to template managers.
Granting Permissions
Note
You need to have either the Company administrator or Template manager permission to perform this action.
Click the sidebar menu icon, and go to the Manage templates menu.
Click the Template settings () icon.
Go to the Set permissions tab.
Select the groups or members you want to grant the Template usage permission and the Template editing permission. Note that you can only select members (not groups) as template editors.
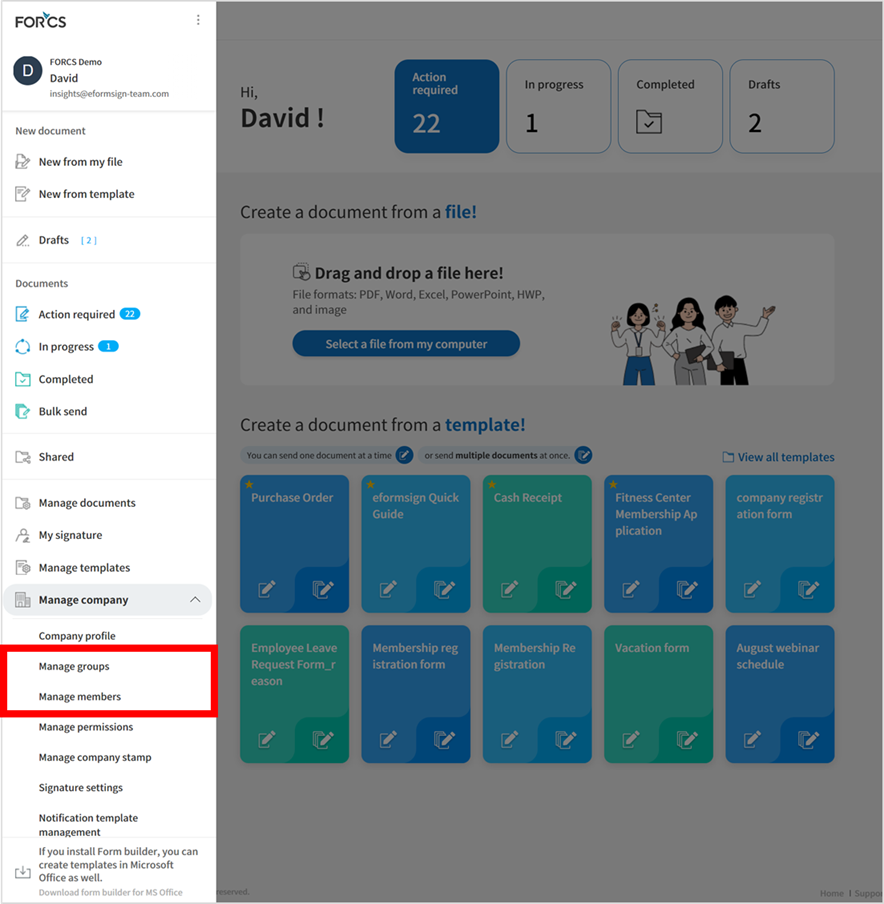
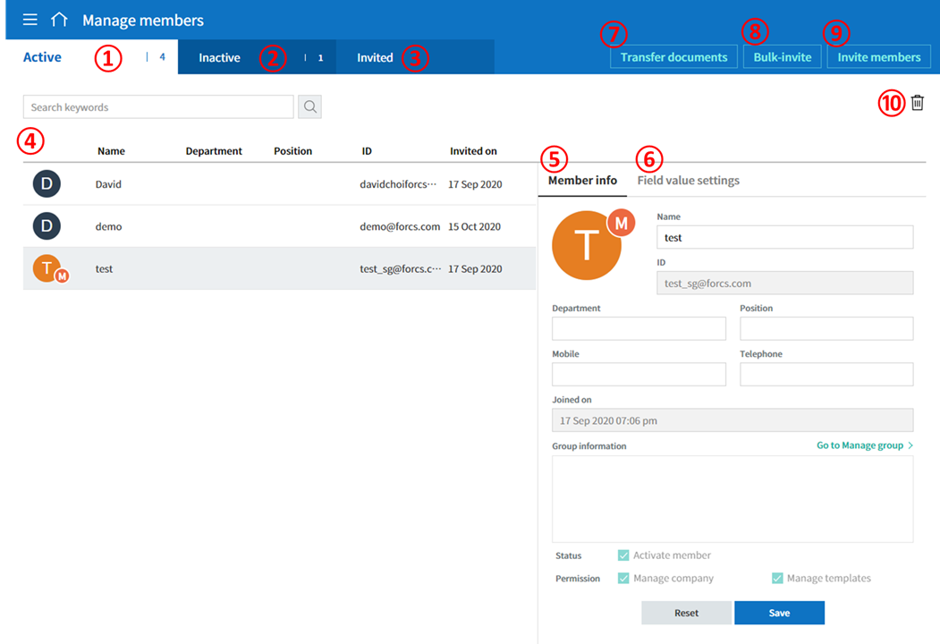
You can invite members to your company or manage invited members in the Manage members menu.
① Active
You can view the list of active members in the company and their information.
② Inactive
You can view the list of inactive members in the company and their information.
③ Invited
You can view the list of members invited to the company and their information.
④ Member list
You can view, edit, or delete the information of a member by selecting a member in the member list and then going to the Member
info tab on the right.
⑤ Member info
You can view the member information, change the member status, and grant permissions including Manage company and Manage templates to members.
⑥ Field value settings
You can set the field values that are related to members.
⑦ Transfer shared folder
You can transfer a shared folder owned by a member to another member. If a member owns multiple shared folders, then the member can bulk transfer all of them or only some of them.
⑧ Transfer documents
Sometimes you may have to transfer a member’s documents to another member due to reasons such as a member leaving the company or transferring to another department. You can use this feature to transfer documents in all status (excluding draft) from the source member to the target member, with the status of transferred documents remaining the same after the transfer.
⑨ Bulk invite
You can invite multiple members at once.
⑩ Invite members
You can invite members via email or ID.
Important
Member invitation links sent via email or SMS are valid for 7 days.
If an invited person does not accept the invitation within 7 days, then you must reinvite the person.
⑪ Download member list
Download the list of members that belong to the company in CVS format.
⑫ Delete
When you click the Trash icon, a checkbox will be activated next to each member in the member list. Tick the members you want to delete and click the Delete button.
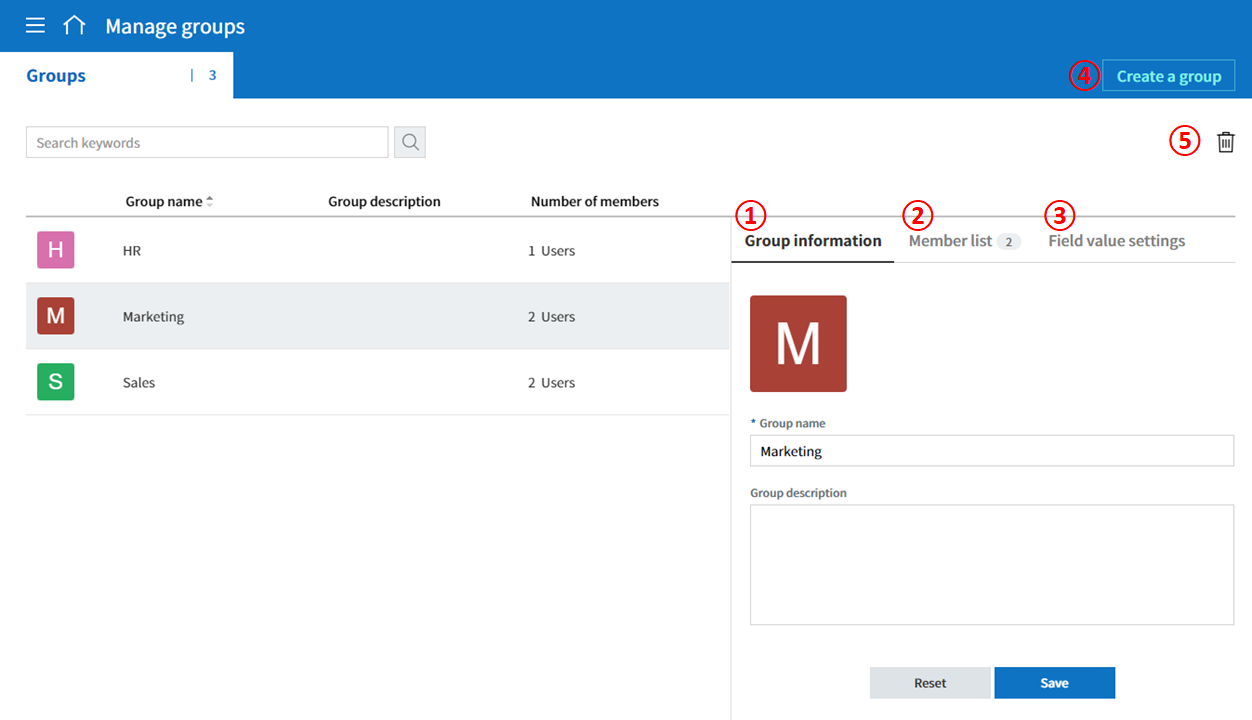
You can create groups in the company and view, edit, or delete each group’s information.
① Group information
When you select a group in the list, you can view the name and description of the group on the right side. You can also edit the group information in the Group information tab.
② Member list
You can view the list of the members in the group and can add or remove members from the group.
③ Field value settings
You can set the field values that are related to the group.
④ Create a group
When you click the Create a group button, the Create a group pop-up window will be displayed. Create a group by entering the group name and description, and adding members by searching.
⑤ Delete a group
When you click the Trash icon, a checkbox will be activated next to each group in the group list. Tick the groups you want to delete and click the Delete button.
The Contacts menu allows you to add and manage non-member contacts, as well as view company contacts added by the administrator.
Contacts can be easily selected from the contact list when sending documents.
My contacts: Non-member contacts added in My contacts or in the Send document pop-up.
Shared contacts: Contacts shared with all members due to the admin or company managers adding them.
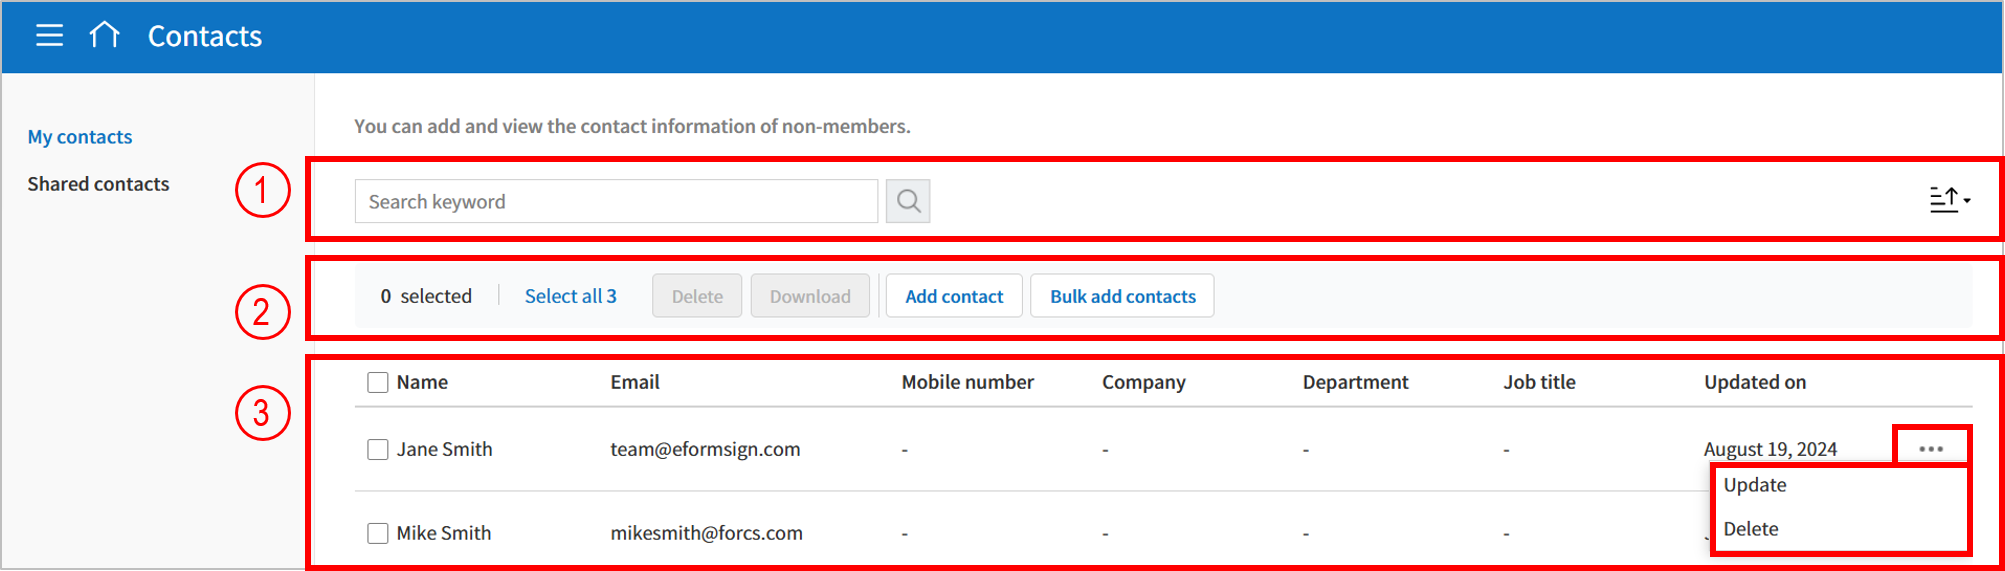
Allows you to add and manage non-member contacts that you use frequently.
① Search and sort contacts
Keyword search: You can search the contact list by entering keywords such as name or email.
Sort: Click the sort icon on the top right corner to sort the contact list in ascending or descending order by name, email, and more.
② Select and add contacts
Select all: Select all the contacts shown in the list.
Delete: Delete all selected contacts.
Download: Download all selected contact info as an Excel file.
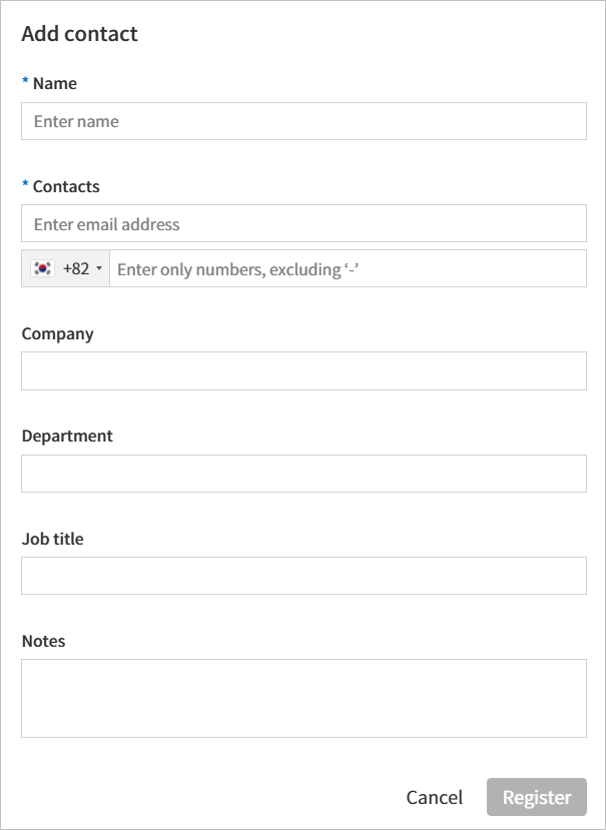
Add contact: Add new contact.
Bulk add contacts: Add new contacts in bulk. You can add up to 1,000 contacts at once.
③ Contact list
Shows all added list of contacts. You can click the see more (⋯) menu on the right to Update or Delete.
Tip
When you enter information for a non-member recipient that is not added in your contacts in the Send document popup, the contact will be automatically added to My contacts.
You can add up to 1,000 contacts in bulk using an Excel file.
Click the Bulk add contacts button.
Click the Download Excel file to download the file.
Open the downloaded Excel file, enter the contact information in the specified format, and save it.
Click the Upload file button to upload the file.
Click the Register button to bulk add contacts.
Note
Instructions for filling out out the bulk add contacts Excel file
You must enter both the name and contact information (email or mobile number).
If the contact information entered in the Excel file matches an existing contact under the following conditions, the existing contact will be updated with the latest information:
Same name and email
Same name and mobile number
Same name, email, and mobile number
Duplicate contacts will not be added. Instead, the existing information will be updated.
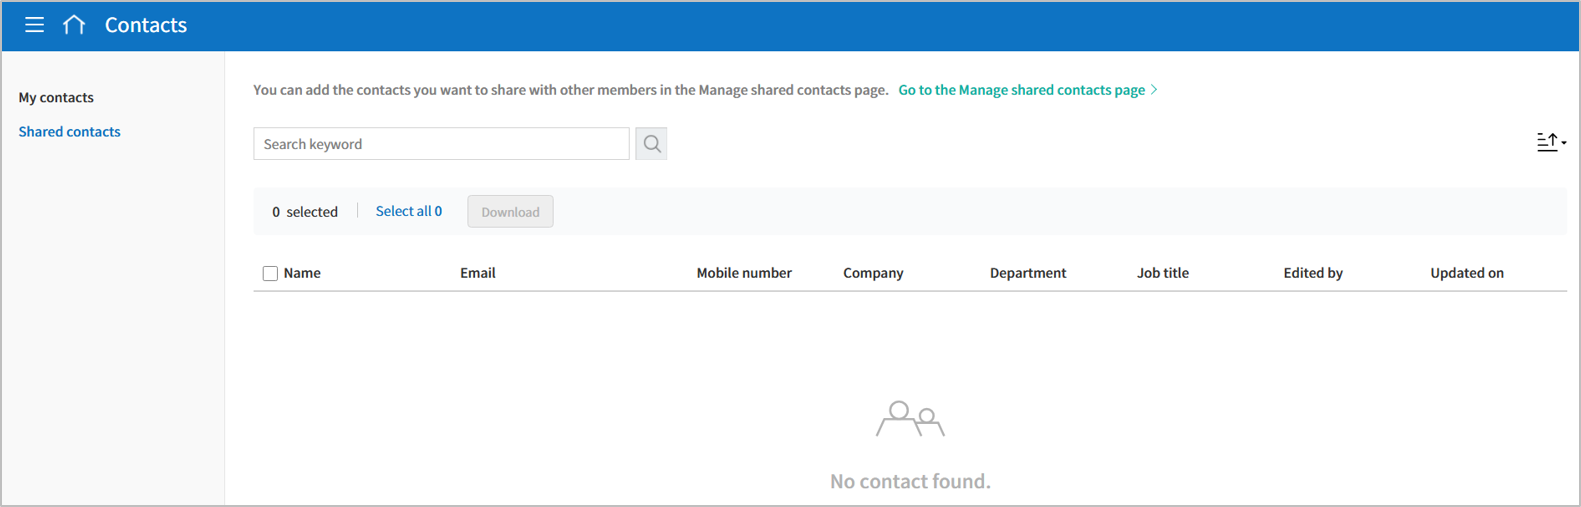
You can add and manage shared contacts that can be accessed by all company members.
Added contacts are automatically shared with all members and displayed under Contacts > Shared contacts.
You can register up to 1,000 contacts at once using an Excel file.
Click Bulk add contacts.
Click the Download Excel file button to download the file.
Open the downloaded Excel file, enter the contact information according to the template format, and save it.
Click the Upload File button to upload the completed file.
Click the Register button to bulk add contacts.
Note
Instructions for filling out the bulk add contacts Excel File
You must enter both the name and contact information (email or mobile number).
If the contact information entered in the Excel file matches an existing contact under the following conditions, the existing contact will be updated with the latest information:
Same name and email
Same name and mobile number
Same name, email, and mobile number
Duplicate contacts will not be added. Instead, existing information will be updated instead.
You can add your signature and initial in browsers (PC andmobile)and apps (mobile).
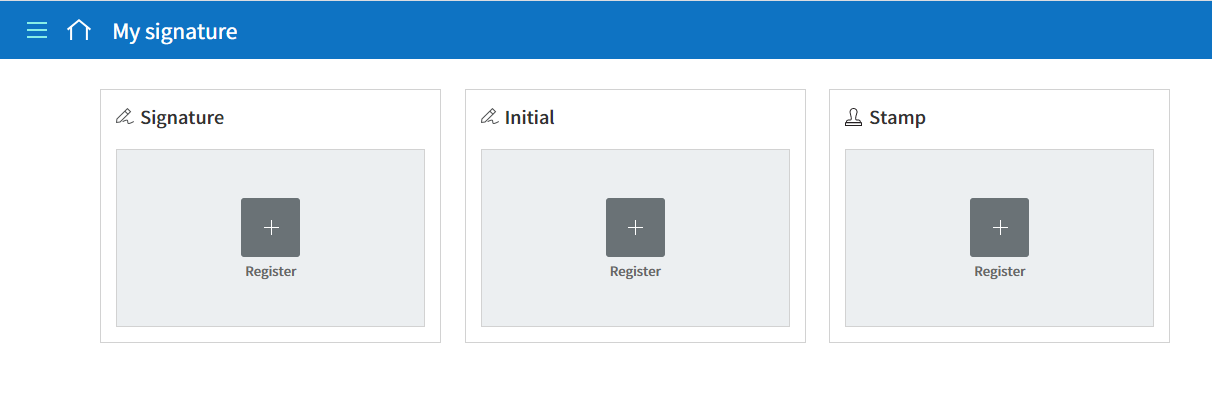
Click the sidebar menu icon, and go to the My signature menu.
Click the Register button in the Signature or Initial section to add a new signature or initial.
Draw
You can draw your signature on the screen.
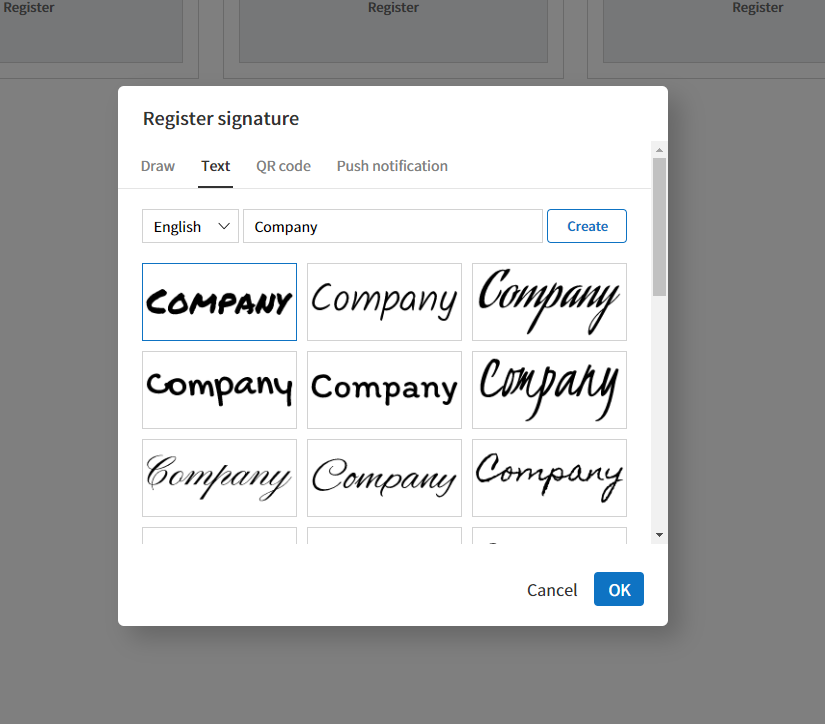
Text
Type your name, and then select a signature style.
Mobile
If you scan the QR code with your smartphone camera, you can access the sign pad page. Draw your signature on the sign pad.
eformsign App
Select a mobile device you want to connect to and click the Send button. You can draw your signature using the eformsign app installed on the connected device.
Click the Save button to save the signature/initial.
Click the Edit or Delete button to edit or delete the signature.
Tip
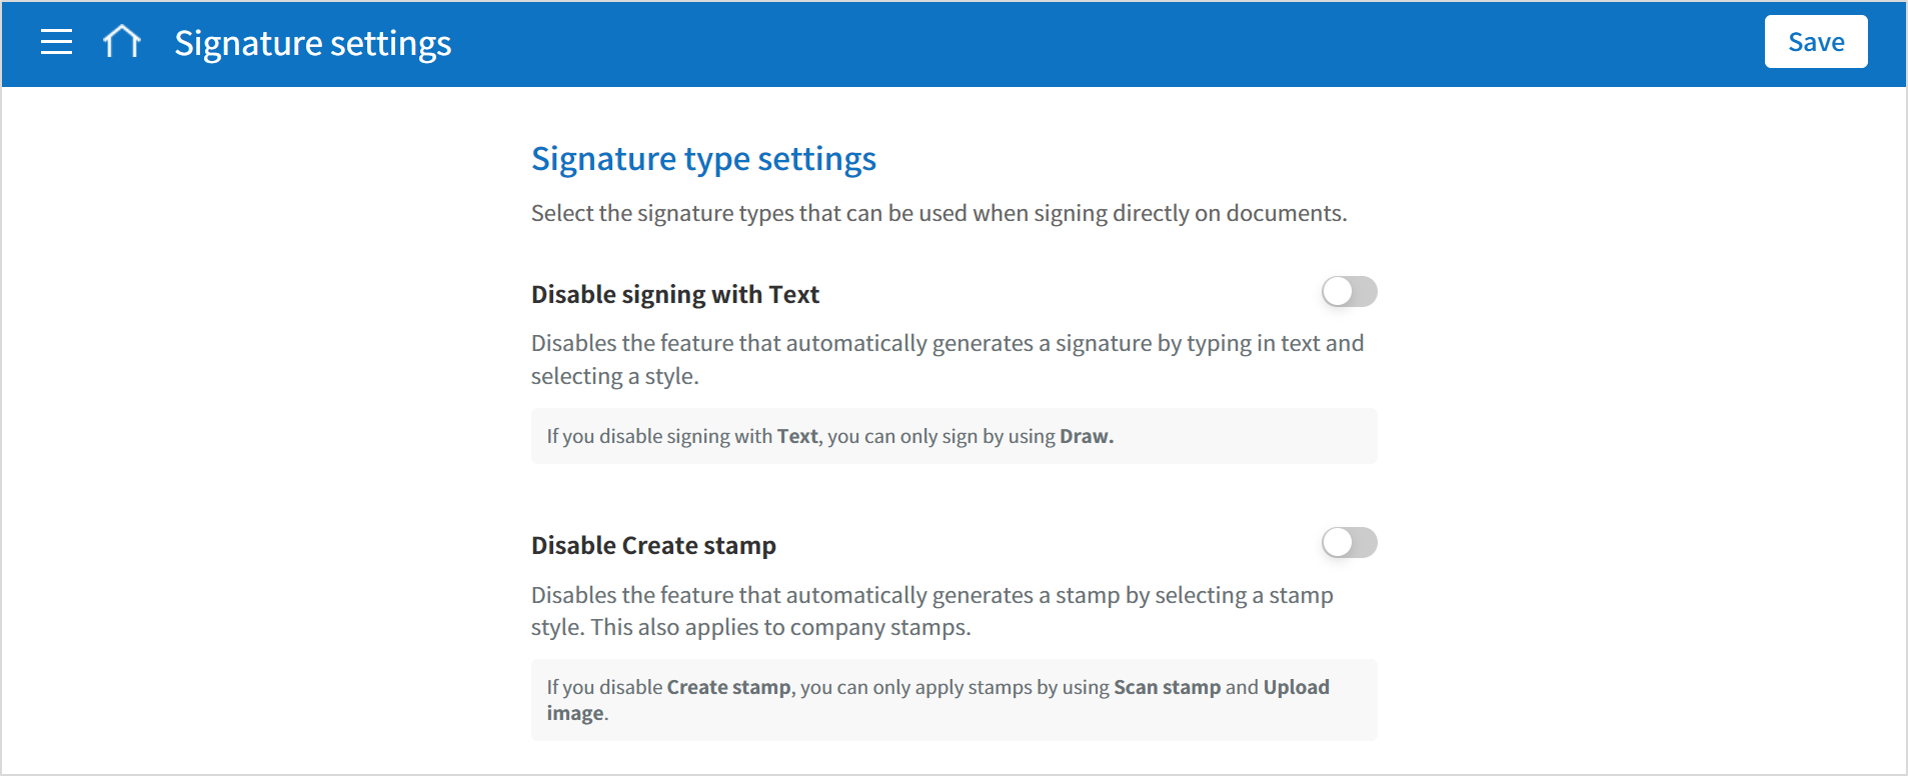
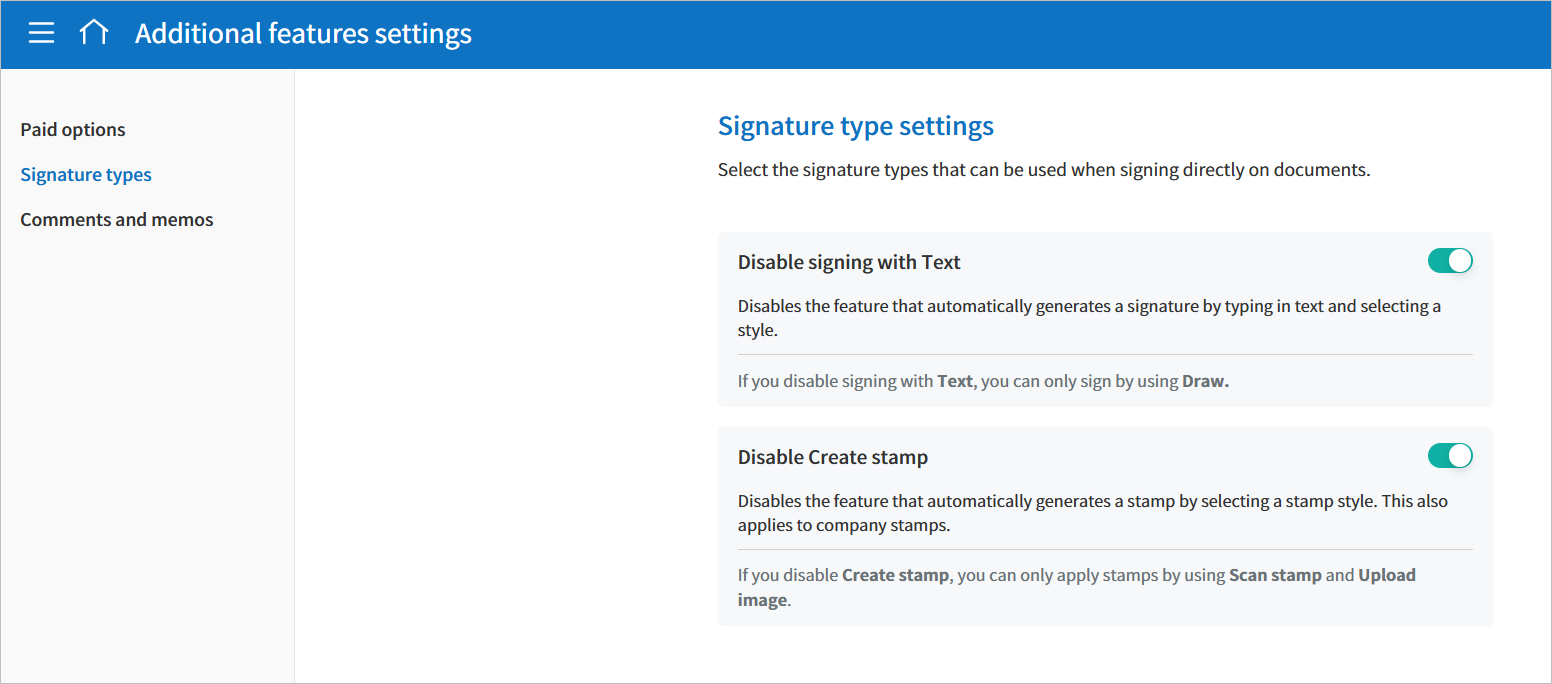
You can select the signature types that can be used when signing on documents.
In Manage company > Signature settings, you can disable or enable the signing methods (such as signing with text and create stamp) that can be used when signing a signature or stamp.
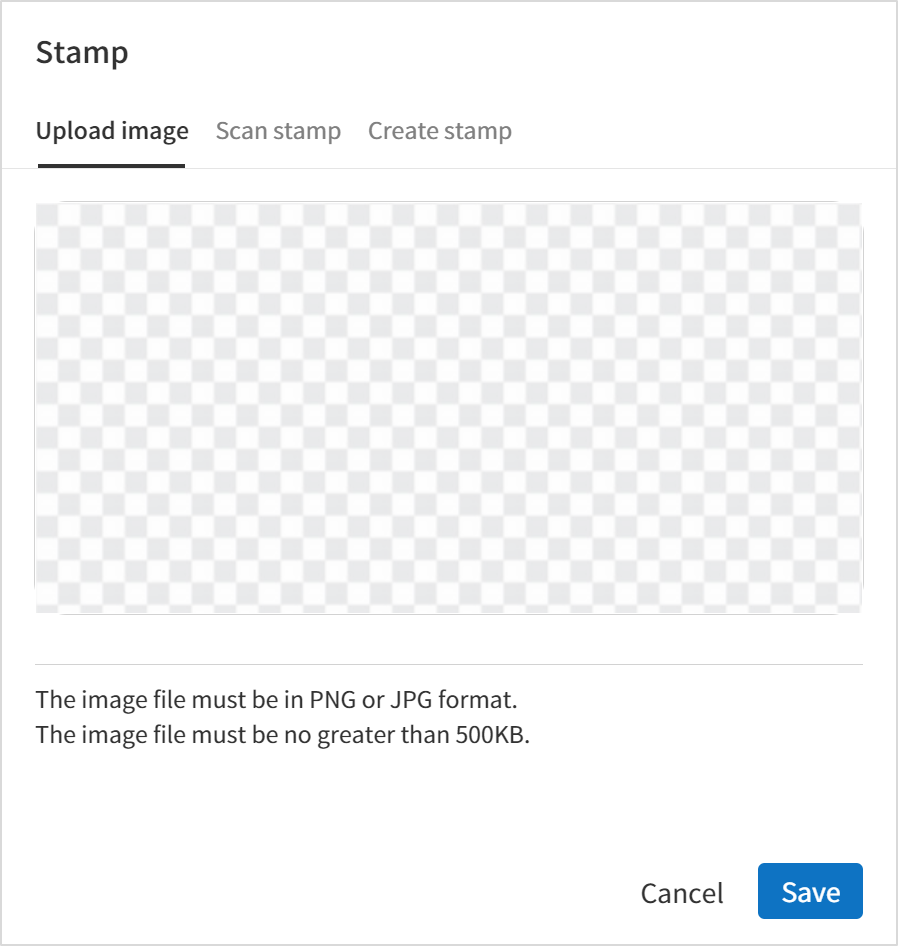
Some documents may require a seal or stamp rather than a signature or initial. In eformsign, there are three ways to add a stamp: creating a stamp, uploading an image, and scanning a stamp.
Important
❗The stamps in My signature are not the same as company stamps.
For official stamps such as corporate seals, use them by adding them as company stamps.
Once you adding one as a company stamp, you can grant permissions to members/groups, and can view its usage history.
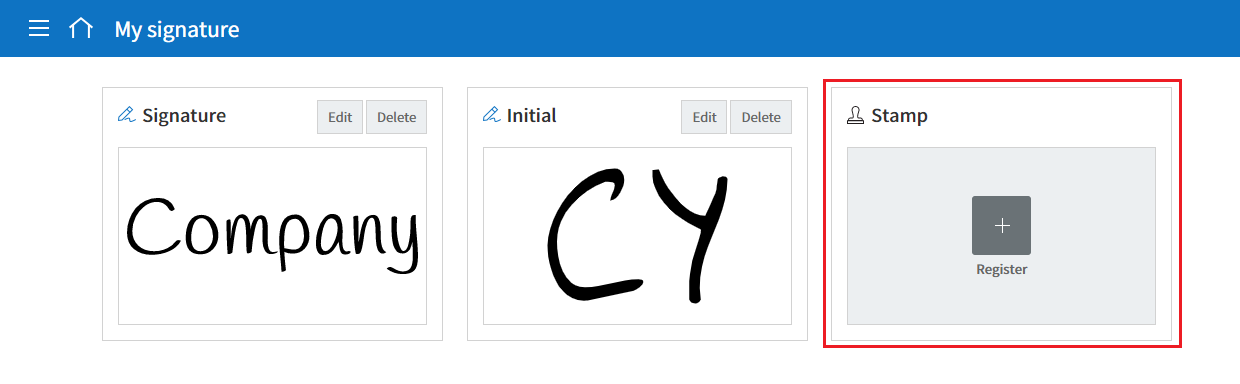
Click the sidebar menu icon, and go to the My signature menu.
Click the Register button in the Stamp section to add a new stamp.
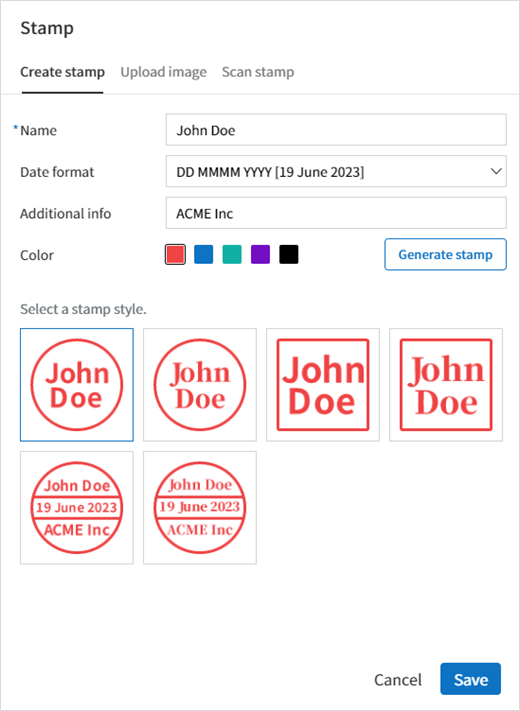
Click the Create stamp tab in the pop-up displayed and create a name for the stamp and choose the date format, enter additional info, and choose the stamp color. Then, click the Generate stamp button and click the Save button to save the stamp.
Click the Edit or Delete button to edit or delete the added stamp.
Tip
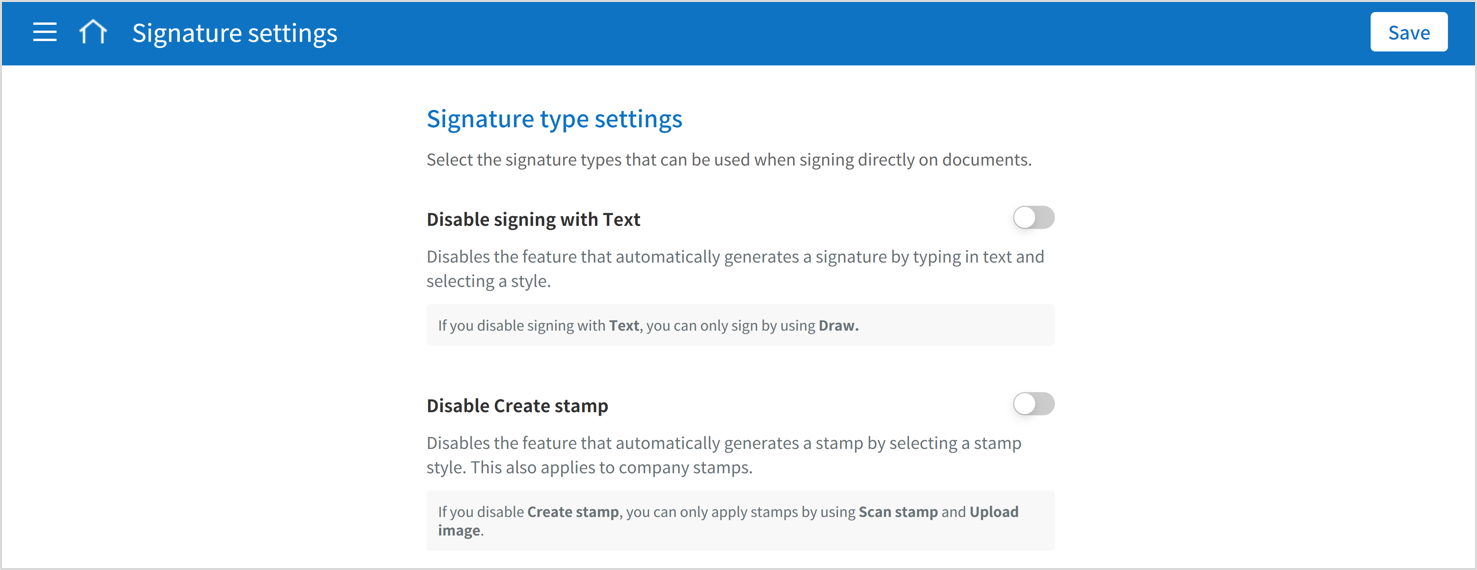
Disabling the create stamp feature
To disable the Create stamp feature when applying a stamp in the signature field, disable the feature in Manage company > Signature settings.
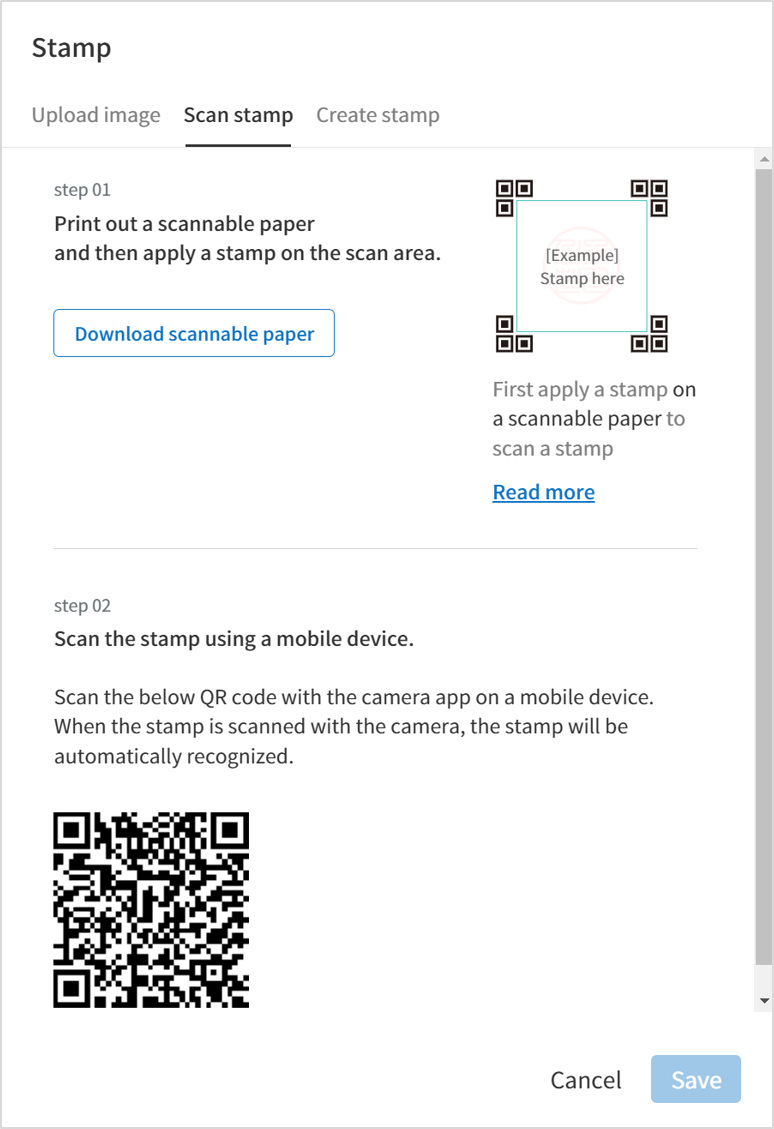
To scan a stamp, you must have a stamp ready to scan and download and print out the Scannable paper for stamps from eformsign.
Scanning a stamp on a PC
Go to the My signature page -> click the Register button under Stamp-> click the Scan stamp tab on the pop-up displayed.
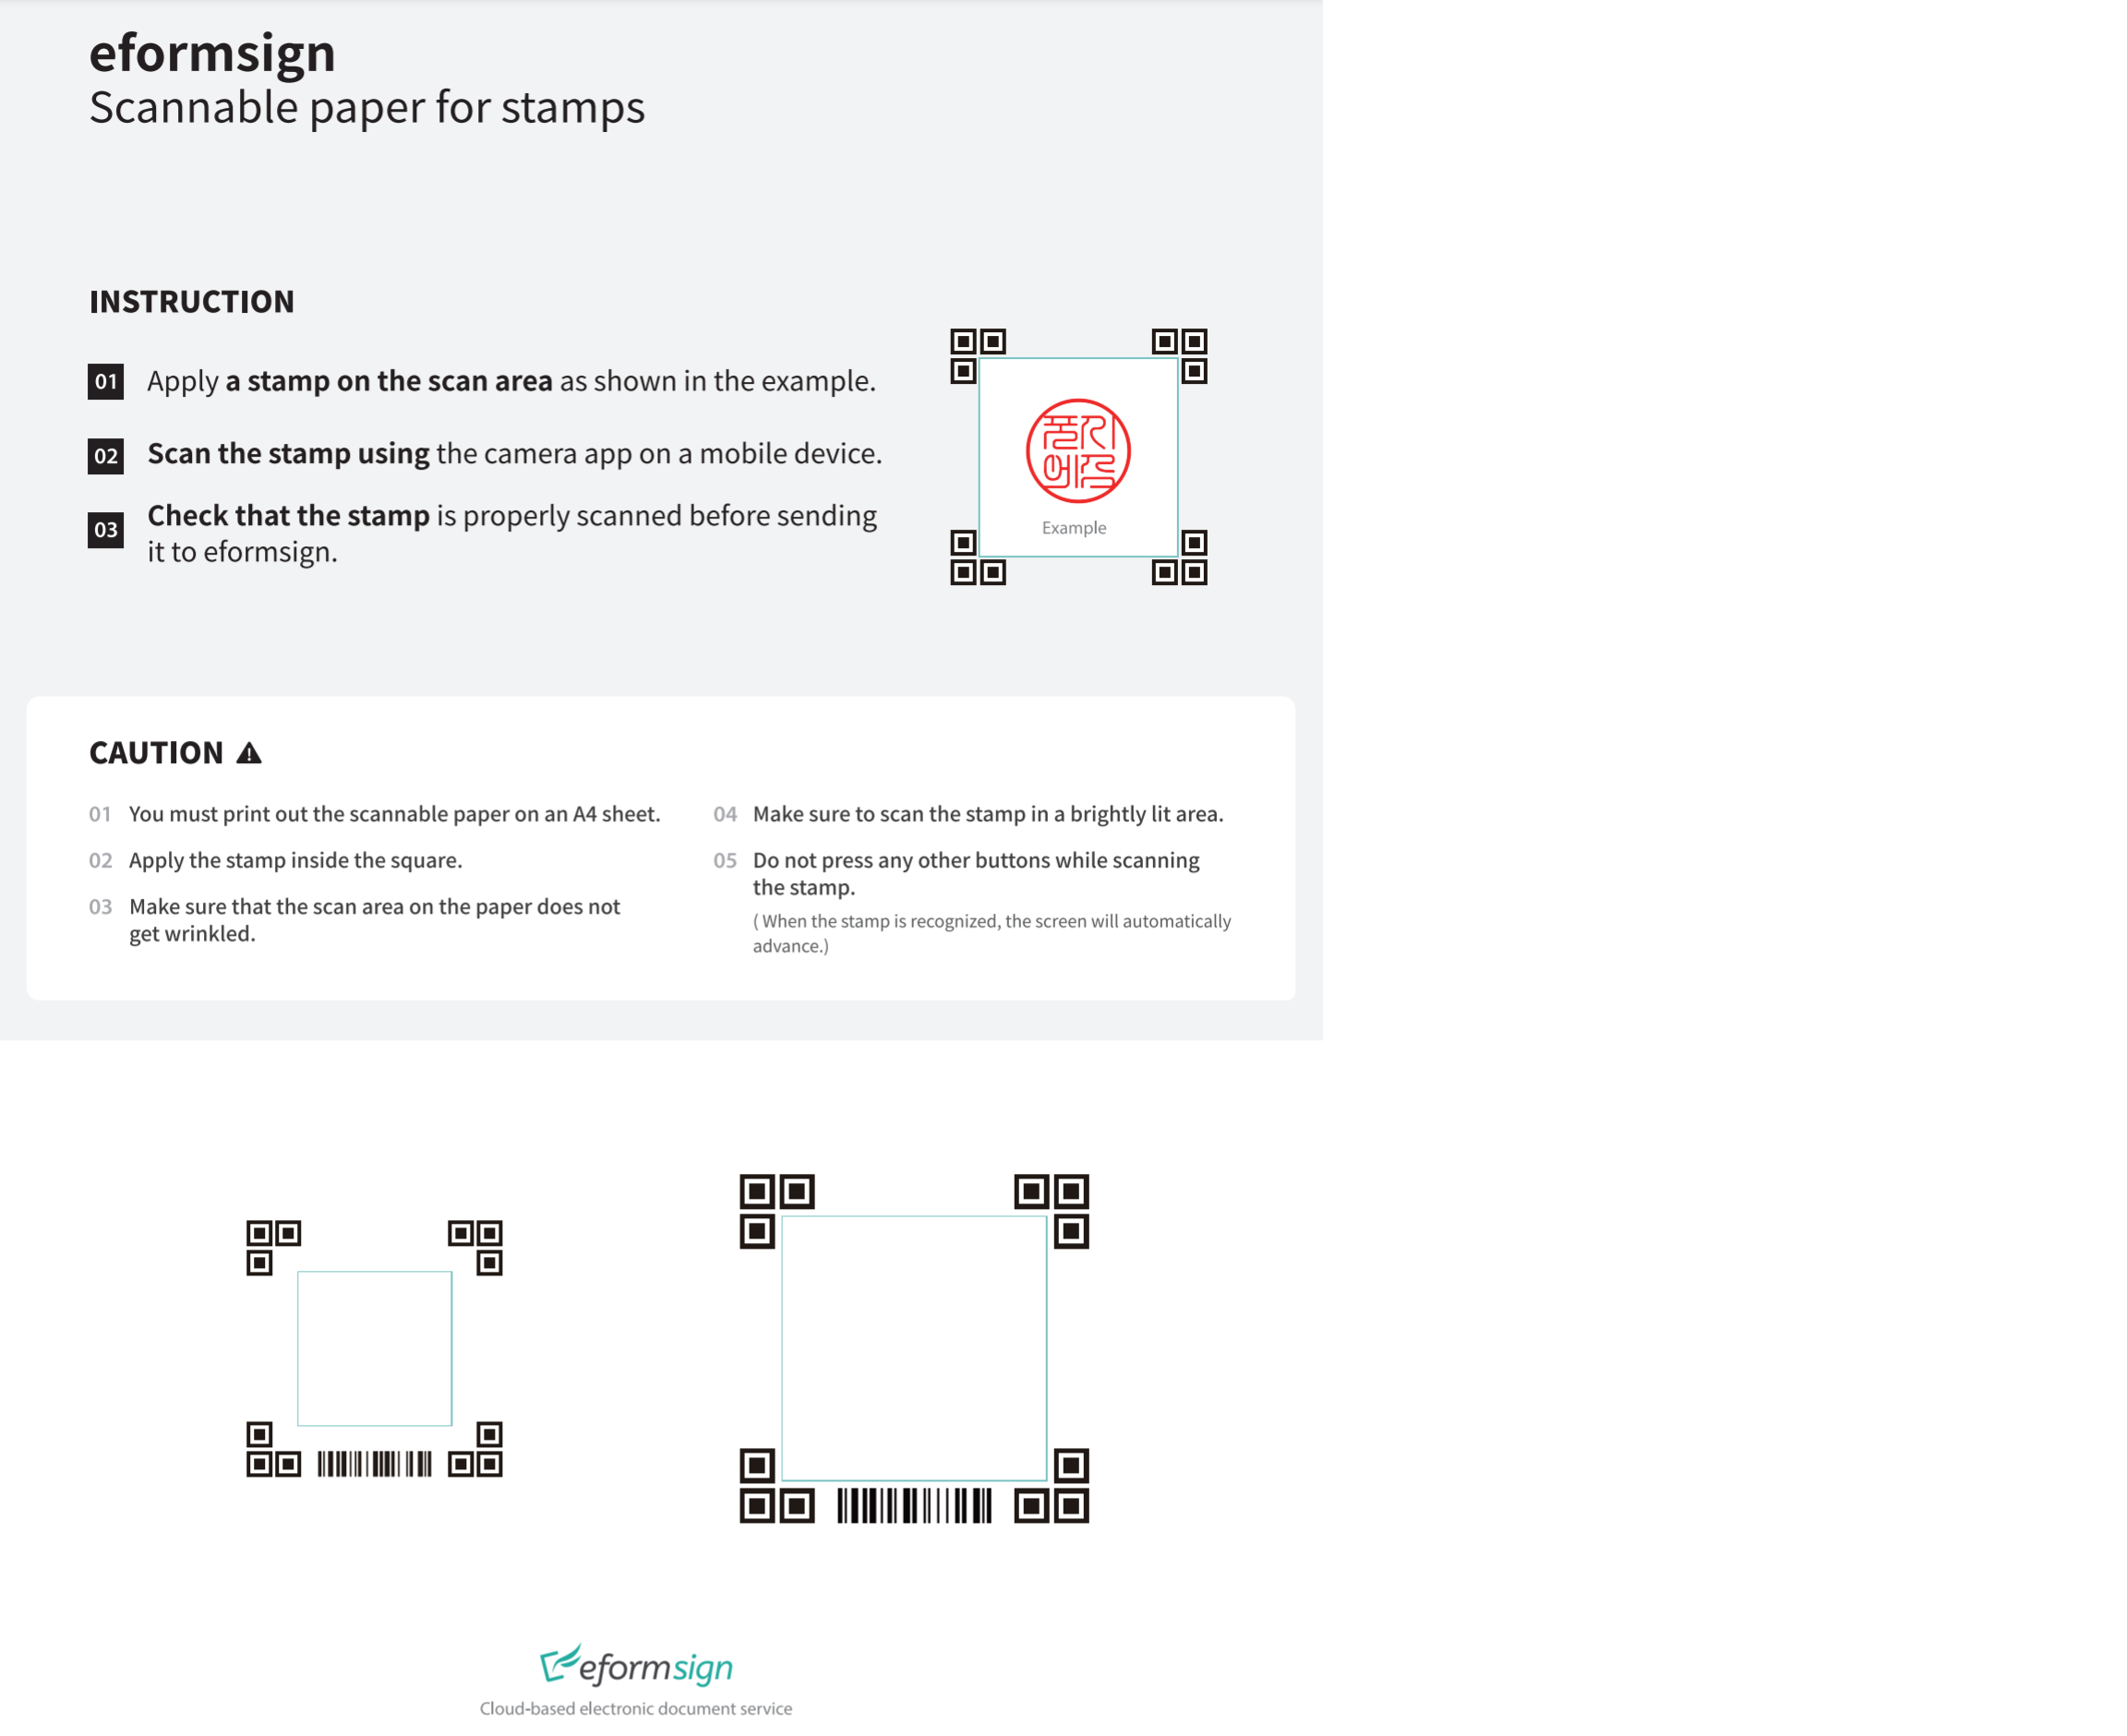
Download and print out Scannable paper for stamps.
Apply the stamp in the center of the scan area in Scannable paper for stamp.
Use the mobile device’s camera app to recognize the QR code. Once recognized, the Scan stamp screen will be displayed.
In the Scan stampscreen, scan the scan area in which the stamp is applied.
Check whether the stamp is properly recognized and touch the Send button to add the stamp on eformsign.
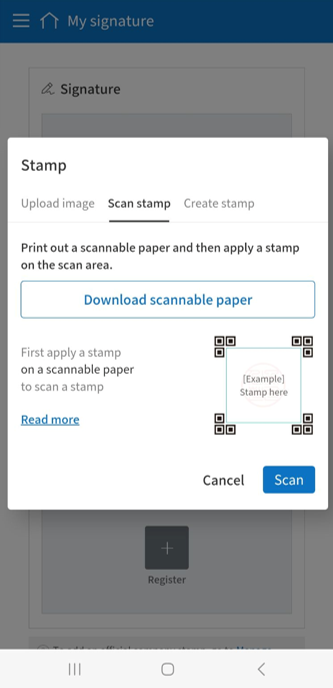
Scanning a stamp on a mobile device
Go to the My signature page -> touch the Register button under Stamp-> touch the Scan stamp tab on the pop-up displayed.
Download and print out Scannable paper for stamps.
Apply the stamp in the center of the scan area in Scannable paper for stamp.
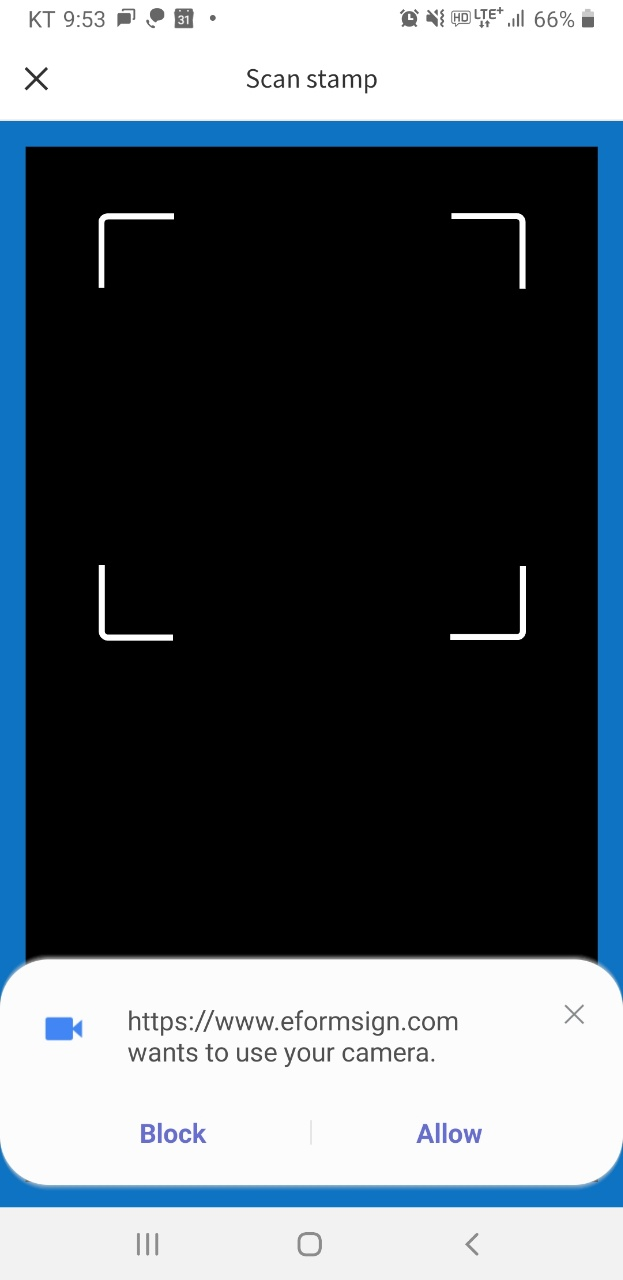
Touch the Scan button.
Allow camera access in the camera screen.
In the Scan stamp screen, scan the scan area in which the stamp is applied.
Check whether the stamp is properly recognized and touch the OK button to add the stamp on eformsign.
Precautions to take when scanning life-sized stamps
Tip
Depending on the device and environment, the stamp may have difficulties in being recognized. In this case, you can take a photo and upload it instead.
Tip 1. If the Open with screen is displayed instead of the stamp scanning screen
In some Android devices, touching the Scan button may display the Open with screen (which allows you to select apps such as camera and gallery) instead of the stamp scanning screen. In this case, you can scan life-sized stamps by taking a photo and uploading it as follows.
① Select Camera in the Open with screen.
② In the camera screen, take a photo making sure that the stamp scanning area is clearly shown.
③ A stamp will be automatically recognized from the photo.
Tip 2. If it says that the stamp was not recognized
Stamps may not be recognized in the camera screen of some mobile browsers due to their low resolution. In this case, you can scan life-sized stamps by taking a photo and uploading it as follows.
Open the mobile device’s default camera app.
Take a photo making sure that the stamp scanning area is clearly shown.
Go back to the stamp screen.
Touch the Upload photo button.
Select the Gallery app (if needed).
Select the photo you took.
When you upload the photo, the stamp will be automatically recognized.
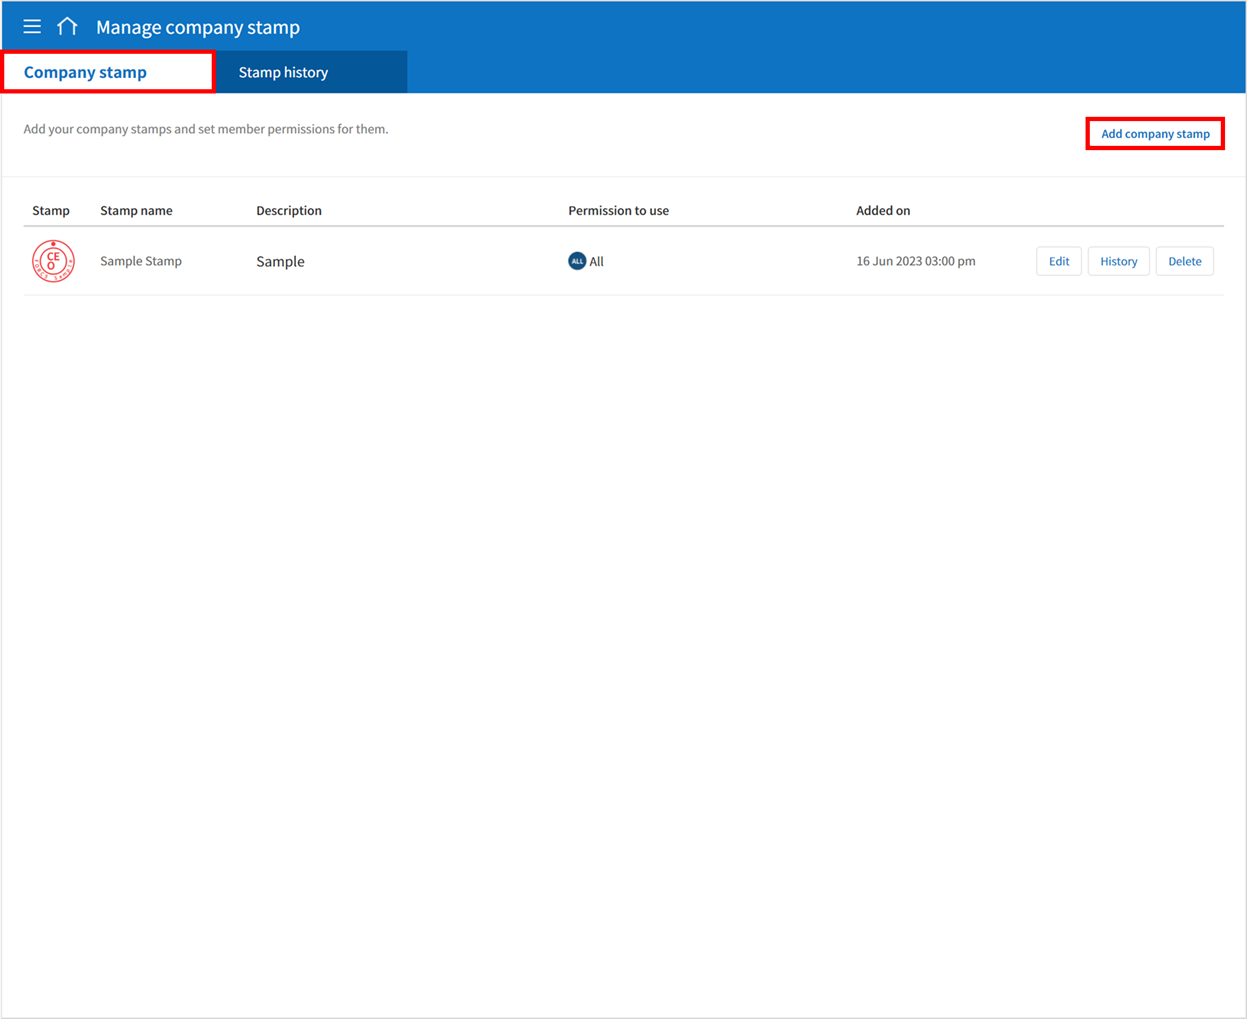
In this tab, you can add company stamps by uploading an image or scanning a real life-sized stamps as well as granting stamp use permission to members/groups. Once a company stamp is added, you can edit and delete it, and even view the history of all changes made to the stamp
To add a company stamp, click the Add company stamp button, name the stamp name, and give permission to groups and members to use the stamp. Then, click the Register button to scan the stamp, upload the image, or create the stamp.
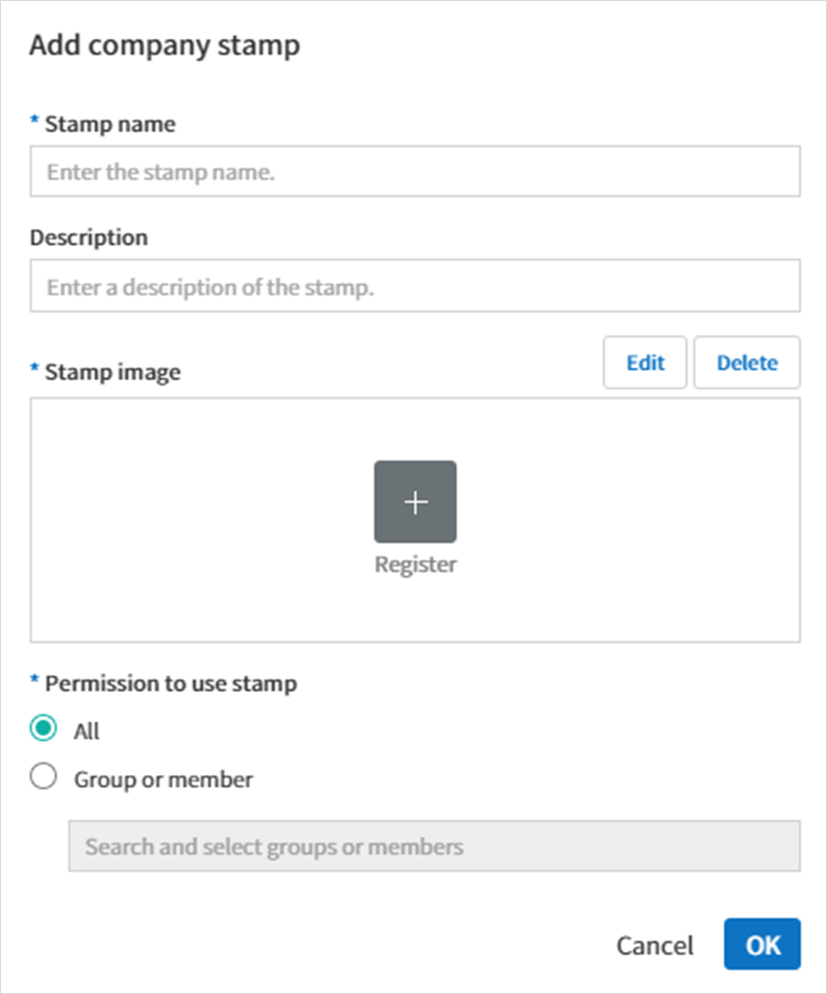
Stamp name: Enter the name of the stamp.
Category: Choose an existing category or create a new category.
Description: Enter the description of the stamp.
Register: You scan the stamp, upload the image, or create the stamp by clicking the Register button.
Permission to use stamp: You can grant permission to use the stamp to all or specific members/groups.
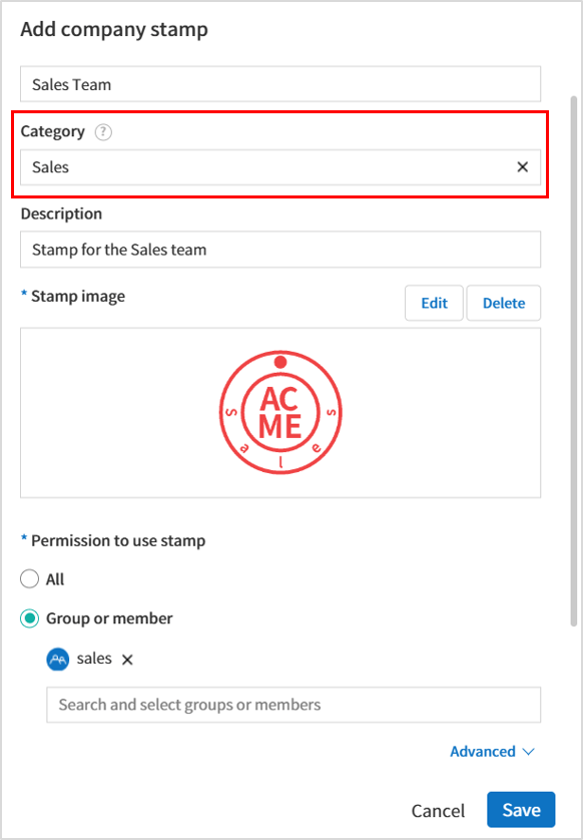
How to Create and Add Company Stamp Categories
When adding a company stamp, you can select an existing category or enter a new category name to create a new category automatically.
Navigate to the Manage company > Manage company stamps page.
Click the Add company stamp button or click the Edit button of the desired stamp.
In the Add/Edit company stamp pop-up, you can create a new category or select an existing one.
If you want to use an existing category, click the input field under Category, select one from the displayed categories, and then click the Save button.
If you want to create a new category, type in a new category name in the input field. A new category will be created automatically once you save.
Once you have clicked the Save button after selecting a category or creating one, the stamp will be saved under that category.
You can create multiple categories by using a slash (/) as a separator (e.g. ACME Inc/Finance Team).
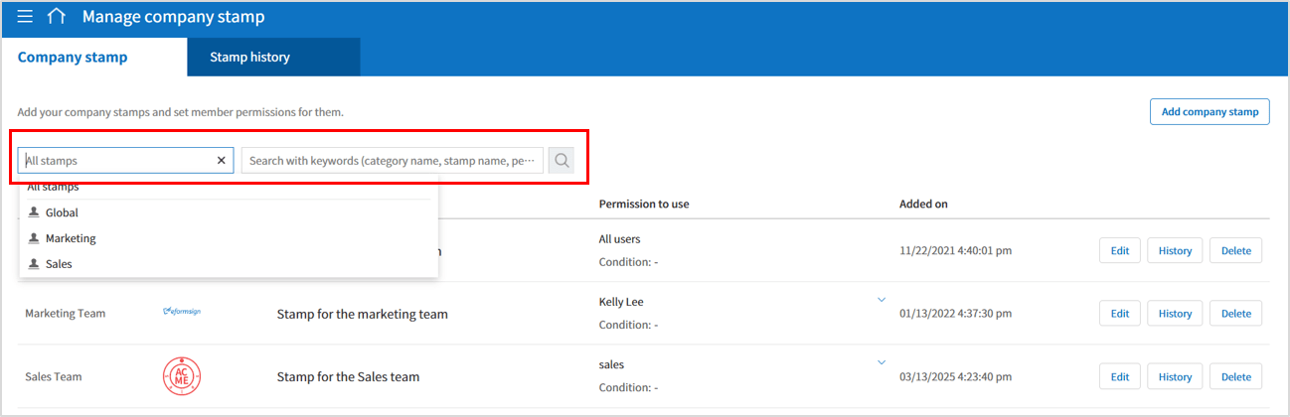
How to Filter and Search Categories
You can quickly search for specific company stamps by entering keywords such as category name, stamp name, and permissions.
Category Filtering: Click the search bar with the placeholder“ All Stamps” on the top-left of the Manage company stamps page. A list of existing company stamp categories will be displayed. Select your preferred category to filter stamps belonging to that category.
Keyword Search: Enter keywords such as the category name, stamp name, or permissions into the search field to quickly find the stamp you need.
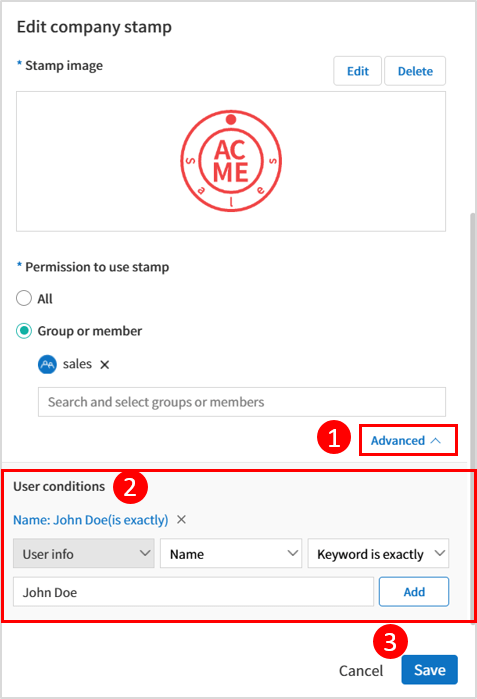
How to Set Advanced Usage Permissions
Permissions for using company stamps can be further refined so that only users meeting certain criteria (department, ID, name, etc.) are allowed to use them.
Click the Add company stamp button or the Edit button of the desired stamp.
In the Add/Edit company stamp pop-up, click Advanced under Permission to use stamp.to display the User conditions secdtion.
Configure the detailed user conditions:
Select a specific condition (ID, Department, Name, etc.) and choose either the Keyword is exactly or Keyword contains options for your keyword.
Enter a keyword in the field below and click the Add button to add it to your conditions.
For example, if you choose “Name” + “Keyword is exactly” and enter “John Doe”, only a member whose name is exactly “John Doe” will have permission to use that stamp.
Once you have finished setting your conditions, click the Save button.
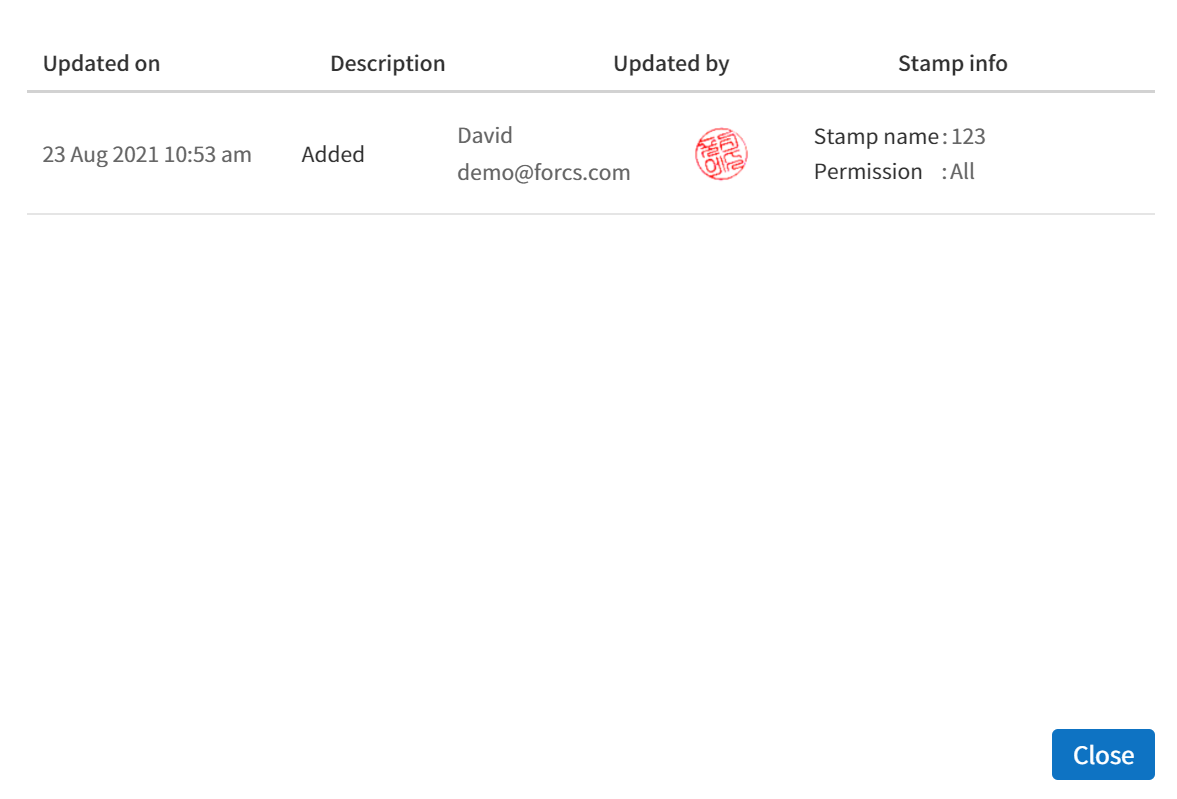
Also, you can see the history of updates and deletions, and modifications made to a stamp. The following shows the stamp history shown when you click the History button.
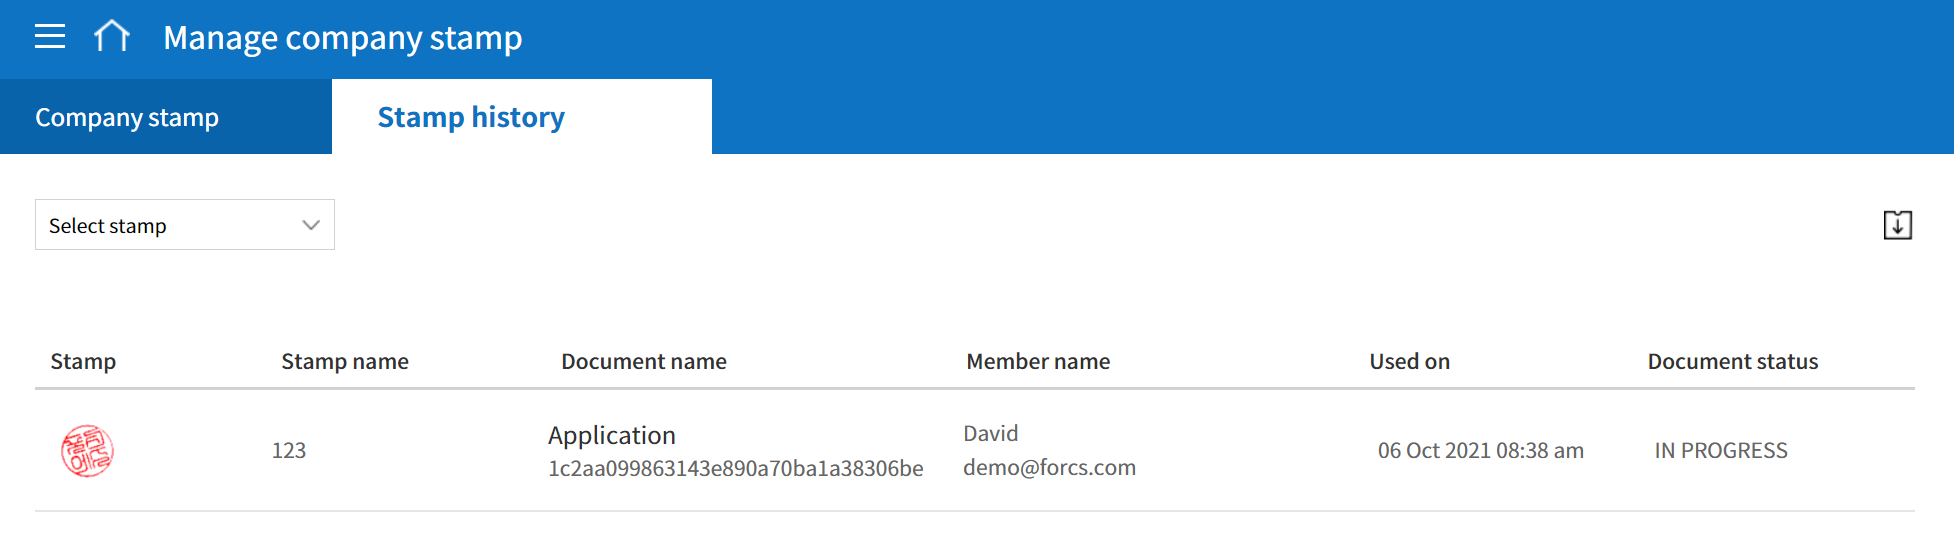
In this tab, you can view the history of all the stamps used. You can view information including each of the stamps that were used, the members that used each stamp, the date each stamp was used, etc. You can also download the stamp history in CSV format.
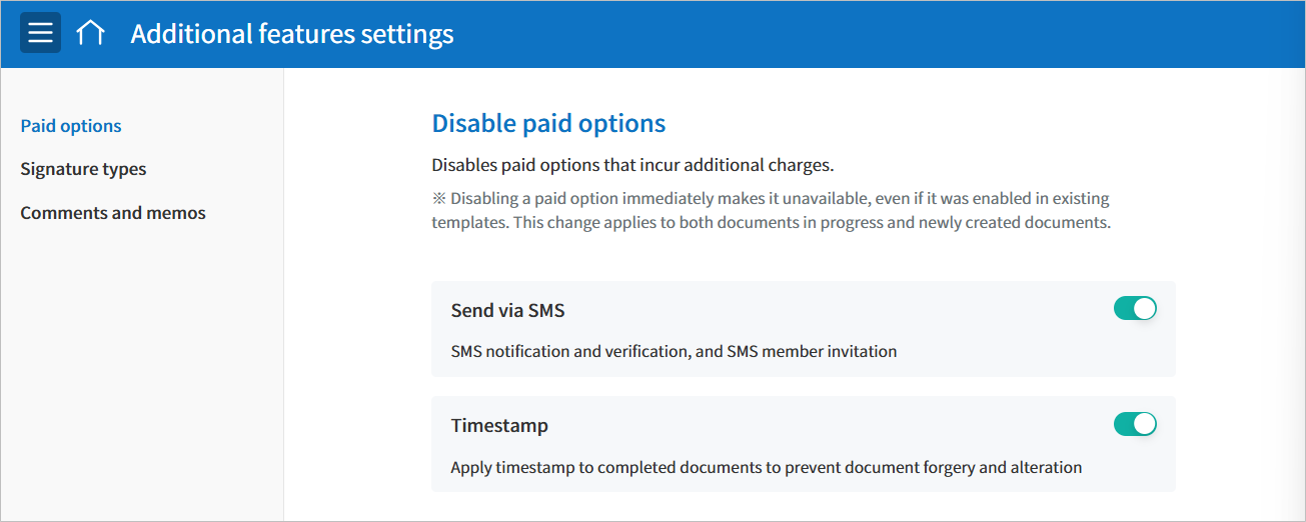
Allows you to control the use of paid options such SMS verification and timestamps.
Caution
If a paid option is disabled, it will no longer be available for use from that point on, even if it was previously set in existing templates. This also applies to both documents already in progress and newly created ones.
Control whether members can use the comments and memos features when filling in documents.
Enable comments: Enable users to add comments on the document using the pen or highlight pen tool.
Enable memos: Enable users to insert text or images on the document using the memo tool.
Caution
Content added using comments or memos is not recorded in the document’s field type change history. Be aware that adding comments or memos to a document may unintentionally alter its original content.
You can secure your account via Login settings and IP access settings. With Login settings, you can enable 2-step verification, disable multiple logins, and lock inactive accounts. With IP access settings, you can set permissions to allow login from specific IP addresses only.
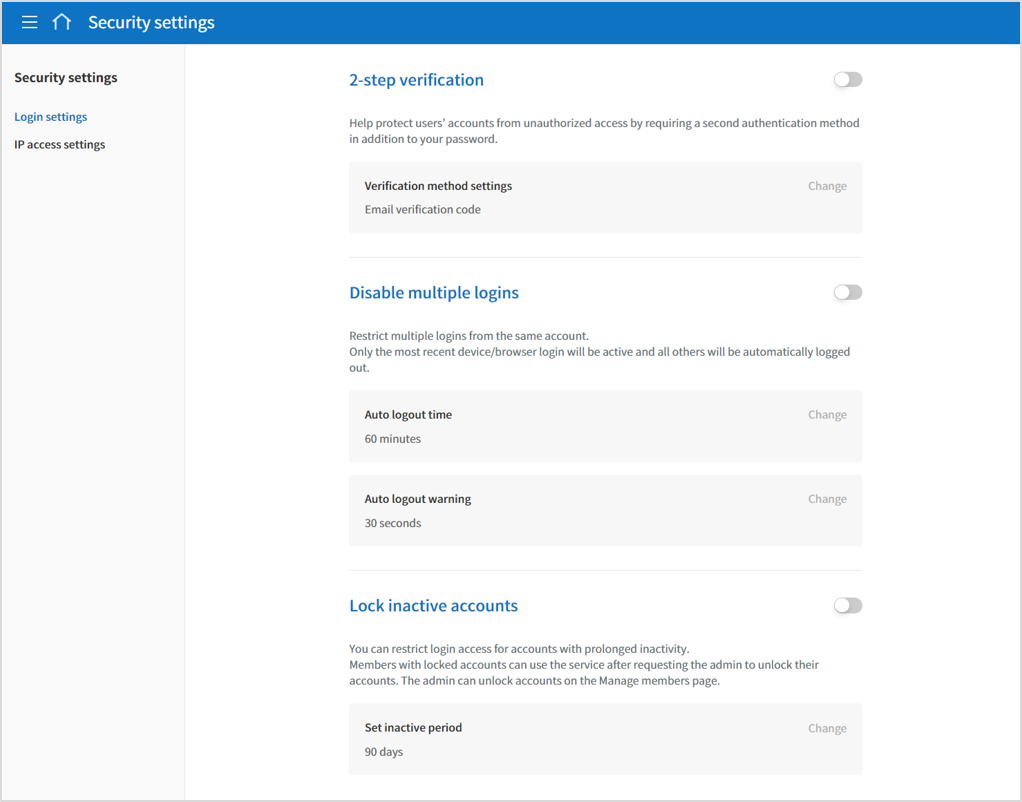
The 2-step verification feature uses Google Authenticator, email, or SMS verification for additional verification at login to protect your account.
You can configure the settings in the Manage company > Security settings > Login settings menu and only the company administrator can access it.
If you enable this feature, you will be automatically logged out, and any subsequent logins will require two-factor authentication.
The default authentication method is Google Authenticator.
The default authentication method can be changed to any of the following if this feature is enabled
Google Authenticator
Email verification code
SMS verification code
Disable multiple logins
The Disable multiple logins feature allows you to restrict multiple logins from the same account.
You can enable it in the Manage company > Security settings > Login settings menu and it can only be enabled by the company administrator.
When enabled, only the last device or browser you accessed (or logged into) will remain logged in, and everyone else will be automatically logged out.
When enabled, you can change the Auto logout time and Auto logout warning.
Auto logout time allows you to set the time after which you are automatically logged out if no activity is detected for a certain period of time after signing in, from a minimum of 10 minutes to a maximum of 1,440 minutes (24 hours).
Auto logout warning allows you to set the time at which you want users to see a warning message before being automatically logged out. You can set it from 30 seconds to 300 seconds.
Lock inactive accounts
The Lock inactive accounts feature allows you to restrict logins from accounts that have not accessed eformsign for a certain period of time.
You can enable it in the Manage company > Security settings > Login settings menu and can only be enabled by the company administrator.
When you enable this feature, it restricts logins from accounts that have not logged in to eformsign for a set period of time from that point forward.
Set inactive period allows you to set the period of inactivity after which accounts will be automatically locked. The inactive period can be set between 7 and 365 days.
Members with locked accounts can use eformsign after requesting the company administrator to unlock their accounts. The company administrator can unlock accounts on the Manage members page.
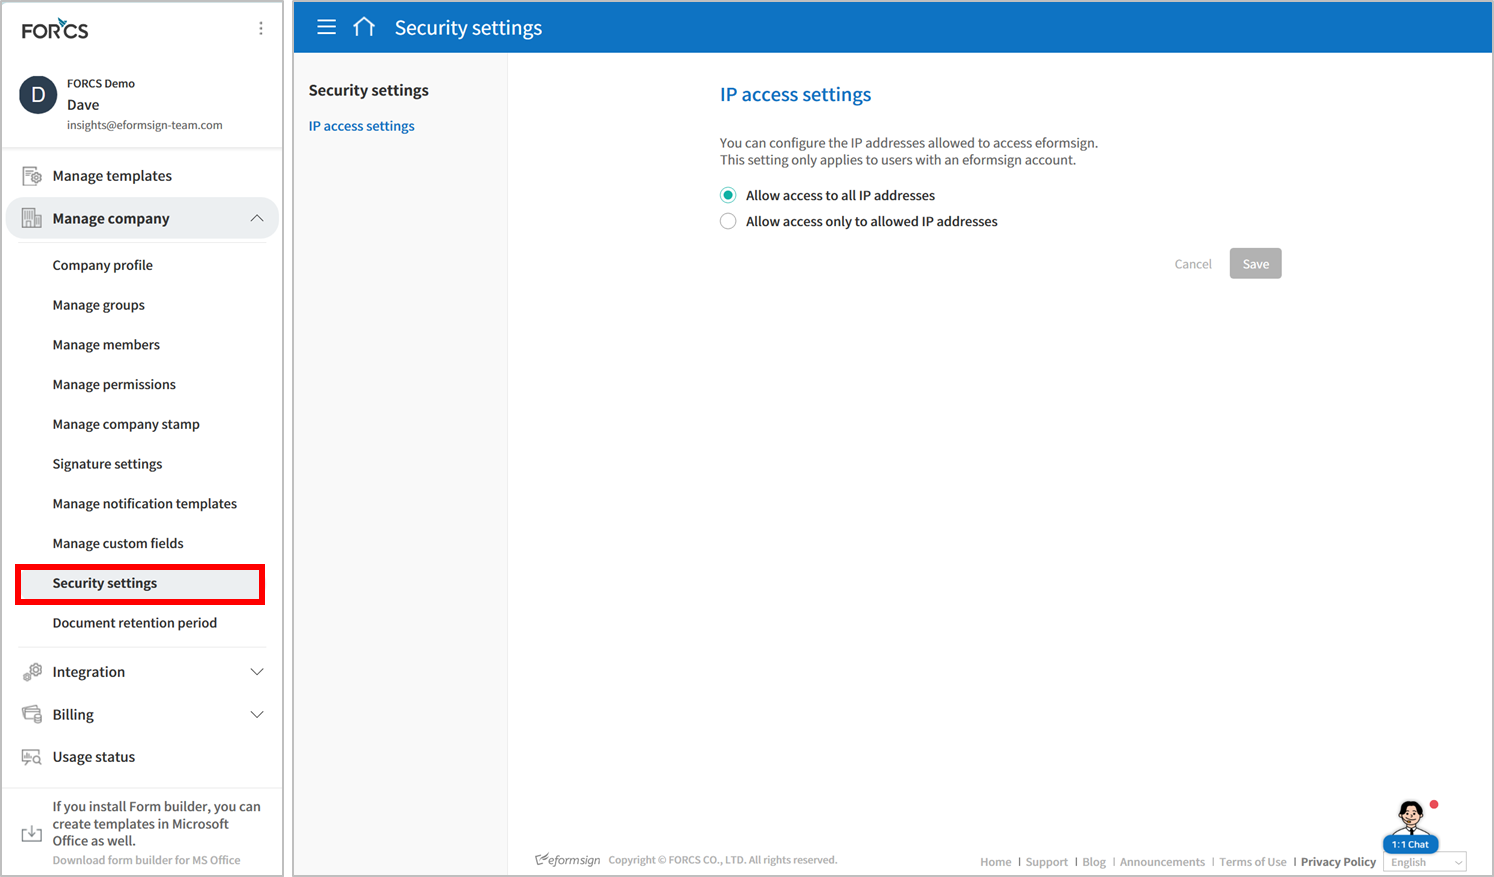
This feature allows you to specify IP addresses for eformsign member access. You can customize access by member permissions, enabling specific members to access designated IPs. You can easily configure IP access for companh administrators, managers, and members.
How to filter IP addresses by permission level
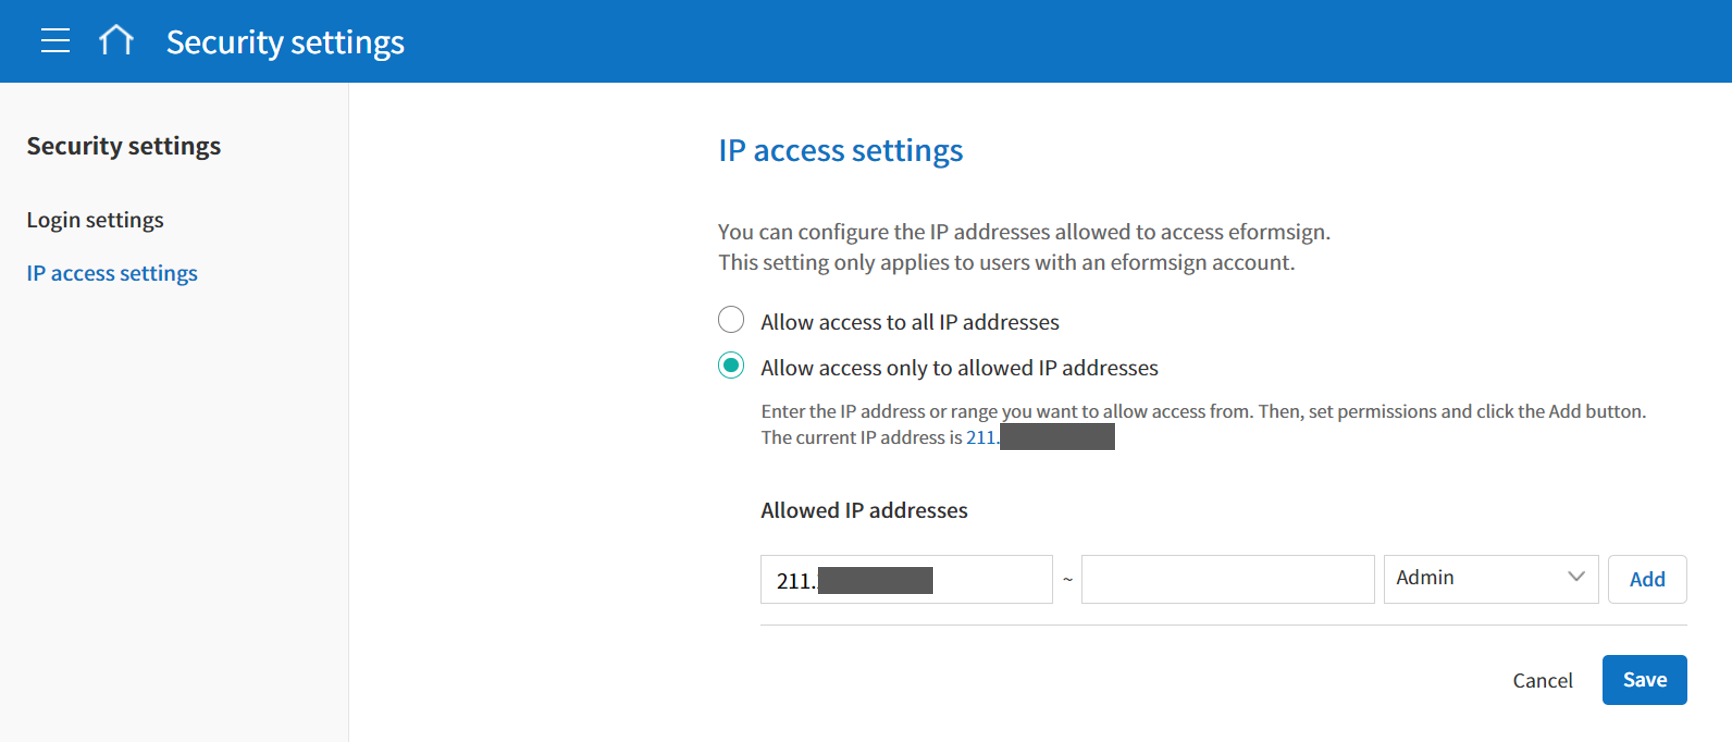
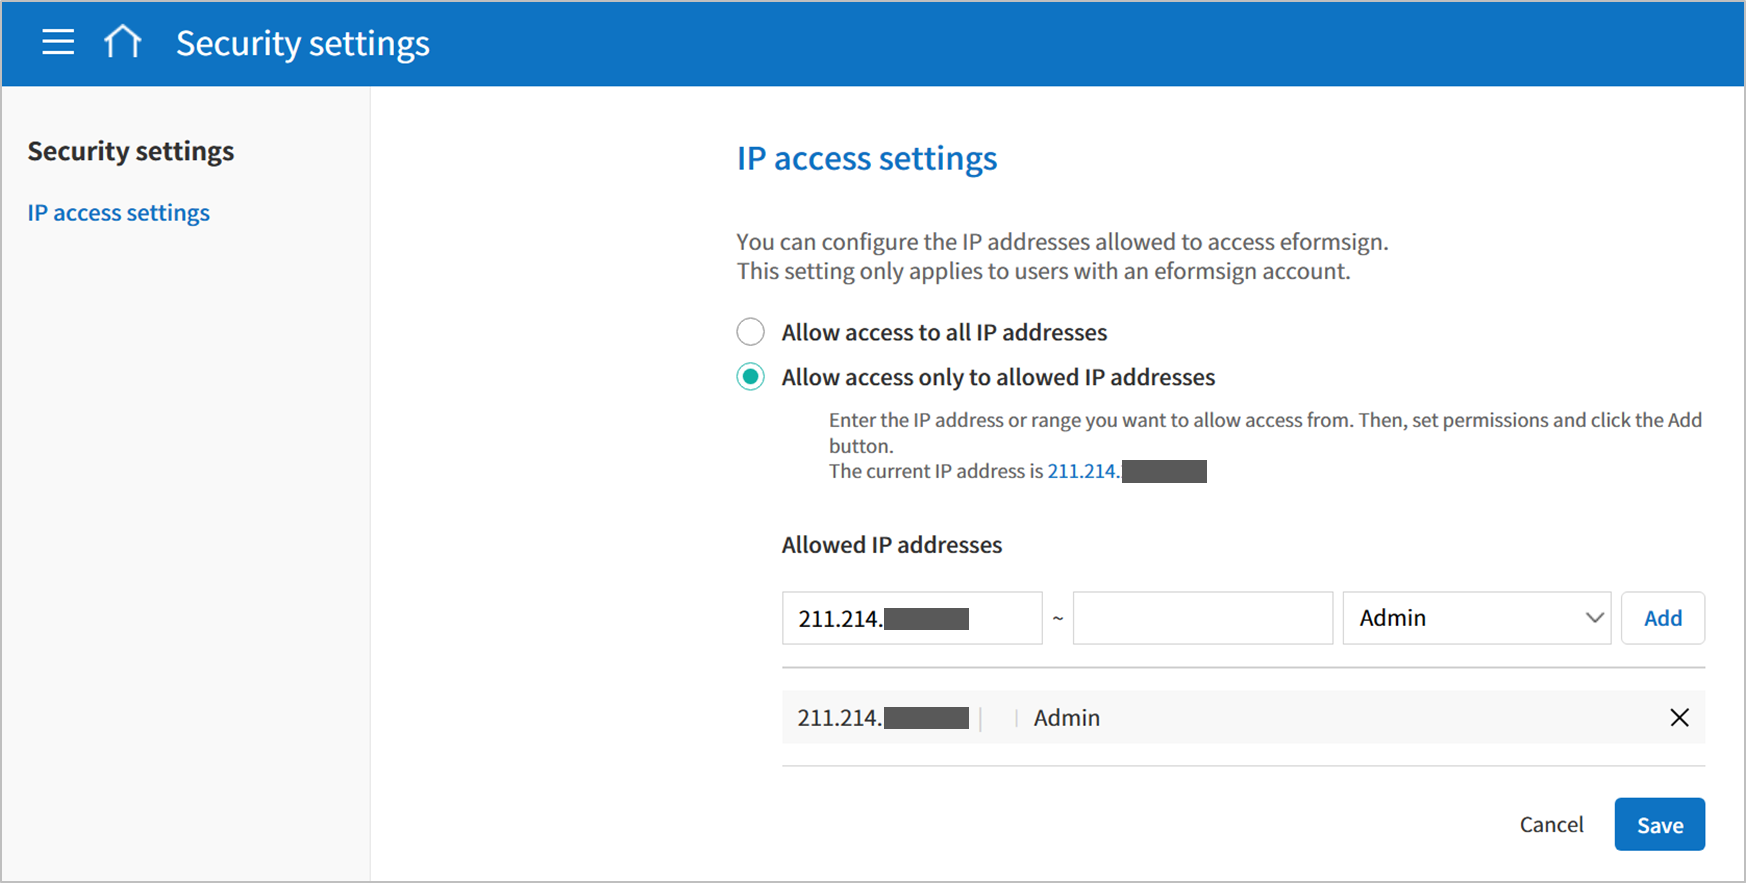
Go to the Manage company > Security settings menu and click IP access settings on the left side of the screen. Under IP access settings, select Allow access only to allowed IP addresses.
Enter the IP address or range you want to allow access from.
Select the permission level (company administrator/company manager/member) you want to allow logins from the IP address.
Click the Add button.
Review the list of allowed IP addresses and then click the Save button.
To increase the safety and efficiency of managing documents, you can set a retention period. The document retention period can be set company-wide or template specific, and documentss are automatically deleted from the document inbox once the retention period expires.
Note
For information on how to set the document retention period by template, go to Template settings.
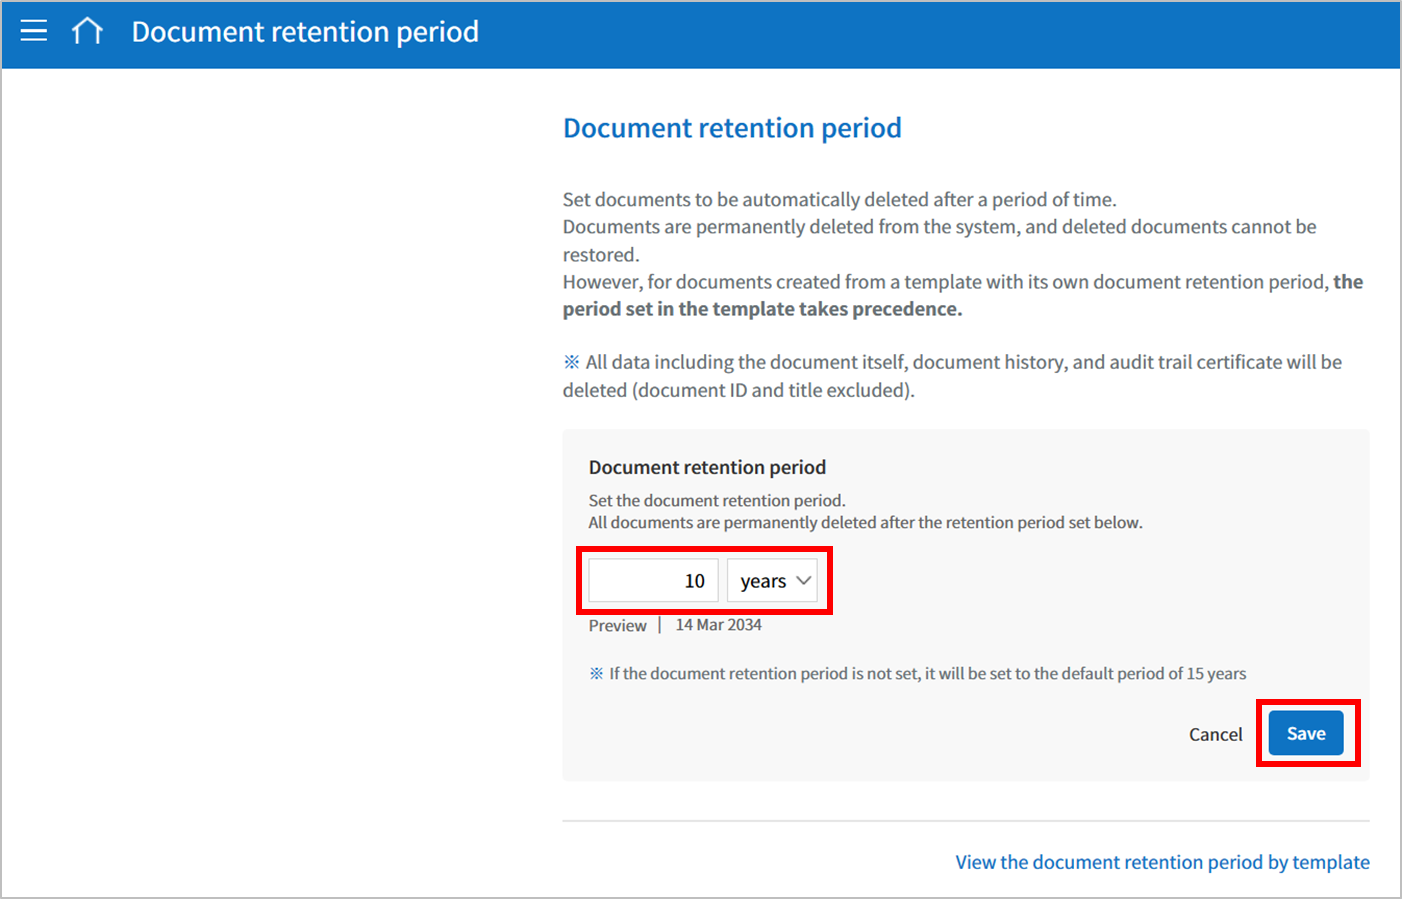
How to set the document retention period
Caution
❗Only the company administrator can perform this action, and once changing the retention period, the change is applied to all the documents in the company.
However, this does not affect the documents created from templates with their own document retention period.
Go to the Manage company > Document retention period menu.
Click Settings in the Document retention period page.
Select months/years in the drop-down box and enter the period.
➡The retention period can be set from a minimum of 1 month to a maximum of 15 years.
Click the Save button to update the retention period, and the change will apply to the documents created hereafter.
Important
📣 Some notes about the document retention period
Documents are automatically deleted permanently after a grace period of 14 days after the retention period.
The document retention period is set to 15 years by default.
If the document retention period is set both company-wide and in an individual template, the retention period set in the template takes precendence.
If you change the document retention period, the change is applied started to the documents created hereafter.
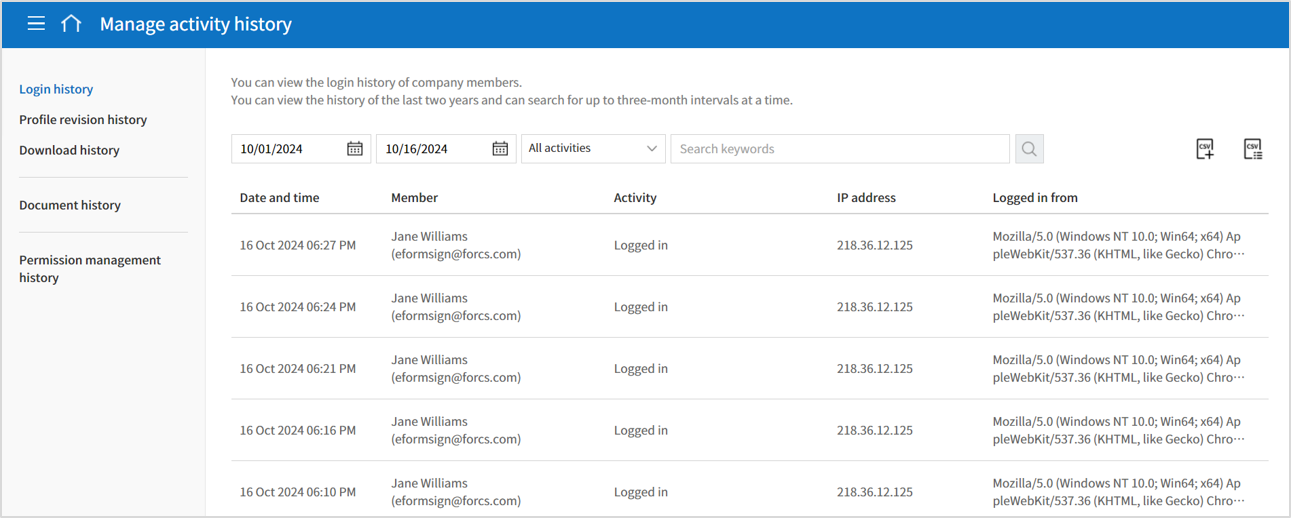
he Manage activity history feature allows you to view the history of logins, profile revisions, downloads, and permissions, as well as download the history in the CSV format. You can access it in the Manage company > Manage activity history menu and it can be accessed only by the company administrator.
Login history: View the login history of company members.
Profile revision history: View the revision history of members’ profiles.
Download history: View the download history and reason of company members.
Document history: View the history of users’ activities related to documents.
Permission management history: View the history of activities that occured in the Manage permissions page.
), and create multiple documents at once from a template by clicking the bulk icon (
).


 ) icon.
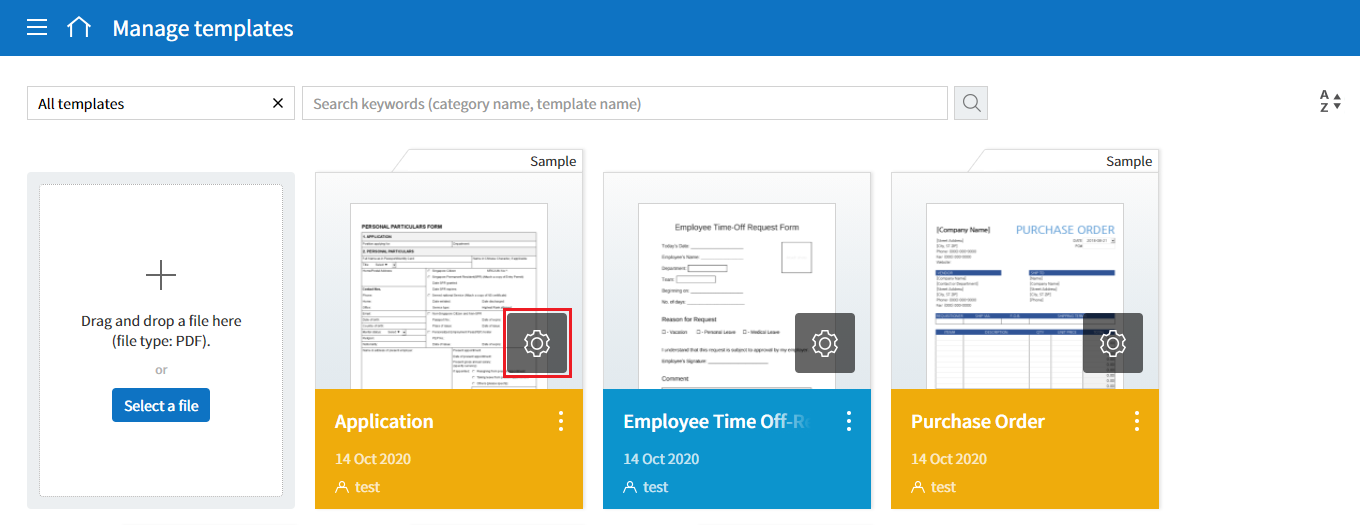


Comments and memos
Control whether members can use the comments and memos features when filling in documents.
Enable comments: Enable users to add comments on the document using the pen or highlight pen tool.
Enable memos: Enable users to insert text or images on the document using the memo tool.
Caution
Content added using comments or memos is not recorded in the document’s field type change history. Be aware that adding comments or memos to a document may unintentionally alter its original content.